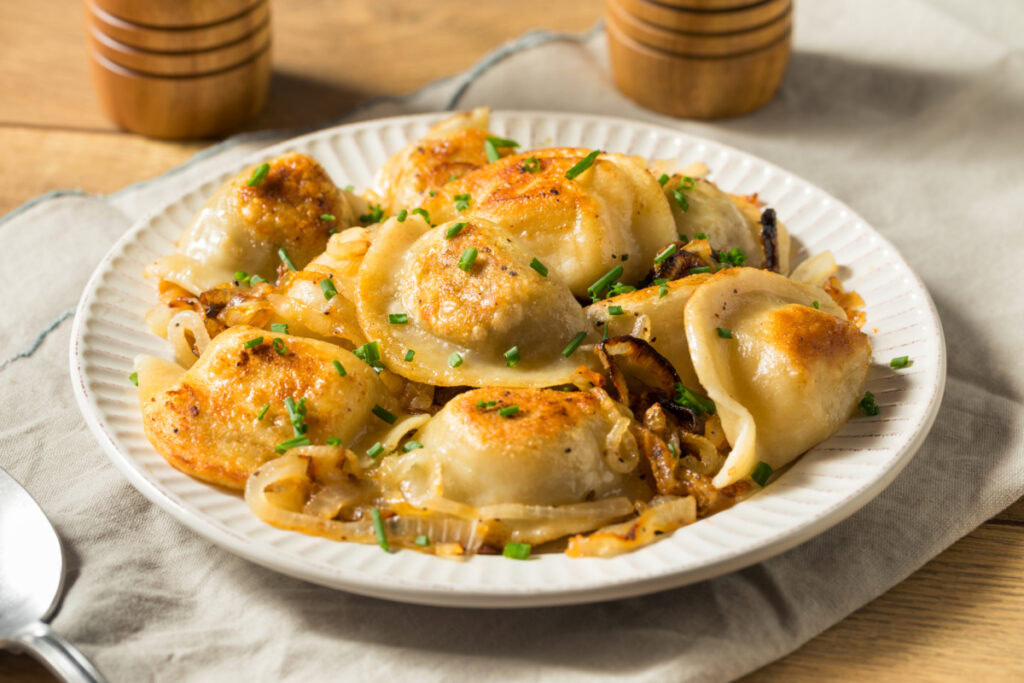
Polish Potato Pierogies Recipe
Polish potato pierogies are these soft, pillowy dumplings stuffed with creamy mashed potatoes, sometimes with cheese or onions mixed in. These recipes have been passed down for ages, and honestly, they’re still a comfort food staple in so many homes.
Making pierogies from scratch does take a bit of time—can’t sugarcoat that—but the dough turns out so tender, and the potato filling is just… worth it. Every minute spent is paid back in flavor.
I grew up with my grandma’s pierogi at family get-togethers, and over the years, I’ve tinkered with the recipe until it felt just right. Folding the dough might seem tricky at first. But after a few tries, it becomes almost relaxing, maybe even fun.
Pierogies are pretty flexible too. You can boil them, crisp them up in a pan, or stash a batch in the freezer for later.
In this guide, I’ll share everything I’ve learned about making real-deal Polish pierogi from scratch. I’ll talk about the tools that make things easier, the ingredients that give the best texture, and the steps to shape each dumpling so it doesn’t fall apart.
By the end, you’ll have a pile of tasty pierogies, ready for all the toppings your heart desires.
Equipment
Making pierogies at home doesn’t require anything too fancy. Having the right tools, though, definitely helps.
For the dough, I usually grab:
- Large mixing bowl
- Measuring cups and spoons
- Rolling pin
- Clean kitchen towel or a bit of plastic wrap
For shaping, here’s what I reach for:
- Round cookie cutter or just a drinking glass (3-4 inches wide)
- Fork for sealing up the edges
- Large baking sheet or even a big cutting board
- Parchment paper or a kitchen towel to keep things from sticking
For cooking, you’ll want:
- A big pot for boiling
- Slotted spoon or spider strainer
- Large skillet or frying pan if you’re into pan-frying
Honestly, I skip the gadgets. A pasta machine can help roll the dough, but I just use my rolling pin. Works fine.
The round cutter is handy for making even circles, which helps with sealing. If you don’t have one, a 3-inch glass does the trick.
Make sure your pot is roomy—at least 4 quarts. The pierogies need space to move when they’re cooking, or else they’ll clump together.
If you’re planning to freeze some, grab extra baking sheets and line them with parchment.
Ingredients
Here’s my go-to recipe for Polish potato pierogies. It makes about 24, which is usually enough for a small crowd or a couple of hungry people.
For the Dough:
- 2 cups all-purpose flour
- 1 large egg
- ½ cup sour cream
- ¼ cup water
- ½ teaspoon salt
For the Potato Filling:
- 2 pounds russet potatoes, peeled and cubed
- 1 cup farmer’s cheese or ricotta cheese
- 1 teaspoon salt
- ½ teaspoon black pepper
- 2 tablespoons butter
For Serving:
- 4 tablespoons butter
- 1 large onion, thinly sliced
- ½ cup sour cream
- 4 strips crispy bacon, chopped (optional)
I stick to simple ingredients for these pierogi with potatoes—they come out tasting just like the traditional pierogi ruskie I remember. The filling is a mix of creamy potatoes and cheese, which is just classic.
For the topping, I like to cook onions in butter until they’re caramelized. The result is a sweet, savory sauce that I could honestly eat on its own.
You can prep the ingredients ahead to save time later. Let the dough ingredients warm up to room temp before mixing. Also, make sure your potatoes are totally cool before adding the cheese.
Instructions
First, I make the pierogi dough. I mix the flour and salt in a big bowl, then add the egg, sour cream, and water. I knead everything for maybe 8-10 minutes, just until the dough feels smooth and stretchy.
I let the dough rest for 30 minutes, covered with a damp towel. This makes it way easier to roll out.
While the dough chills, I get the filling ready. I mash the cooked potatoes until they’re really smooth, then mix in the cheese, salt, pepper, and butter. I taste it and tweak the seasoning if it needs it.
Here’s how I shape the pierogi:
- Roll out the dough on a floured surface until it’s about 1/8 inch thick.
- Cut circles using a 3-inch cutter or glass.
- Spoon about 1 tablespoon of filling into the center of each circle.
- Fold the dough over to make a half-moon.
- Press the edges together, making sure they’re sealed up tight.
- Crimp the edges with a fork if you want them extra secure.
Next, I bring a big pot of salted water to a boil. I gently drop in 6-8 pierogies at a time, so they don’t stick together.
They’ll sink at first, then float. Once they float, I let them cook for another 2-3 minutes. I scoop them out with a slotted spoon and set them on a plate.
You can eat them right away, or fry them up in butter for a crispy outside.
Notes
Pierogi freeze really well, so they’re great for prepping ahead. I think freezing them before boiling works best.
To freeze, lay uncooked pierogi on a baking sheet lined with parchment. Make sure they aren’t touching, or they’ll stick. Pop the sheet in the freezer for a couple of hours.
Once they’re solid, toss them into freezer bags or airtight containers. They’ll keep for up to 3 months. No need to thaw before cooking.
When you’re ready to cook frozen pierogi, just add them straight to boiling water. Give them a couple extra minutes compared to fresh ones.
The dough should feel soft but not sticky. If it’s sticking, add a bit more flour. If it seems dry or cracks when you fold it, add a splash of water.
Russet potatoes are my favorite for the fluffiest filling. Mash them while they’re still hot for the smoothest texture.
Seal the edges well so the filling doesn’t leak out. I like using a fork for a tight seal and a little pattern.
Leftover cooked pierogi keep in the fridge for 3-4 days. I usually reheat them in a skillet with butter until they’re crispy and hot again.
Equipment
- Large mixing bowl
- Measuring cups and spoons
- Rolling Pin
- Clean kitchen towel or a bit of plastic wrap
- Round cookie cutter or just a drinking glass (3-4 inches wide)
- Fork for sealing up the edges
- Large baking sheet or even a big cutting board
- Parchment paper or a kitchen towel to keep things from sticking
- A big pot for boiling
- Slotted spoon or spider strainer
- Large skillet or frying pan if you’re into pan-frying
Ingredients
- 2 cups all-purpose flour For the Dough
- 1 large egg For the Dough
- 1/2 cup sour cream For the Dough
- 1/4 cup water For the Dough
- 1/2 teaspoon salt For the Dough
- 2 pounds russet potatoes For the Potato Filling. peeled and cubed
- 1 cup farmer’s cheese or ricotta cheese For the Potato Filling
- 1 teaspoon salt For the Potato Filling
- 1/2 teaspoon black pepper For the Potato Filling
- 2 tablespoons butter For the Potato Filling
- 4 tablespoons butter For Serving
- 1 large onion For Serving. thinly sliced
- 1/2 cup sour cream For Serving
- 4 strips crispy bacon For Serving. chopped; optional
Instructions
- Make the dough: In a large bowl, whisk together the flour and salt. Add the egg, sour cream, and water, then mix until a shaggy dough forms.
- Knead and rest: Knead on a lightly floured surface for 8–10 minutes until smooth and elastic. Cover with a damp towel and let rest for 30 minutes.
- Cook potatoes and make filling: Boil the peeled, cubed potatoes until fork-tender, then drain well. Mash until smooth, then mix in cheese, butter, salt, and pepper. Cool to room temperature.
- Roll and cut: Roll the rested dough to about 1/8-inch (3 mm) thick. Cut 3-inch circles using a round cutter or drinking glass.
- Fill and seal: Place about 1 tablespoon filling in the center of each circle. Fold into a half-moon and press edges firmly to seal; crimp with a fork for extra security.
- Boil: Bring a large pot of salted water to a gentle boil. Cook pierogies in batches (6–8 at a time) until they float, then boil 2–3 minutes more. Remove with a slotted spoon and drain.
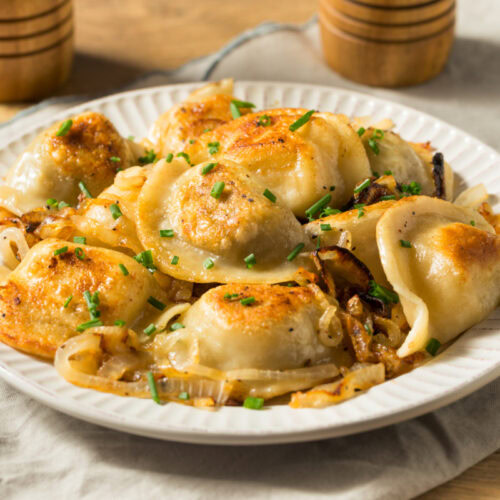
- Optional pan-fry and serve: Sauté sliced onion in butter until golden. Pan-fry boiled pierogies in butter until lightly crisp, then serve with onions, sour cream, and optional bacon.
Notes
Nutrition
Tasting Notes
When I bite into a freshly cooked pierogi, the first thing that hits me is the tender, pillowy dough. It’s soft, but there’s a little chew to it—just enough to make you want another bite.
The potato filling is creamy and smooth, with that buttery goodness you hope for. I get a bit of onion in there too, which adds a nice savory kick.
Seasoning? It’s nothing fancy—just salt and pepper—but honestly, that’s all it needs. The flavors come through without trying too hard.
If I’ve piled on some fried onions, they bring this sweet, caramelized crunch that’s such a good match for the soft pierogi. Then there’s sour cream, which adds a cool, tangy note that cuts through the richness.
Honestly, the whole thing just screams classic Polish comfort food to me. Warm, filling, but not so heavy that you regret that second helping.
I think the butter or oil from pan-frying really matters here. It gives the edges a little crisp while keeping the inside soft—such a good combo.
There’s something homey about the taste. Each pierogi is just simple, real food—no need for anything fancy.
The potato filling really shines, with the dough and toppings just playing backup. Sometimes, that’s all you want.