Glazed Carrots with Peas Recipe
Glazed carrots with peas is one of those side dishes that looks fancy but honestly, it’s almost no work. The sweet glaze on the carrots goes so well with the pop of fresh peas.
I like making this when I want something colorful and tasty on the table without losing my whole evening to cooking.
This recipe uses butter, sugar, and just a bit of seasoning to make a shiny glaze that transforms basic veggies. Carrots get soft and sweet, peas stay bright and fresh, and the whole thing comes together in about 20 minutes.
Let’s get into what you’ll need, from tools to ingredients, and I’ll share a few tips for tweaking the flavors if you want.
Equipment
You really don’t need any fancy gadgets for this glazed carrots and peas situation. I pretty much rely on what’s already in my kitchen.
Here’s what I grab:
- Large skillet or sauté pan with a lid (10-12 inches is good)
- Sharp knife for slicing carrots
- Cutting board
- Measuring cups and spoons
- Wooden spoon or spatula for stirring
- Vegetable peeler (if you like peeled carrots)
The skillet with a lid is key. I like a wide pan so the carrots can sit in a single layer—helps them cook evenly and pick up that glaze.
A sharp knife makes cutting a lot less annoying. I slice my carrots into rounds or sometimes sticks, just depends on what mood I’m in.
Having a small bowl nearby for measured ingredients isn’t a bad idea. It makes things move faster since this dish comes together pretty quick.
If you’ve got a non-stick pan, that’s awesome for this. The glaze won’t stick as much. But honestly, a regular stainless pan is fine too—just keep an eye on it and give things a stir.
Ingredients
Here’s exactly what you’ll need for these glazed carrots and peas. It’s a short list, nothing wild.
For the Vegetables:
- 1 pound carrots, peeled and sliced into rounds
- 1 cup frozen or fresh peas
- 2 tablespoons unsalted butter
- 2 tablespoons honey
- 1 tablespoon brown sugar
- ½ cup water or vegetable broth
- Salt and pepper to taste
- 1 tablespoon fresh parsley, chopped (optional)
Carrots are the main event here. I always go for regular carrots over baby carrots—the texture and taste are just better.
The honey is what makes that shiny, sweet glaze. You can dial the sweetness up or down, just add more or less honey.
Butter gives the glaze that rich, almost silky vibe. Brown sugar teams up with the honey for a sweet, balanced coating.
Peas bring a pop of green and a little freshness. Frozen peas are super convenient and they cook fast.
A sprinkle of fresh parsley at the end is totally optional, but I think it makes the dish look and taste a little fancier.
Instructions
First, I peel the carrots and cut them into rounds—about 1/4 inch thick is my go-to. That size just cooks evenly and scoops up easily.
Bring a medium pot of water to a boil, then drop in the carrots. They’ll need about 5 minutes before the peas go in, since carrots take longer to get tender.
After 5 minutes, add the peas and cook everything together for another 3-4 minutes. I usually poke a carrot with a fork to check if it’s tender but not falling apart.
Drain the veggies in a colander. Seriously, get rid of all the extra water—otherwise the glaze won’t stick.
Put the empty pot back on the stove over medium heat and toss in the butter. Once it’s melted, stir in the honey and let it warm up for about 30 seconds, just until it’s starting to bubble.
Add the drained carrots and peas to the pot with the glaze. Toss gently for a minute or two, making sure everything’s coated in that sweet, buttery mix.
I add salt and pepper here, and sometimes a handful of chopped parsley or thyme if I have it. Totally up to you.
Give it all one last toss and move the glazed veggies to a serving dish. Serve it up while it’s still warm and glossy.
Notes
A few things I always keep in mind: carrots need about 5 minutes of cooking before adding the peas. That way, both finish together.
You can use frozen or fresh peas—whatever’s in the freezer works, honestly. Frozen peas are usually picked at their best, anyway.
The glaze thickens up as it cools, so if it looks a bit thin in the pan, don’t stress. I usually take it off the heat while it’s still a little runny.
Cutting the carrots into even pieces really helps them cook at the same speed. I try to keep them all around 1/4 inch thick.
If you want a different kind of sweetness, you can swap honey for the sugar or vice versa. The flavor changes a bit, but both work.
You can toss in other veggies too—green beans or snap peas are nice for variety. The trick is not to overcook anything; you want a bit of crunch left.
Leftovers keep in the fridge for about three days. I just reheat them gently in a pan with a splash of water to bring back the glaze.
Butter makes the dish richer, but if you want something lighter, olive oil works too. The flavor’s a little different, but still good.
Add salt at the end, not the start. That way, you can tweak the flavor once the glaze has reduced and everything’s come together.

Equipment
- Medium pot
- Colander
- Vegetable peeler
- cutting board
- sharp knife
- Measuring cups and spoons
- Wooden spoon or spatula
Ingredients
- 1 lb carrots peeled and sliced into 1/4-inch rounds
- 1 cup peas fresh or frozen
- 2 tbsp unsalted butter
- 2 tbsp honey
- 1 tbsp brown sugar packed
- salt to taste
- black pepper to taste
- 1 tbsp fresh parsley chopped, optional
Instructions
- Peel the carrots and slice into 1/4-inch rounds (try to keep slices even so they cook at the same speed).
- Bring a pot of water to a boil. Add the carrots and cook 5 minutes.
- Add the peas and cook 3–4 minutes more, until the carrots are tender but not mushy and the peas are bright green.
- Drain well in a colander (excess water prevents the glaze from sticking). Return the empty pot to the stove over medium heat.
- Melt the butter, then stir in the honey and brown sugar. Cook about 30 seconds, just until the mixture begins to bubble.
- Add the drained carrots and peas back to the pot. Toss gently 1–2 minutes until everything is glossy and evenly coated.
- Season with salt and pepper to taste. Sprinkle with chopped parsley (optional) and serve warm.
Notes
Nutrition
Tasting Notes
Taking a bite of these glazed carrots with peas, the first thing that jumps out is just how naturally sweet the carrots are. That buttery glaze? It gives each piece a rich, mellow taste, but somehow it never feels too much.
The carrots are tender, but there’s still a little bite to them—nobody wants mushy veggies, right? Then you get the peas, which add these fresh pops that keep things interesting.
There’s a hint of honey and butter in every bite, and if you’ve tossed in herbs like thyme or parsley, you might catch those earthy flavors sneaking through. What I like is that the veggies still taste like themselves, not just like glaze.
The peas have this mild, almost sweet note that goes hand in hand with the carrots. It all just feels like something you’d want at a homey dinner, nothing too fancy or fussy.
Each piece is coated just enough, so you get a sticky-sweet glaze but can still taste the veggies underneath. Honestly, it’s a combo that somehow feels both refreshing and really satisfying.
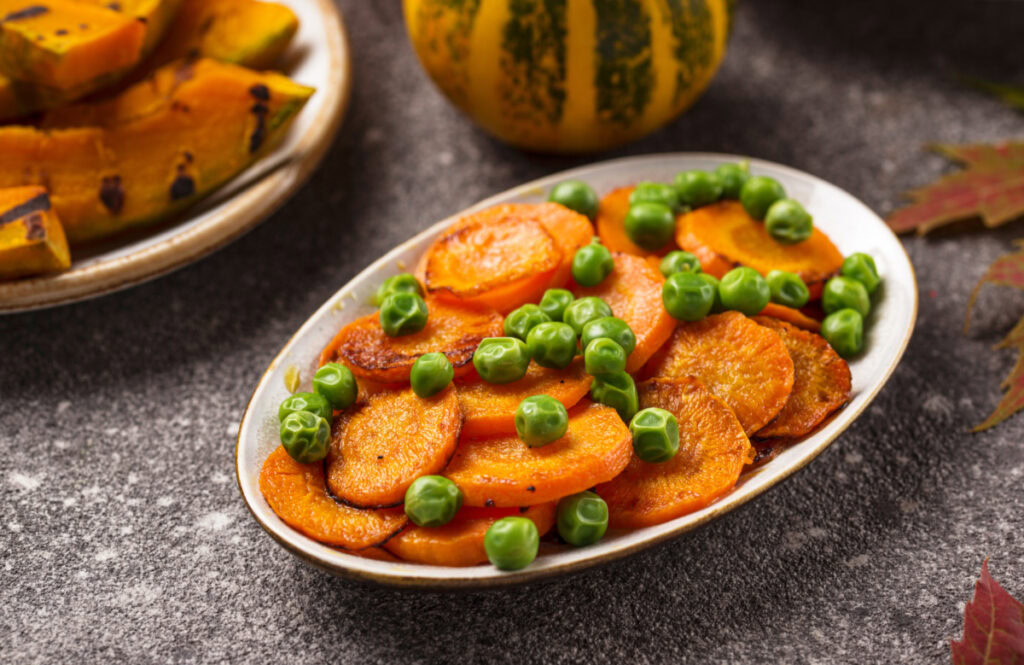
And you can’t ignore how bright and colorful it looks—the orange and green together just pop on the plate. Every forkful gives you a bit of both, so you get the whole experience in every bite.