Healthy Homemade Almond Butter Recipe
Making almond butter at home? Honestly, it’s way easier than you’d guess. You really just need almonds and a food processor—smooth, creamy almond butter in about 10 minutes, tops.
Store-bought versions usually toss in extra oils, sugar, and weird preservatives you probably don’t want. I like making my own because, well, I get to decide exactly what goes in.
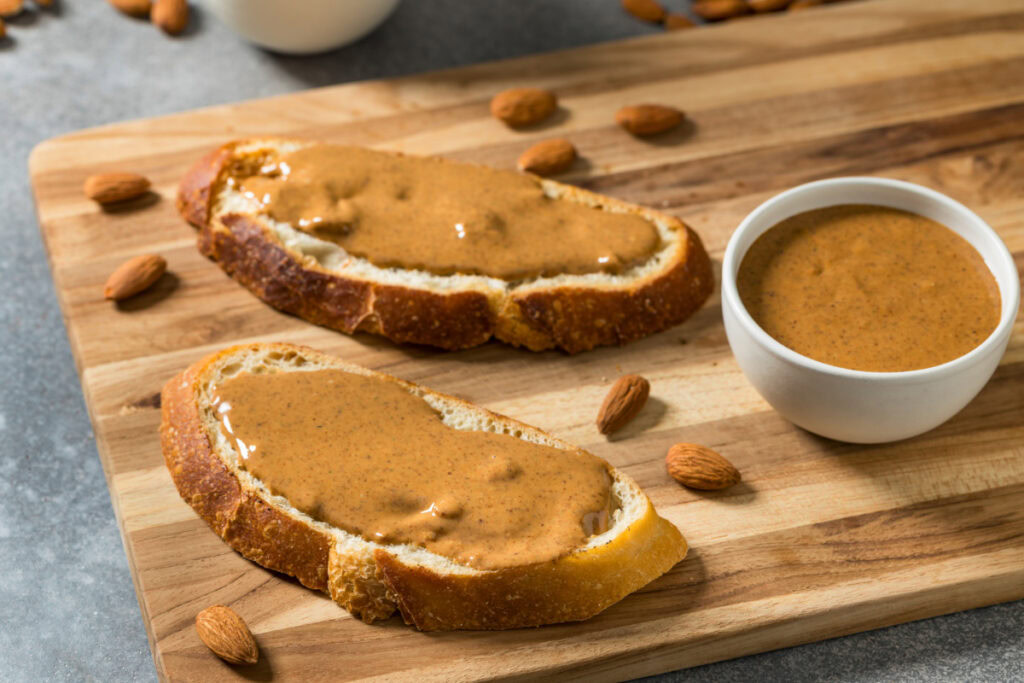
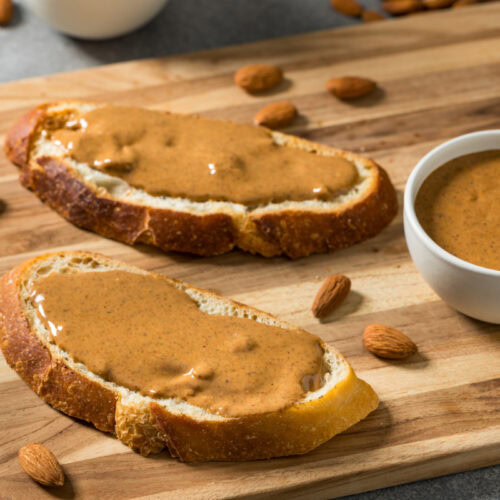
This almond butter is great on toast, in smoothies, or—let’s be real—straight off the spoon. The taste? Way fresher than anything from a jar at the store.
Let me walk you through what you need, the basics, and how to pull it off. I’ll throw in a few tips and what to expect when you finally try a spoonful.
Equipment
Making almond butter doesn’t require anything fancy. Most kitchens have what you need already.
The real MVP here is a food processor or a high-powered blender. I lean toward the food processor since the wider base helps the almonds move around better.
You want your machine to be strong enough to grind nuts into a smooth paste. Here’s what I grab:
- Food processor or high-powered blender (at least 7-cup size)
- Rubber spatula for scraping down the sides
- Measuring cups if you care about exact amounts
- Airtight glass jar or container for storing your almond butter
- Baking sheet (only if you want to roast the almonds first)
I’d suggest a food processor with at least 600 watts. Anything weaker might overheat or just not cut it. My 11-cup food processor gets the job done easily.
You’ll want that rubber spatula because the almonds like to stick to the sides as they break down. For storage, I always use glass jars with a tight lid—Mason jars work great and keep things fresh in the fridge for up to two weeks.
If roasting your almonds sounds good, grab a rimmed baking sheet. It brings out more flavor, but honestly, it’s not required.
Ingredients
You really only need one main ingredient for almond butter: almonds. I go with raw almonds most of the time, but roasted almonds give a deeper, toastier flavor if that’s your thing.
Here’s what you’ll need for the basic version:
- 3 cups raw almonds (or roasted)
- Pinch of salt (optional)
That’s it. I love how unfussy this is.
Want to make it chocolatey? You’ll need a couple extras:
- 3 cups raw or roasted almonds
- 2-3 tablespoons cocoa powder
- 2-3 tablespoons honey or maple syrup
- Pinch of salt
Raw almonds give a milder, slightly sweet taste. Roasted ones? Toasty and richer, which I think is hard to beat.
Buying almonds in bulk usually saves a few bucks. Just make sure they’re fresh—if they smell weird, skip them.
You can always add cinnamon, vanilla, or coconut oil if you want to change things up. I usually keep it simple, but chocolate almond butter is a fun treat once in a while.
Instructions
I start with 2 cups of raw almonds in my food processor. You really do need a powerful machine—almonds are stubborn.
First, I pulse for about 1 minute until everything looks coarsely chopped, kind of like almond meal. Then I let it run for another 2-3 minutes and scrape down the sides with my spatula.
After that, I keep it going for another 5-8 minutes. The almond mix goes through a few stages:
- It starts dry and crumbly.
- Then it forms a ball that bounces around.
- Finally, it relaxes into a smooth, creamy butter as the oils come out.
Once it’s smooth, I add anything extra—maybe 1/4 teaspoon salt or 1 tablespoon honey if I’m feeling it. Then I blend for another 30 seconds to mix everything in.
I pour the almond butter into a clean glass jar with a tight lid. The whole thing takes about 10-15 minutes of actual work.
I keep my almond butter in the fridge, where it stays good for up to 2 weeks. If the oil separates, I just give it a stir before using.
Notes
Storing almond butter is pretty straightforward. I use a glass jar with a tight lid and keep it in the fridge. It lasts up to 3 months if you keep it cold.
You’ll probably see oil rise to the top after a bit. Totally normal—just stir it back in and you’re good to go.
How smooth it gets really depends on how long you blend. If you want it super smooth, keep going for 12-15 minutes. For a chunkier spread, stop around 8-10 minutes.
The food processor will get warm, which actually helps the oils come out. If it starts getting too hot, just let it rest for a few minutes.
I think roasted almonds have the best flavor, but raw ones work if you want something milder. Both are good for you.
Add-ins like honey or cinnamon should wait until after the almonds have turned to butter. If you add them too early, things can get clumpy.
Almonds have plenty of natural oil, so you really don’t need to add extra. Some recipes call for coconut oil, but honestly, I never do.
Making almond butter takes a little patience. If it looks dry or crumbly, just keep going—it’ll smooth out, I promise.
Equipment
- Food processor (7-cup or larger) or high-powered blender
- rubber spatula
- Airtight glass jar
- Baking sheet (optional for roasting)
Ingredients
- 3 cups almonds raw or roasted
- 1/4 teaspoon fine salt optional, to taste
- 1 tablespoon honey or maple syrup optional, for a lightly sweet almond butter
- 2 tablespoons unsweetened cocoa powder optional, for chocolate almond butter
Instructions
- Optional roast: For deeper flavor, preheat the oven to 350°F (175°C). Spread almonds on a baking sheet and roast 8–10 minutes. Cool 5 minutes before blending (warm almonds blend faster).
- Add almonds to a food processor. Pulse for about 1 minute until coarsely chopped.
- Process 2–3 minutes, then stop and scrape down the sides. Continue processing 5–8 minutes more, scraping as needed, until the mixture turns from crumbs to a ball and finally into smooth, creamy almond butter.
- Once smooth, add salt (if using). For variations, add honey/maple and/or cocoa powder after the almonds have become butter. Blend 30 seconds to combine.
- Spoon into a clean jar. Store tightly covered in the refrigerator and stir if natural oil separation occurs.
Notes
Nutrition
Tasting Notes
The very first thing I pick up when I try my homemade almond butter is that deep, nutty flavor. It’s way more intense than anything I’ve grabbed off a store shelf—probably because I’m working with super fresh almonds.
The natural oils do their thing and make it so creamy, it basically melts as soon as it hits my tongue. Honestly, it’s kind of hard to go back to the store-bought stuff after this.
If I’m making it creamy, I just let the blender run for a while. It gets all silky and spreadable, with a mellow, slightly sweet taste that’s just right for toast or tossing into a smoothie.
The smooth almond butter spreads like a dream—no weird gritty bits hanging around. Sometimes I wonder why I ever settled for less.
On days when I want something with a little more bite, I’ll go for crunchy. I either stop blending sooner or just stir in some chopped almonds at the end.
Those chunky pieces add so much personality, and honestly, I think the flavor pops more because of the bigger almond bits. It’s got a different vibe—hard to explain, but really good.
Raw almond butter? That one’s lighter, almost delicate. It’s not as sweet and there’s this faint grassy note—some folks are really into that.
I usually reach for it when I don’t want the roasted taste to take over whatever I’m making. The color changes a lot depending on how long I roast the almonds—sometimes it’s a pale tan, sometimes it’s closer to deep brown.
Roasting longer brings out these caramel-like flavors. If I keep it light, the taste stays bright and fresh.
My homemade version always tastes a bit cleaner than the commercial jars, probably because I know exactly what’s in it. There’s this natural sweetness, no sugar needed.
It’s warm, a little earthy, and honestly, it just reminds me why almonds are such a classic.