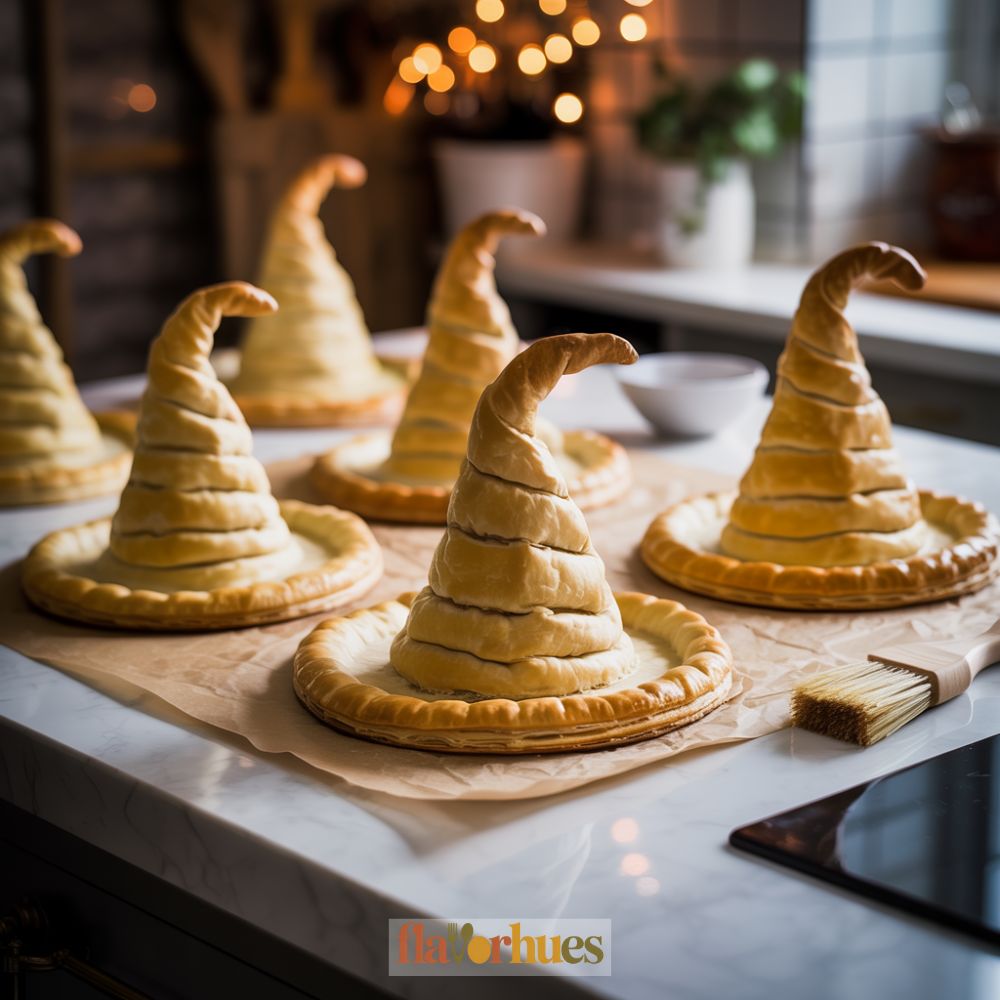
Puff Pastry Witch Hat Recipe
I love making fun treats for Halloween, and one of my favorites is puff pastry witch hats that are easy to bake and perfect as a festive dessert.
These treats look like little witch hats and only take a few simple ingredients.
Kids and adults both enjoy the cute shape and the light, crispy texture.
Whenever I bring out these witch hat pastries, they’re the first dessert to disappear at any Halloween party.
They’re great for adding a spooky and tasty touch to your Halloween recipes without needing special baking skills.
With just a few steps, I can have a batch ready for sharing or snacking.
Why I Love Them
I love making puff pastry witch hats because they are easy, fun, and perfect for Halloween treats. The shape is simple but still looks unique on the table.
These snacks are always a hit with kids and adults. It’s so much fun seeing everyone get excited about eating food that looks spooky!
I like using puff pastry because it gets crispy and golden in the oven. The flavor goes well with both sweet and savory fillings.
When planning a Halloween party, these witch hats are my go-to Halloween party food. They work as both a snack and a fun table decoration.
- They can be filled with cheese, chocolate, or jam.
- The hats look good even if I’m not perfect at shaping them.
They’re an easy spooky snack that doesn’t take much time. That’s exactly what I need for busy fall days.
Equipment
When I make puff pastry witch hats, I always start by gathering my tools. A baking sheet is one of the main items I need.
It provides a flat surface for baking the hats evenly. I also use parchment paper to line my baking sheet.
This keeps the pastry from sticking and makes cleanup much easier. If I don’t have parchment paper, I sometimes use a non-stick baking mat.
A sharp knife or pizza cutter helps me cut the puff pastry into the right shapes. I find it much easier to get clean edges this way.
Here’s a quick list of what I use:
- Baking sheet
- Parchment paper
- Pizza cutter or sharp knife
- Pastry brush (for brushing egg wash)
- Small bowl for the egg wash
- Cooling rack
A pastry brush is helpful to spread egg wash on the pastry, giving it a golden finish. I like using a small bowl to mix the egg wash before brushing.
Lastly, I move the baked witch hats to a cooling rack. This lets them cool down without getting soggy on the bottom.
If you have these basics, you’re ready to start baking!
Ingredients
Making puff pastry witch hats is fun and easy if you have the right ingredients. Here is what I need to make these tasty treats:
- 1 sheet of puff pastry (thawed)
- Nutella (or any chocolate hazelnut spread)
- 1 egg (for egg wash)
- Pretzel rods or pretzel sticks
- Flour (for dusting)
Puff pastry is the star ingredient. I use one sheet, which is usually enough for several witch hats.
Nutella gives each hat a sweet, chocolatey filling. Sometimes I spread a thick layer, but a little goes a long way.
For the outside, I need an egg wash. I make it by beating one egg with a splash of water.
This helps the hats bake to a shiny, golden brown. Pretzel rods act as witch hat “wands” or decorations.
I find that both pretzel sticks and rods work, but rods are sturdier.
I always check my pantry for these basics before starting. It makes baking the witch hats quick and easy.
Instructions
First, I preheat my oven to 400°F (200°C) to make sure it’s hot and ready for baking. I line a baking sheet with parchment paper, so the pastry doesn’t stick.
I unfold the puff pastry sheet and cut out triangles using a knife or pizza cutter. Each triangle will become a witch hat.
I save any extra corner for making small witches’ brooms later. Next, I roll each triangle into a cone shape—starting at the wide end and rolling toward the tip.
Then I place them on the baking sheet, making sure the seam is underneath. For the brim, I cut circles out of pastry using a cookie cutter or a glass.
I set each circle under the cone, pressing gently so it sticks. This creates the base of each hat.
If I want to make witches’ brooms, I cut thin strips from leftover pastry. I then wrap and twist them around a stick (like a pretzel stick), and pinch the ends to look like bristles.
I brush the hats and brooms with a little beaten egg. This helps them turn golden and flaky.
I bake everything for 12–15 minutes, or until the pastry is puffed and light brown. I let it cool before serving or decorating.
Tip: I use chocolate or sprinkles to decorate the hats if I want them to look extra festive.

Equipment
- Pizza cutter or sharp knife
- Small bowl (for egg wash)
Ingredients
- 1 sheet puff pastry
- 4 tablespoons Nutella
- 1 egg for egg wash
- 8 pretzel rods
- 2 tablespoons flour for dusting
Instructions
- Preheat your oven to 400°F (200°C) and line a baking sheet with parchment paper.
- Unfold the puff pastry sheet on a lightly floured surface.
- Cut out triangles with a pizza cutter or sharp knife — each will become a witch hat.
- Roll each triangle from the wide end toward the tip to form a cone.
- Pinch the edges to seal, then cut circles from excess dough to form brims for the hats.
- Attach each circle underneath its cone to create the base of the hat.
- If you wish, wrap and twist small strips of leftover dough around a pretzel rod to create broomstick handles.
- Fill each cone with a small spoonful of Nutella (but avoid overfilling) and press to seal.
- Brush all the hat formations with a beaten egg wash for color.
- Bake for 12–15 minutes or until the pastry is puffed and golden brown.
- Let them cool on a wire rack before serving.
- Serve alongside a cup of warm cocoa or a spooky brew!
Nutrition
Substitute
Sometimes I run out of puff pastry or want to switch things up. There are a few simple swaps you can use for this recipe.
Here’s a quick list:
- Crescent roll dough: This is easy to find and bakes up soft and fluffy.
- Phyllo dough: This gives you a crispier texture, but remember to use melted butter between the layers.
- Homemade pie crust: Not as light, but it still works if that’s what I have on hand.
If I don’t have chocolate chips for the filling, I use Nutella, peanut butter, jam, or even marshmallows. Each one changes the taste and makes the hats fun and different.
Sometimes I don’t have egg wash for brushing. I use milk or melted butter to help the tops turn golden in the oven.
Here’s a quick comparison table:
| Ingredient | Substitute Options |
|---|---|
| Puff Pastry | Crescent dough, phyllo, pie crust |
| Chocolate Chips | Nutella, peanut butter, jam, marshmallows |
| Egg Wash | Milk, melted butter |
Swapping ingredients is easy and lets me use what I already have at home. It also helps if I want to try new flavors or textures.
What Can Go Wrong?
Sometimes the puff pastry doesn’t turn golden brown. This usually means my oven isn’t hot enough, or maybe I just didn’t bake it long enough.
I always check my hats near the end of baking time, just in case. You never really know until you peek.
If I use too much filling, the hats might leak or burst open while baking. The trick is to use just a small spoonful and pinch the edges tightly.
My hats can lose their shape if the dough gets too warm. Once it softens, it’s just so hard to mold into anything decent.
I try to keep the pastry cold until I’m ready to shape it. If things start to get messy, I’ll chill the hats for a bit before baking.
| Problem | Cause | Fix |
|---|---|---|
| Not golden brown | Oven too cool or short baking | Bake a few mins longer |
| Leaking filling | Too much filling or loose seal | Use less, seal edges well |
| Misshapen hats | Dough too warm | Keep dough cold |
If the hats look pale, I’ll brush them with a little egg wash before they go in the oven. That usually helps get that classic golden brown color I’m after.