Skeleton Meat and Cheese Spread Charcuterie Board Recipe
I love making food that looks fun and tastes great, especially when I’m hosting family and friends. My Skeleton Meat and Cheese Spread Charcuterie Board is a simple recipe that brings smiles to everyone’s faces.
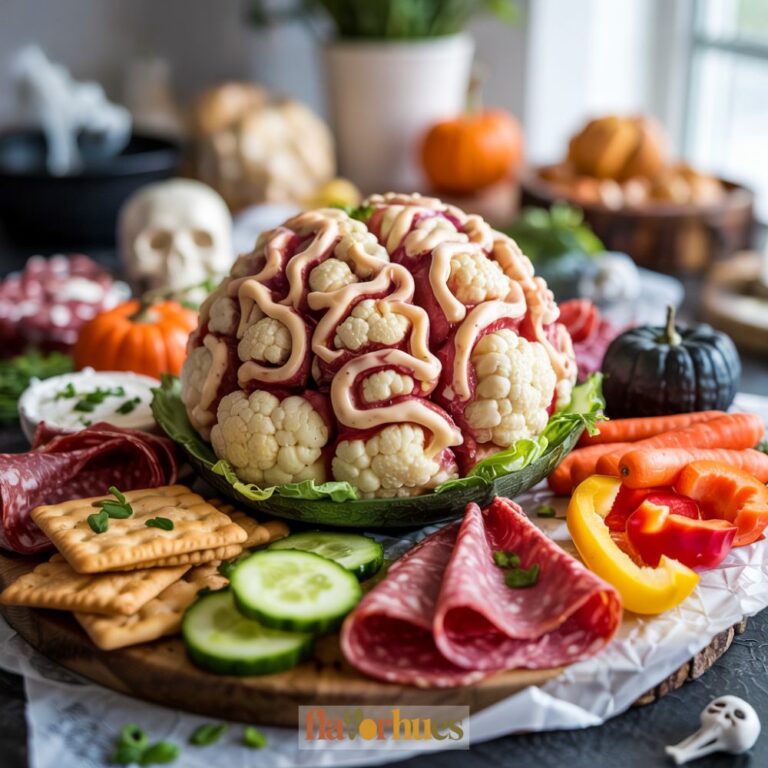
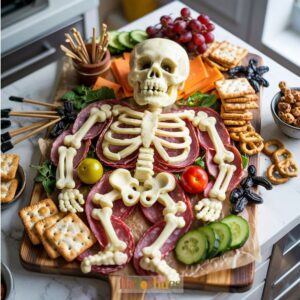
This board features a playful skeleton made from deli meats and cheeses that’s perfect for parties, especially around Halloween.
When I make this, it only takes about 15 minutes to set up, and it always gets lots of compliments. The best part is that you can customize the board with your favorite meats, cheeses, and crackers.
Kids and adults both enjoy picking from the different snacks and seeing the skeleton come to life on the table.

Why I Love Them
I enjoy making these skeleton meat and cheese boards because they are easy and fun. It doesn’t take a lot of time to put everything together.
My friends and family always smile when they see the skeleton design. It makes any party feel more special and playful.
I like that everyone can pick their favorite pieces. The mix of meats, cheeses, and snacks gives everyone something they enjoy.
I also love how I can change up the meats and cheeses. This means I can use what I have at home or try something new each time.
Making the skeleton shape lets me get a little creative. I use different types of cheese and meats for arms, legs, and a skull.
Sharing this board makes me feel proud. It’s an easy way to treat people and show I care.
Equipment
To make my skeleton meat and cheese spread charcuterie board, I always gather a few simple tools before I start.
Here’s what I use:
- One large serving board or tray (about 18 x 12 inches)
- A sharp knife for slicing cheese and meats
- Small bowls (at least 2–3) for dips and spreads
- Mini serving spoons or spreaders
- Toothpicks or tongs for easy grabbing
- Parchment paper or wax paper (optional, for easier cleanup)
I like using a wooden or slate board because it looks nice and is easy to clean. If you don’t have a big board, you can use a clean baking sheet or a large platter.
A sharp knife helps me get neat slices of cheese and meat. Small bowls are great for keeping dips, olives, or jams in place.
I use mini spoons for spreading soft cheeses. Toothpicks or small tongs make it simple for guests to pick up snacks without touching the food.
Sometimes I put down parchment paper first to help with cleaning up. Having the right tools makes building the skeleton shape easier, so I always set everything out before I start arranging.
Ingredients
I like to gather all my things before starting. Here’s what I use for my Skeleton Meat and Cheese Spread Charcuterie Board:
Meats:
- 6 slices salami
- 6 slices pepperoni
- 4 slices ham
Cheeses:
- 4 slices cheddar cheese
- 4 slices mozzarella cheese
- 1/2 cup cream cheese (for spreading)
Crackers and Bread:
- 10 assorted crackers
- 1 small baguette (sliced)
Veggies and Extras:
- 1/2 cup baby carrots
- 1/2 cup green grapes
- 1/2 cup black olives
- 1/4 cup sliced cucumbers
For the Skeleton Shape:
| Ingredient | Amount | Use |
|---|---|---|
| Sliced mozzarella | 4 slices | Body, ribs, and skull |
| Salami | 2 slices | Eyes and mouth details |
| Cream cheese | 1/4 cup | Face and bone highlights |
I also grab little cookie cutters to help cut the cheese into bone shapes. Toothpicks make it easier to set and move the pieces around.
If I want to add a sweet touch, I add 1/4 cup of candy eyeballs or a small handful of raisins for eyes.
Instructions
First, I place a large, clean cutting board on my countertop. I like to set out all my ingredients before I start so I have everything ready.
I unwrap my cheese and meat slices, then use a small knife or cookie cutter to shape some pieces like bones.
For the skeleton’s head, I use a mini wheel of cheese or a hard-boiled egg, carving out simple eyes and a mouth.
Next, I start assembling the skeleton shape on the board. Here’s how I do it:
| Skeleton Part | What I Use |
|---|---|
| Skull | Mini cheese wheel |
| Ribcage | Cheese stick pieces |
| Arms/Legs | Salami or ham rolls |
| Spine | Cheese block strips |
I put crackers and pretzels around the skeleton for even more crunch. Grape tomatoes and olives can become “joints” at elbows and knees.
I fill in empty spaces with sliced veggies, nuts, or fruit. I keep the spread colorful and fun but not too crowded, so each part stands out.
I finish by adding small forks or toothpicks for easy grabbing. Finally, I cover the board with plastic wrap and chill it in the fridge if I will serve it later.
Equipment
- 1 large serving board or tray (about 18 x 12 inches)
- 2–3 small bowls (for dips or olives)
- Mini serving spoons or spreaders
- Toothpicks or tongs
- Parchment or wax paper (optional, for easy cleanup)
- Small cookie cutters (for bone shapes)
Ingredients
Meats:
- 6 slices salami
- 6 slices pepperoni
- 4 slices ham
Cheeses:
- 4 slices cheddar cheese
- 4 slices mozzarella cheese
- 1/2 cup cream cheese for spreading
Crackers and Bread:
- 10 assorted crackers
- 1 small baguette sliced
Veggies and Extras:
- 1/2 cup baby carrots
- 1/2 cup green grapes
- 1/2 cup black olives
- 1/4 cup sliced cucumbers
For the Skeleton Shape:
- 4 slices sliced mozzarella body, ribs, and skull
- 2 slices salami eyes and mouth details
- 1/4 cup cream cheese face and bone highlights
- 1 mini cheese wheel or hard-boiled egg for the skull
- 1/4 cup candy eyeballs or raisins optional, for eye decoration
Instructions
- Place a large clean serving board on your countertop and set out all your ingredients.
- Slice cheese and meat into desired shapes. Use cookie cutters to make bone shapes if available.
- For the skeleton’s head, use a mini cheese wheel or a hard-boiled egg. Carve simple eyes and a mouth using a small knife.
- Begin building the skeleton shape on the board:
- Use cheese strips or slices for the spine and ribcage.
- Arrange rolled salami or ham for arms and legs.
- Use mozzarella slices or sticks to shape bones.
- Add salami slices for eye and mouth features. Use cream cheese for highlights or details.
- Surround the skeleton with assorted crackers, sliced baguette, and colorful fruits or vegetables.
- Fill small bowls with olives, dips, or grapes, and place them around the board.
- Add toothpicks or small tongs for easy grabbing.
- Cover the board and refrigerate until ready to serve.
Substitute
Sometimes I can’t find the exact ingredients or want to switch things up. Here are some easy swaps I like to use for this skeleton meat and cheese spread:
Meats
- Instead of salami, I use thin-sliced turkey or roast beef.
- If prosciutto isn’t available, ham works well.
Cheeses
- Cheddar is great, but I also use sliced mozzarella or Monterey Jack.
- For a stronger taste, I swap in Swiss or pepper jack.
Crackers and Bread
| Original | Substitute |
|---|---|
| Mini breadsticks | Pretzel rods |
| Wheat crackers | Rice crackers |
| Sliced baguette | Pita chips |
Vegetables
- If I don’t have baby carrots, I slice up bell peppers or use cucumber rounds.
- Grape tomatoes can be swapped for cherry tomatoes.
Extras
- I like to use hummus or ranch dip instead of cream cheese spread sometimes.
- If I want more crunch, I add nuts like almonds or cashews.
What Can Go Wrong?
Sometimes, my board just doesn’t look like a skeleton. I end up mixing up the bones or putting the eyes in the wrong place.
If I forget to plan the layout, everything gets crowded or a little messy. It’s honestly easy to lose track of what goes where.
Soft cheeses? They can get too warm and start melting all over the place. I try to keep my board cool until it’s time to serve, but sometimes that’s easier said than done.
Meats like salami can dry out if I leave them out too long. It’s a balancing act, really.
Here are some common issues I see:
| Problem | Why It Happens | What I Do Instead |
|---|---|---|
| Cheese melts or softens | Board is out too long | Refrigerate until last minute |
| Meats stick together | Slices are too thin or moist | Layer with parchment |
| Skeleton falls apart | Pieces not secure or too close | Shape carefully, use toothpicks or crackers for support |
| Boring look | Not enough color or texture | Add pickles, fruits, or nuts |
Sometimes I pick meats that have a really strong smell, and they just overpower the cheese. Mixing mild and strong flavors helps keep things balanced—or at least that’s what I aim for.
If I use too many tiny pieces, people can’t pick things up without making a mess. Now I try to use both small and large items, so the skeleton’s easier to build and eat.
Food safety matters to me. I check expiration dates and make sure raw and cooked foods stay separate.
I always clean my tools before I start. That’s just basic, right?