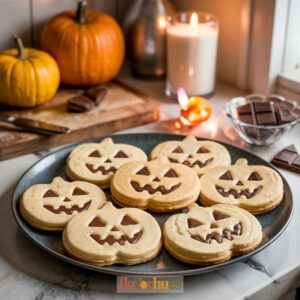
Milk Chocolate Stuffed Jack-O’-Lantern Cookies Recipe
Every fall, I look forward to baking treats that bring a smile to everyone’s face.
Milk Chocolate Stuffed Jack-O’-Lantern Cookies are not only fun to make but also have a creamy chocolate filling that melts in your mouth.
These cookies turn a simple afternoon into a cozy Halloween memory.
The best part is how the jack-o’-lantern faces peek out from the buttery cookie.
I love seeing the gooey chocolate surprise when you take a bite.
If you’re searching for a tasty, festive idea, these cookies are a great way to add a special touch to your Halloween table.

Why I Love Them
I love these Milk Chocolate Stuffed Jack-O’-Lantern Cookies because they are fun to make and even more fun to eat.
The little pumpkin faces always make me smile.
They’re easy to make, so I don’t need to spend hours in the kitchen.
I can use basic cookie dough and shape them with simple tools or even just my hands.
Biting into the cookies and finding the creamy milk chocolate center is the best part.
I like that I can get creative with the faces.
Sometimes, I make each one different, which makes baking more enjoyable.
Sharing these cookies at parties or as gifts makes people happy.
The smell of fresh-baked cookies always fills my kitchen, and that’s something I really like.
Equipment
I always make sure to gather all my tools before I start baking.
Here are the basic items I use for making Milk Chocolate Stuffed Jack-O’-Lantern Cookies:
- Baking sheet: I use a flat baking sheet to lay out my cookies so they bake evenly.
- Parchment paper: This helps prevent sticking and makes cleanup easier.
- Mixing bowls: I grab a few different sizes for mixing dough and filling.
A pumpkin-shaped cookie cutter is needed to give the cookies their classic jack-o’-lantern look.
I sometimes use a regular pumpkin cookie cutter, but anything with a pumpkin shape works.
Wire cooling racks come in handy once the cookies are out of the oven.
They help cool the cookies evenly so they don’t get soggy on the bottom.
After the cookies are completely cooled, I store them in an airtight container to keep them fresh.
I find this makes them last longer and keeps them soft.
Having the right equipment makes this recipe easier and more fun.
Ingredients
When I make my Milk Chocolate Stuffed Jack-O’-Lantern Cookies, I stick to ingredients that bring out rich flavors and soft textures.
Below are the items I always use for the dough and the filling.
Cookie Dough Ingredients
- 2 1/2 cups all-purpose flour
- 1 teaspoon baking soda
- 1/2 teaspoon salt
- 1 teaspoon ground cinnamon
- 1/4 teaspoon ground nutmeg
- 1/4 teaspoon ground ginger
These spices give the cookies a warm and spicy flavor.
I recommend using fresh spices if you can.
- 1 cup (2 sticks) salted butter, softened
- 1 cup light brown sugar, packed
- 1/2 cup granulated sugar
- 2 large eggs
- 2 teaspoons pure vanilla extract
This mix makes the base soft and tasty.
The combination of brown sugar and butter keeps the cookies chewy.
Chocolate Center
For the filling, I always pick sweet, creamy milk chocolate.
I use about 6 ounces of milk chocolate bars or discs.
Breaking them into small pieces makes it easier to stuff into the cookies.
Cinnamon Sugar Coating
To coat the cookies, I stir together:
| Ingredient | Amount |
|---|---|
| Granulated sugar | 1/4 cup |
| Ground cinnamon | 2 teaspoons |
I roll each cookie in this mix before baking.
This gives the cookies a crisp, spiced sugar crust.
Instructions
I start by preheating my oven to 350°F (175°C) and lining a baking sheet with parchment paper.
This keeps the jack-o’-lantern cookies from sticking.
Next, I roll out my cookie dough on a lightly floured surface.
I make sure it’s about 1/4-inch thick.
Using a pumpkin-shaped cookie cutter, I cut out an even number of shapes.
Half of my cut-outs will become the tops.
With a small knife or cookie cutter, I carve fun jack-o’-lantern faces into them.
The other half stay plain for the bottoms.
I place a milk chocolate square or disc in the center of each plain bottom cookie.
I gently set the face cookie on top of each base and pinch the edges closed to seal in the chocolate.
I lay all the assembled chocolate filled cookies on the prepared baking sheet.
Sometimes, I use a fork to press the edges for a simple pattern.
I bake the cookies for 10-12 minutes, or until the edges turn golden brown.
After baking, I let them cool on the pan for about 5 minutes before moving them to a wire rack.
When I break one open, melted chocolate peeks out from inside the jack-o’-lantern face.
Equipment
- Pumpkin-shaped cookie cutter
- Wire cooling rack
- Airtight container
Ingredients
Cookie Dough:
- 2 1/2 cups all-purpose flour
- 1 teaspoon baking soda
- 1/2 teaspoon salt
- 1 teaspoon cinnamon (ground)
- 1/4 teaspoon nutmeg (ground)
- 1/4 teaspoon ginger (ground)
- 1 cup salted butter (ground)
- 1 cup light brown sugar
- 1/2 cup granulated sugar
- 2 eggs
- 2 teaspoons pure vanilla extract
Chocolate Filling:
- 6 ounces milk chocolate squares or discs
Cinnamon Sugar Coating:
- 1/4 cup granulated sugar
- 2 teaspoons ground cinnamon
Instructions
- Preheat the oven to 350°F (175°C) and line a baking sheet with parchment paper.
- Roll out the cookie dough on a lightly floured surface to about 1/4 inch thick.
- Use a pumpkin-shaped cookie cutter to cut out an even number of cookies.
- With a small knife or another small cookie cutter, cut out jack-o’-lantern faces from half of the cookies.
- Place a piece of milk chocolate in the center of each plain cookie.
- Gently place a matching face cookie on top and press edges together to seal in the chocolate.
- Roll each cookie in cinnamon sugar mixture for additional flavor.
- Bake for 10–12 minutes or until edges are lightly golden brown.
- Let cookies cool for 5 minutes on the baking sheet before transferring to a wire rack to cool completely.
- Serve with a glass of cold milk or your favorite warm drink.
Nutrition
Substitute
Sometimes I run out of milk chocolate or want to try something new.
There are lots of ways to substitute the chocolate in these cookies.
- Dark chocolate: If I want a richer taste, I use dark chocolate pieces instead of milk chocolate.
- White chocolate: White chocolate gives these cookies a sweeter flavor.
- Peanut butter cups: Sometimes I press a mini peanut butter cup in place of the chocolate.
If I don’t have pumpkin cookie cutters, I use other shapes or cut out circles.
The cookies still taste great, even if they’re not pumpkin-shaped.
Here’s a quick table with other common swaps:
| Ingredient | Substitute |
|---|---|
| Milk chocolate | Semi-sweet chocolate |
| Butter | Margarine or shortening |
| All-purpose flour | Gluten-free flour blend |
If anyone in my family has allergies, I check all chocolate and filling options to find safe choices.
I also use nut-free chocolate or sunflower seed butter cups for my niece.
Trying different stuffings and shapes keeps my cookies fun every time I bake them.
What Can Go Wrong?
Sometimes, my cookies spread too much and lose their Jack-O’-Lantern shape. This usually happens if the dough isn’t chilled long enough.
If I skip this step, the cookies might not look as neat. It’s a little disappointing when they come out looking more like blobs than pumpkins, honestly.
If the face details on my cookies fade away when baking, I probably pressed too lightly with the cutter. I always try to press firmly so the shapes stay clear, but sometimes I get lazy or distracted and, well, you can tell.
The chocolate inside can leak if I don’t seal the edges well. I use my fingers to gently pinch the cookie edges together, making sure there are no gaps.
Sometimes, the cookies bake unevenly and turn brown too quickly. This happens if my oven is too hot or if the cookie sheets are too close to the heat source.
I always check the oven temperature before I start, but let’s be real, sometimes I forget. That’s when the bottoms get a little too toasty.
If I use too much flour while rolling out the dough, the cookies may turn out dry. I sprinkle just enough flour to keep the dough from sticking, but not too much.
| Issue | Cause | Fix |
|---|---|---|
| Chocolate leaks | Edges not sealed | Pinch edges well |
| Cookie loses shape | Warm dough | Chill before baking |
| Faces fade | Not deep enough cuts | Press cutter firmly |
| Dry cookies | Too much flour | Use less when rolling |
Sometimes I pour a glass of milk that’s too small or forget it altogether. I always remind myself that a big, cold glass of milk goes best with these cookies—otherwise, what’s the point?