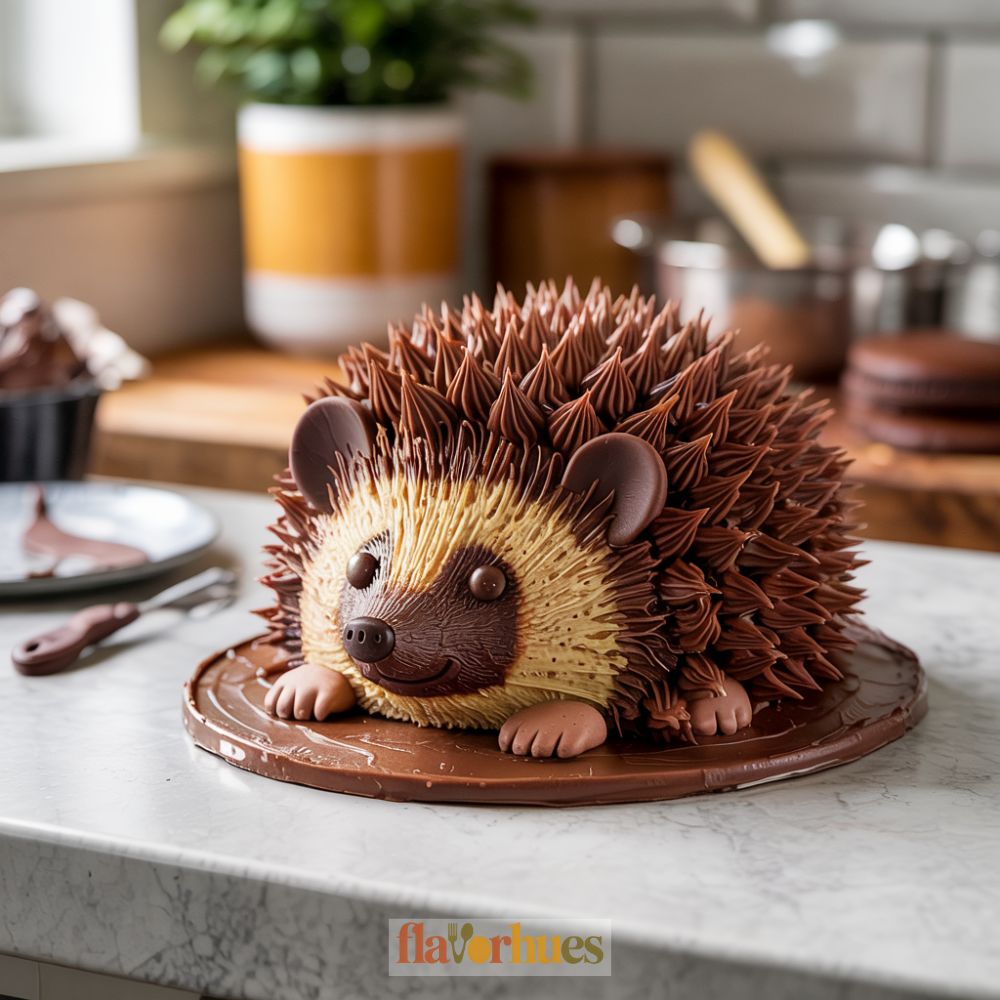
Hedgehog Cake Recipe
I’m excited to share my easy hedgehog cake recipe, perfect for birthdays or just having fun in the kitchen.
With a simple cake base and easy-to-find decorations, anyone can make a cute cake that looks just like a little hedgehog.
It doesn’t matter if you’re a baking pro or trying cake decorating for the first time.
This hedgehog cake recipe uses basic ingredients and straightforward steps, so you won’t feel overwhelmed.
I love how this cake always brings smiles to the table and makes any gathering feel special.
Why I Love Them
Making a hedgehog cake always puts a smile on my face. The cute shape and fun details make it different from any other birthday cake.
My friends and family always seem excited to see it. I like that a chocolate hedgehog cake feels special but isn’t hard to make.
It uses simple ingredients that I often already have at home. I don’t need fancy tools—just a bit of creativity.
Here are a few reasons why I enjoy baking them:
- They are great for birthdays or parties.
- It’s easy to decorate them with chocolate, sprinkles, or candy.
- Each cake is unique because I can personalize the face and spikes.
Kids really like these cakes because of the playful design. Sometimes, they even want to help put on the chocolate spikes or candies.
This makes baking together even more fun. Another reason I love making hedgehog cakes is that they taste delicious.
The mix of moist cake and rich chocolate frosting is always a hit.
| What I Like | Why It Matters |
|---|---|
| Fun design | Brings smiles |
| Simple steps | Easy to follow recipe |
| Tasty cake | Everyone enjoys it |
Sharing a hedgehog cake makes celebrations memorable. It is not just a dessert—it also starts conversations and giggles around the table.
Equipment
Having the right equipment makes making a hedgehog cake much easier. I like to get everything ready before I start.
Here’s what I use:
- Mixing bowls for making the cake batter and icing
- A pudding basin for shaping the main part of the cake
- Cake board to display and move the cake
- Greaseproof paper to line the baking pan and keep things from sticking
- Measuring cups and spoons
- Electric hand mixer or whisk
- Small spatula or butter knife for spreading icing
I always use greaseproof paper when baking. It keeps the cake from sticking and makes it easy to lift out.
The pudding basin gives my hedgehog its round body shape. I try to pick a heat-safe one that will fit enough cake batter.
A cake board makes decorating and moving the finished cake much easier for me, especially if I want to show it off at a party or bring it somewhere.
If I want to add details, I also keep toothpicks or piping bags nearby. That way, decorating is neat and fun.
Ingredients
Making a hedgehog cake starts with gathering all the right ingredients. I like to make sure I have everything ready before I begin.
Here’s a simple table to show what you’ll need:
- 2 cups All-purpose flour
- 1½ cups Sugar
- ½ cup Cocoa powder
- 2 tsp Baking powder
- 3 large Eggs
- 1 cup Butter (softened)
- 1 cup Water
- 2 tsp Vanilla extract
I also use a pinch of salt to bring out the flavors.
For the icing and decorations, I need:
- Icing sugar: 2 cups
- Cocoa powder: ¼ cup
- Soft butter: ½ cup
- Milk: 2 tbsp
- Mini chocolate chips or sprinkles for spikes
- Candy eyes or white chocolate chips for the eyes
- A chocolate button or candy for the nose
It’s important to measure each ingredient carefully. Too much or too little can change how the cake turns out.
With simple pantry ingredients like flour, cocoa powder, and baking powder, I can make both the cake and the icing.
If I want a bigger cake, I just double the amounts above, but always balance cocoa powder and baking powder for the best taste and texture.

Equipment
- Pudding basin (heat-safe bowl)
- Cake board
Ingredients
For the Cake:
- 2 cups All-purpose flour
- 1 1/2 cups Sugar
- 1/2 cups Cocoa powder
- 2 tsp Baking powder
- 3 Eggs
- 1 cup Butter softened
- 1 cup Water
- 2 tsp Vanilla extract
- 1/4 tsp Salt
For Icing and Decorations:
- 2 cup Icing sugar
- 1/4 cup Cocoa powder
- 1/2 cup butter softened
- 2 tbsp Milk
- Mini chocolate chips or sprinkles — to create hedgehog’s spikes
- Candy eyes or white chocolate chips — for the eyes
- Chocolate button or candy — for the nose
Instructions
- Preheat your oven to 350°F (175°C).
- Grease a pudding basin with butter or spray and line it with greaseproof paper.
- In a large bowl, combine flour, sugar, cocoa, baking powder, and salt.
- Add in the eggs, butter, water, and vanilla extract.
- Mix with a hand mixer or whisk until smooth and well blended.
- Pour batter into prepared pudding basin.
- Bake for 30–35 minutes or until a toothpick inserted comes out clean.
- Let the cake cool completely before removing from basin.
- Trim a small piece off the side to create a flat base for your hedgehog.
- Prepare frosting by mixing icing sugar, cocoa, soft butter, and milk until smooth.
- Spread frosting evenly over the cooled cake with a spatula.
- Insert chocolate chips or sprinkles to create hedgehog’s “spikes”.
- Attach candy eyes and a chocolate button for the nose.
- Optional: pipe green-tinted frosting at base to resemble grass.
- Serve and enjoy your hedgehog-shaped chocolate cake with friends and family.
Nutrition
Instructions
First, I let my round cake layers cool completely. This helps the frosting stick and keeps the cake from breaking.
I use a sharp knife to gently shape the cake into a hedgehog body. I trim a little off one end to make the nose.
I mix my buttercream and add green food colouring to a small part for the grass.
To cover the cake, I spread chocolate buttercream all over. I use a spatula for smooth sides.
Next, I stick chocolate buttons in rows on the back. This makes the hedgehog’s “spines.”
Tip: Overlap the buttons for a fun look.
I insert pieces of Pocky at an angle for extra spines if I want. These give my hedgehog more texture.
For eyes and nose, I press in candy eyes and add a chocolate button or a piece of black fondant for the nose.
At the base, I pipe the green buttercream around the hedgehog’s feet. This looks like grass and adds color.
- Tools I use: serrated knife, spatula, piping bag
- Decorations: chocolate buttons, Pocky, candy eyes, green-tinted buttercream
Decorating is my favorite part, and makes the cake so cute!
Substitute
Sometimes I don’t have all the ingredients on hand. There are easy swaps I use for my Hedgehog Cake.
If I run out of butter, I use margarine or coconut oil. Both work well, but coconut oil gives a light coconut taste.
For eggs, I can use a mashed banana or 1/4 cup of unsweetened applesauce for each egg.
Chocolate is the star, but some days I use cocoa powder instead of melted chocolate. I just mix 3 tablespoons of cocoa powder and 1 tablespoon of vegetable oil to replace each ounce of chocolate.
If I want a gluten-free cake, I use gluten-free flour instead of regular flour. The texture changes a little, but the taste stays good.
For toppings, I sometimes use crushed cereal or sliced almonds instead of chocolate sprinkles. This makes decorating easy with what I have at home.
What Can Go Wrong?
When I make a hedgehog cake, a few things can go wrong if I’m not careful.
The cake may be too dry or too wet. If it’s dry, it crumbles when I try to shape it.
If it’s too moist, it falls apart and is hard to frost.
Sometimes, the frosting can be a problem.
If it’s too runny, it slides off the cake. If it’s too thick, it’s tough to spread and can make the cake look messy.
I’ve also struggled with the decorations. The face and spikes can be tricky.
Sometimes my eyes look uneven or the spikes don’t stay in place.
Here’s a quick list of common mistakes I try to avoid:
- Overbaking the cake
- Using frosting that’s too warm
- Not letting the cake cool before decorating
- Rushing the design