Halloween Nutter Butter Cookies Recipe
I love making fun treats for Halloween, and these Nutter Butter cookies are always a hit at my house.
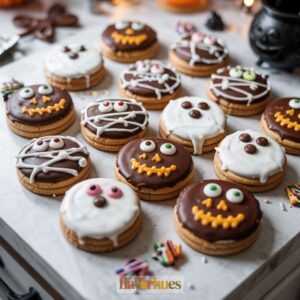
These Halloween Nutter Butter Cookies are easy to make with simple ingredients and come out looking spooky and cute every time.
Whether you want ghosts, mummies, or monsters, you can decorate them in so many ways.
I like bringing these cookies to Halloween parties because they’re quick to put together and kids always recognize them.
They’re also a great choice if you need a last-minute Halloween treat that doesn’t take a lot of work.
With just a few steps, you’ll have a batch of festive cookies everyone will want to try.

Why I Love Them
I really enjoy making these Halloween Nutter Butter cookies because they’re so simple.
Most of the time, I don’t need any complicated tools or fancy ingredients. They fit right in with other easy Halloween cookies and treats.
Decorating the cookies lets me be creative.
One day, I might make witch hat cookies. The next time, I try monster cookies with candy eyes and bright colors.
Every time, I get to play with new Halloween ideas—sometimes they’re a little weird, but that’s half the fun.
These cookies work great for Halloween parties.
I like to put them out on the dessert table between other Halloween desserts. Kids and adults both pick them up quickly because they look fun and taste good.
I also like that I can make a big batch quickly, which is helpful when I need party food in a hurry.
Equipment
When I make Halloween Nutter Butter Cookies, I always start by gathering everything I need.
Here’s the basic equipment that helps me keep things simple and fun.
Baking Sheet
I use a flat baking sheet to lay out my cookies before and after decorating.
It keeps my workspace neat and lets the cookies cool without sticking together.
Parchment Paper
Lining the baking sheet with parchment paper is helpful.
It makes cleanup faster and helps move cookies around without them breaking.
Double Boiler (or Microwave-Safe Bowl)
When melting chocolate or candy coating, I prefer a double boiler. It fits on top of a pot with simmering water, so the chocolate melts slowly and doesn’t burn.
If I’m short on time, a microwave-safe bowl works too.
Small Bowls and Spoons
I set out a few small bowls for the candy melts and sprinkles.
Spoons make it easier to scoop and drizzle melted chocolate over the cookies.
Tongs or Forks
Tongs or forks are great for dipping and flipping cookies in melted chocolate.
My hands stay clean, and the cookies get an even coating.
Decorating Tools
For details, I use toothpicks or piping bags with a small tip.
Sometimes, I just snip the corner off a plastic sandwich bag to squeeze out icing or melted chocolate.
Here is a quick table for reference:
| Equipment | Purpose |
|---|---|
| Baking Sheet | Holds cookies |
| Parchment Paper | Easy cleanup, nonstick |
| Double Boiler/Microwave | Melt chocolate or candy melts |
| Small Bowls | Hold decorations |
| Tongs/Forks | Dip and coat cookies |
| Toothpicks/Piping Bags | Add small details |
Ingredients
To make these Halloween Nutter Butter Cookies, I use a handful of simple ingredients.
Most of these are easy to find at any grocery store. Here’s what I use:
Main Ingredients:
- Nutter Butter cookies (or any peanut butter cookies)
- White chocolate (chips or bars)
- Candy melts (white and colored)
- Chocolate chips (regular and mini)
For decoration, I like to use fun extras.
These help turn plain cookies into spooky treats.
Decorative Ingredients:
- Candy eyeballs or candy eyes
- Mini chocolate chips (for eyes or noses)
- Almond bark or white candy coating
- Melted white chocolate or white almond bark (for drizzling)
If I want to change it up, I sometimes use colored candy melts to make mummies, ghosts, or monsters.
Peanut butter gives the cookies a rich, nutty taste.
I like to arrange my ingredients in a table for easy prep:
| Ingredient | Used For |
|---|---|
| Nutter Butter cookies | Cookie base |
| White chocolate chips | Coating and drizzle |
| Candy eyes | Decoration |
| Mini chocolate chips | Decoration/eyes |
| Candy melts | Coating and detail work |
| Almond bark | Alternative coating |
Most recipes let me swap melting chocolate for white melting chocolate, depending on how bright I want the designs.
Using melted white chocolate or almond bark gives the cookies a smooth finish that’s easy to decorate.
Instructions
First, I line a baking sheet with parchment paper.
This keeps my Nutter Butter cookies from sticking while I decorate.
Next, I melt white chocolate or candy melts in a microwave-safe bowl.
I heat in 30-second intervals, stirring each time, until smooth.
I use a fork to dip each Nutter Butter into the melted chocolate.
I gently tap the fork on the edge of the bowl so extra chocolate drips off. Then I place the cookie on the lined baking sheet.
For my ghost cookies, I add candy eyes while the chocolate is still wet.
I sometimes use mini chocolate chips for eyes if I don’t have any candy eyes.
I let the cookies set for about 15 minutes.
If I need them to set faster, I pop the tray in the fridge.
For more fun, I use colored icing or melted chocolate to make faces or spooky designs.
Sometimes, I add sprinkles too.
Equipment
- spoons
- Tongs or forks
- Toothpicks or piping bags
Ingredients
- 20 Nutter Butter cookies
- 1½ cups white chocolate chips or white candy melts
- ½ cup candy melts assorted colors, optional
- 40 candy eyeballs
- 2 tablespoons mini chocolate chips
- ½ cup almond bark optional alternative to white chocolate
Instructions
- Line a baking sheet with parchment paper and set aside.
- Melt white chocolate chips or candy melts in a double boiler or microwave-safe bowl. Stir every 30 seconds until smooth.
- Using a fork or tongs, dip each Nutter Butter cookie into the melted chocolate. Tap off excess and place on the parchment-lined baking sheet.
- While the coating is still wet, decorate with candy eyes or mini chocolate chips.
- Let cookies set at room temperature for 15 minutes, or refrigerate for faster setting.
- Use colored candy melts or melted chocolate in piping bags or sandwich bags with a snipped corner to add spooky details.
- Allow all decorations to fully set before serving or storing.
Nutrition
Substitute
Sometimes I don’t have Nutter Butter cookies at home.
In that case, I use other sandwich cookies or vanilla wafer cookies instead.
Any oval-shaped cookie works well if I want to keep the “mummy” or “ghost” look.
If I need to replace peanut butter (for allergies or preference), I go with sunflower seed butter, cookie butter, or even cream cheese frosting for a similar texture.
For decorations, if I run out of candy eyes, I make eyes by adding a tiny dot of melted chocolate on a white chocolate chip.
Sprinkles or mini chocolate chips also work as eye substitutes.
| Item | Substitute Options |
|---|---|
| Nutter Butter | Vanilla wafers, graham crackers |
| Peanut butter | Sunflower seed butter, cookie butter |
| Candy eyes | Chocolate chips, sprinkles |
| White chocolate | Almond bark, vanilla candy melts |
With these options, I always have a way to keep my Halloween cookies fun and tasty, even if I’m missing a main ingredient.
What Can Go Wrong?
Sometimes, my cookies end up a little too soft or even mushy. That usually happens if I don’t give the chocolate enough time to set before tossing the cookies into an airtight container.
If the decorations start sliding off, it’s probably because the chocolate was still too warm when I put on the sprinkles or those candy eyes. These days, I just wait a minute or so before decorating—seems to help things stick better.
Here’s a quick look at common issues:
| Problem | Cause | Quick Fix |
|---|---|---|
| Soggy cookies | Not cooled fully | Let chocolate set first |
| Decorations falling off | Wet chocolate or too much shaking | Let chocolate cool a bit |
| Broken cookies | Rough handling | Handle gently |
Sometimes, the cookies break when I try to move them off the tray. I usually grab a spatula and remind myself to let them rest until they’re actually firm—patience isn’t my strong suit, but it pays off.
If I forget to seal the cookies up tight in an airtight container, they can turn stale or hard. I try to remember to check the lid, but hey, nobody’s perfect.