Graveyard Tombstone Cake Pops Recipe
Halloween’s probably my favorite excuse to go wild with treats, and these Graveyard Tombstone Cake Pops always steal the show. They look spooky but honestly, they’re not hard to make at all—especially when you don’t have a ton of time.
You just need a handful of basic ingredients and a bit of creativity to pull off cake pops that are both adorable and delicious.
I love how you can switch up the decorations and colors. Kids get into it too, especially when they’re in charge of the designs.
They’re perfect for parties or sending along to school. The real fun is watching everyone try to pick the “best” tombstone from the bunch—there’s always one that turns out extra weird or cute.
Why I Love Them
Honestly, these cake pops are just plain fun to make. There’s plenty of room to get creative with the decorations, and it never feels overwhelming.
Honestly, it’s more fun with friends or family. Decorating gets silly, especially when you’re trying to scribble tiny letters on a cookie “tombstone.”
They fit right in at parties or just hanging out. People always seem excited to see them on the table.
The mix of chocolate and cookie crunch is so good—sweet but not over the top. Every batch turns out a little different, which just adds to the fun.
Sometimes I throw in gummy worms or candy flowers, just to keep things interesting. Why not?
Equipment
Before I start, I pull out all my gear so I’m not scrambling mid-recipe. Here’s what I usually set out:
Mixing tools:
- Large mixing bowl
- Spatula or spoon
- Hand mixer or stand mixer (not totally necessary, but handy)
Shaping and decorating:
- Baking tray or sheet pan
- Parchment paper
- Measuring cups and spoons
- Plastic wrap
Cake pop essentials:
- 8-inch cake pan (for baking the cake)
- Sharp knife (for crumbling and shaping)
- Small cookie scoop (helps with even pops)
- Lollipop sticks
- Microwave-safe bowl (for melting chocolate or candy melts)
For decorating:
- Black food marker (for tombstone writing)
- Piping bags or a plastic bag (for icing)
- Small bowls for toppings and sprinkles
Having everything close by makes things way smoother (and more fun, honestly).
Ingredients
To whip up these Graveyard Tombstone Cake Pops, I just grab a few things from my kitchen and maybe a quick trip to the store.
Here’s my go-to list:
| Ingredient | Amount |
|---|---|
| Chocolate cake | 1 box (about 400g or 15oz), baked and cooled |
| Cream cheese frosting | 1/2 cup (about 120g) |
| Milk chocolate chips | 1 cup (175g) |
| White chocolate chips | 1/2 cup (90g) |
| Black food coloring gel | A few drops |
| Lollipop sticks | 20 sticks |
| Crushed chocolate cookies | 1/2 cup (60g) |
| Rectangle-shaped cookies | 10 pieces (like Milano or similar) |
| Candy bones or skulls | 1 small pack |
| Green sprinkles or coconut | 1/4 cup (20g), for grass |
| Edible marker | 1 |
I crumble the chocolate cake and mix it with frosting until it’s kind of like dough. For decorating, I use the white chocolate, food coloring, and candy bones to make things look extra spooky.
Sometimes I swap out chocolate chips for melting wafers, just depends on what’s in the pantry. Thicker cookies make the best tombstones—they don’t fall over as easily.
Green sprinkles or colored coconut make awesome “grass.” The edible marker is great for doodling silly names or just “RIP.”
Instructions
First things first: I get all my supplies together so I’m not hunting for stuff halfway through.
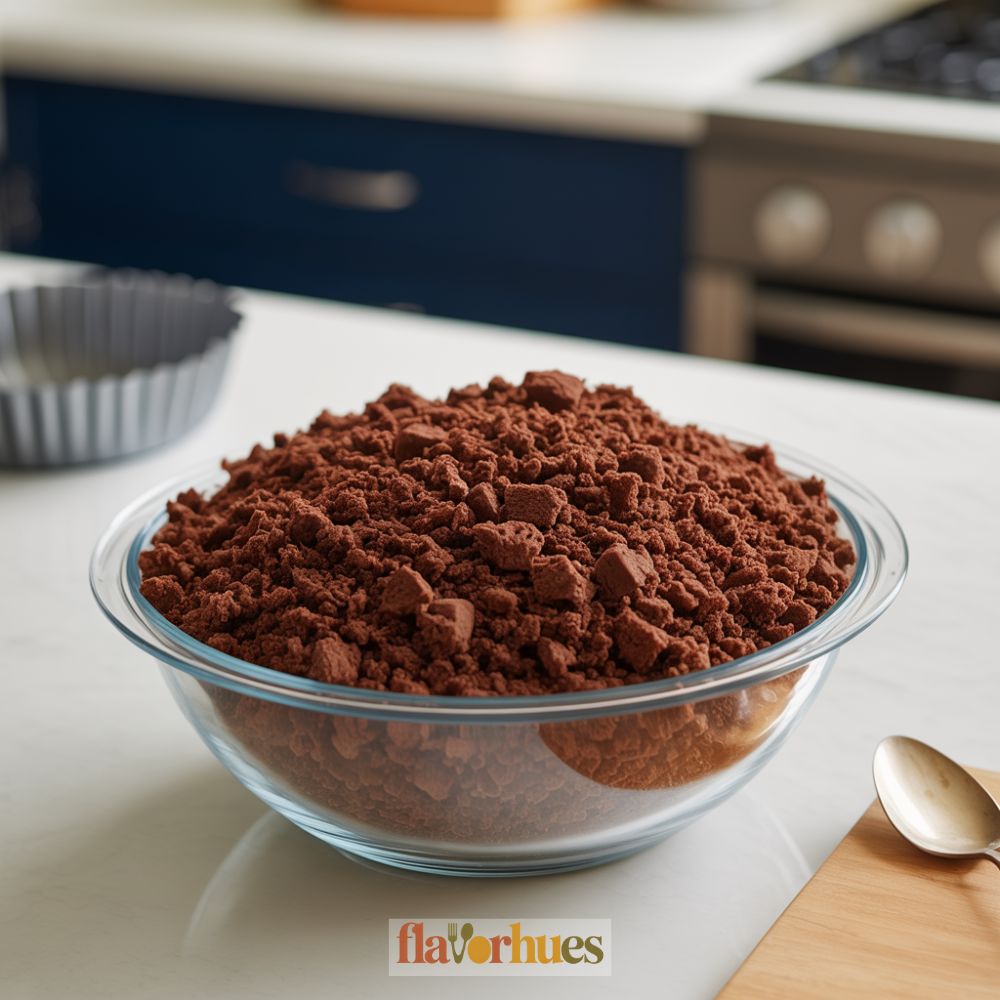
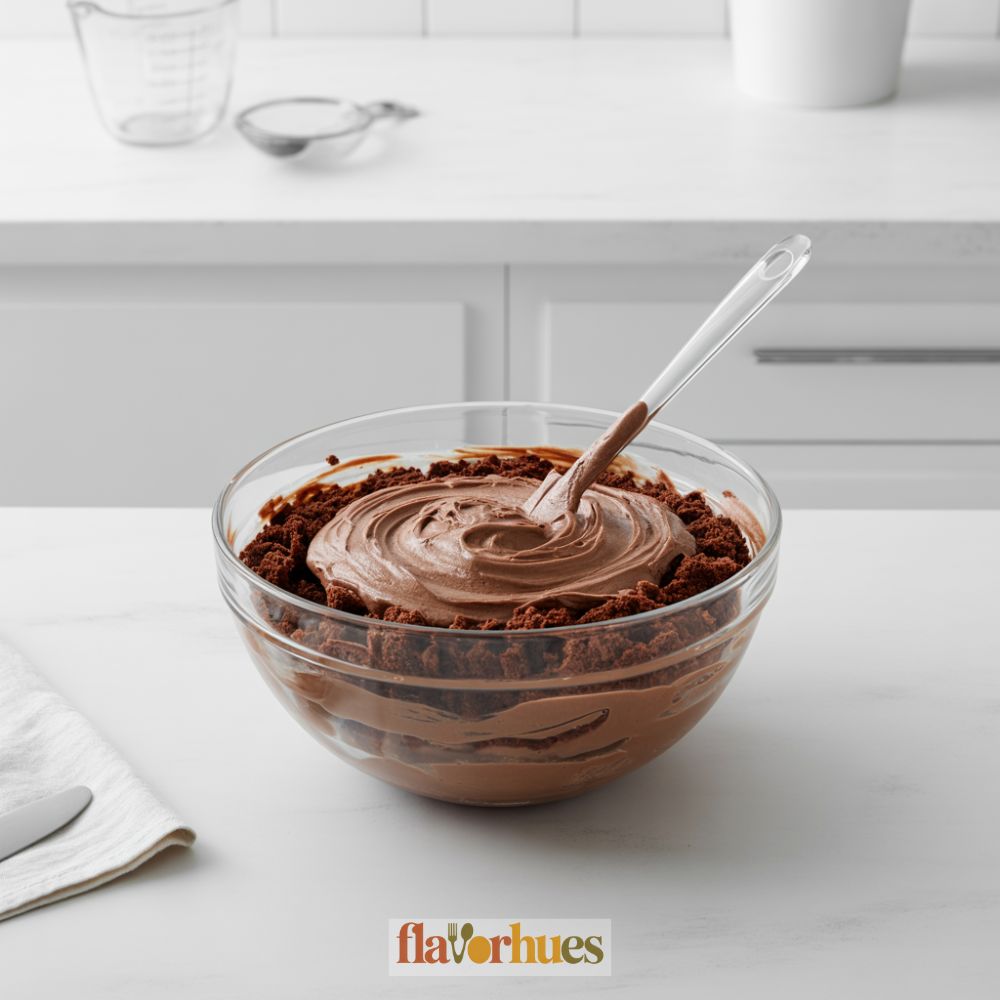
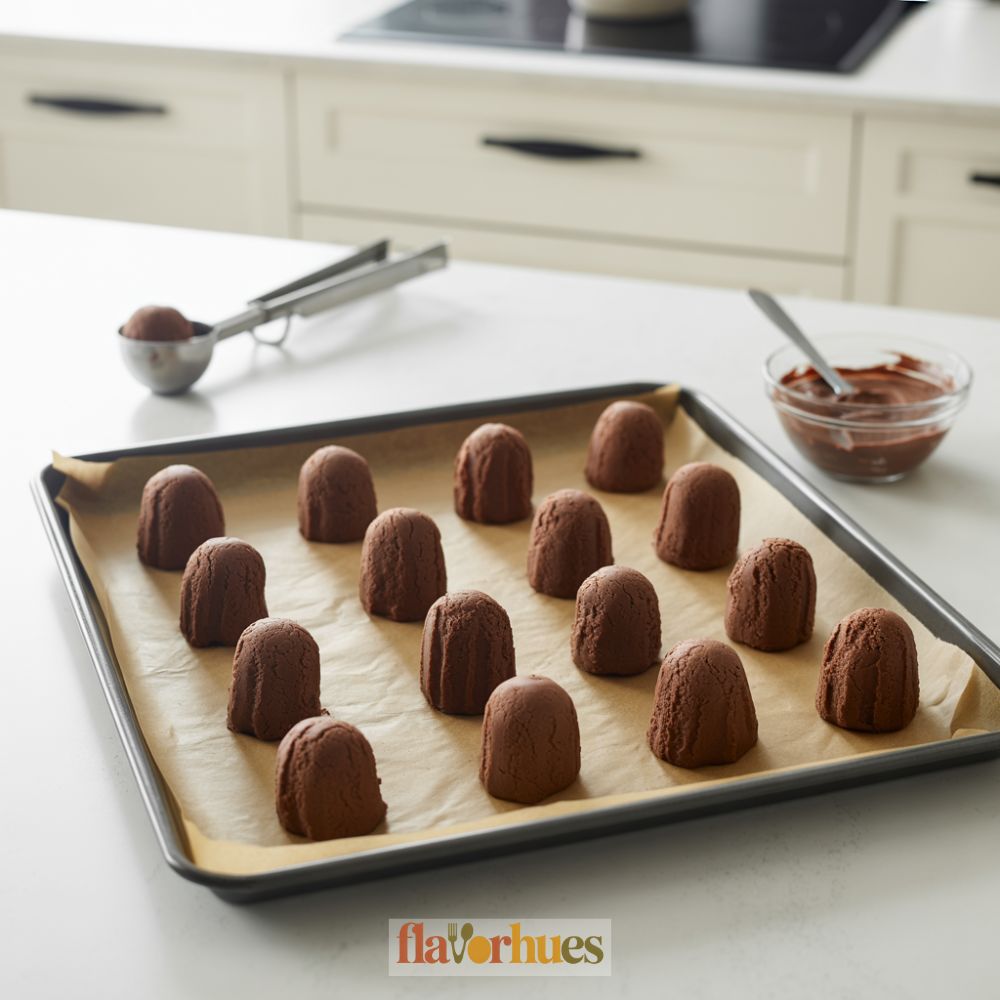
I break up the cooled cake into crumbs in a big bowl. Then I mix in the frosting and knead it until it feels like play-dough—messy, but kind of satisfying.
I scoop out little bits, roll them into balls, and squish them a bit so they look more like graves than spheres. Lollipop sticks go right in the middle.
I melt the candy melts in the microwave, stirring every half minute or so. When it’s smooth, I dip each cake pop and let the extra drip off.
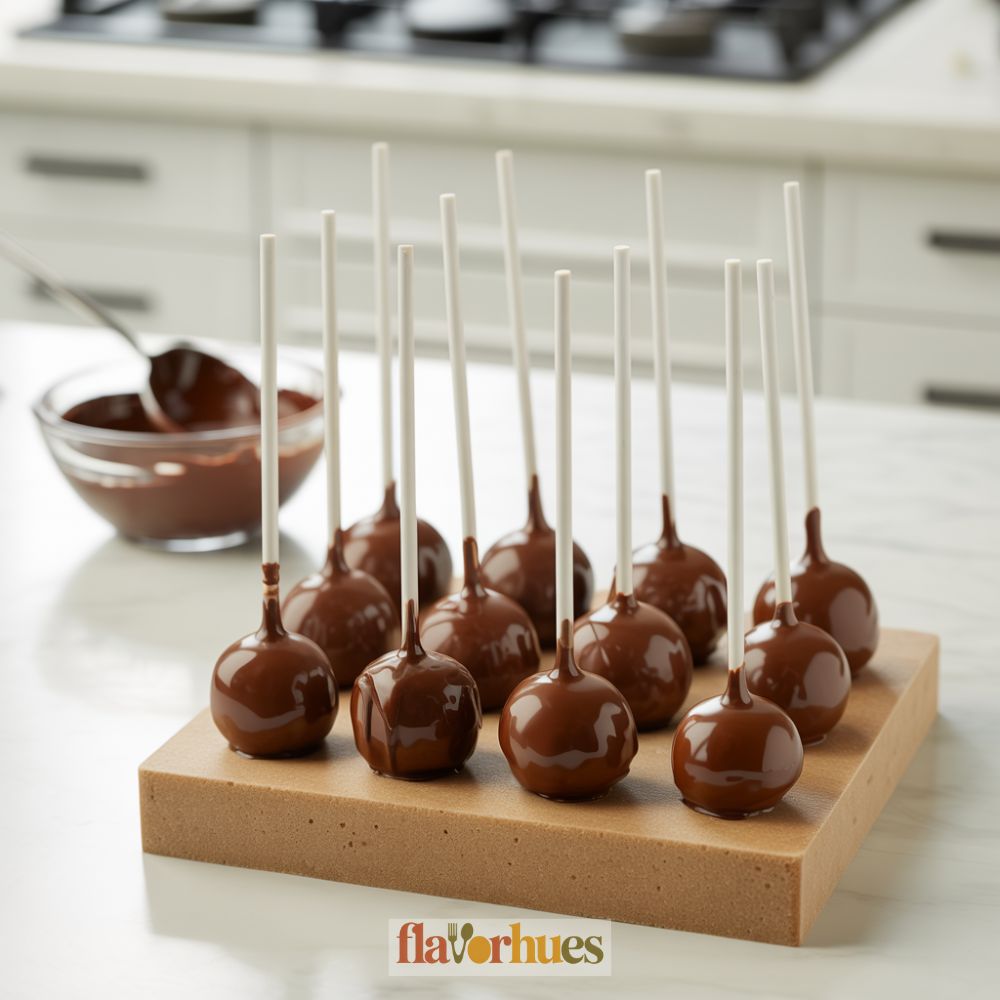
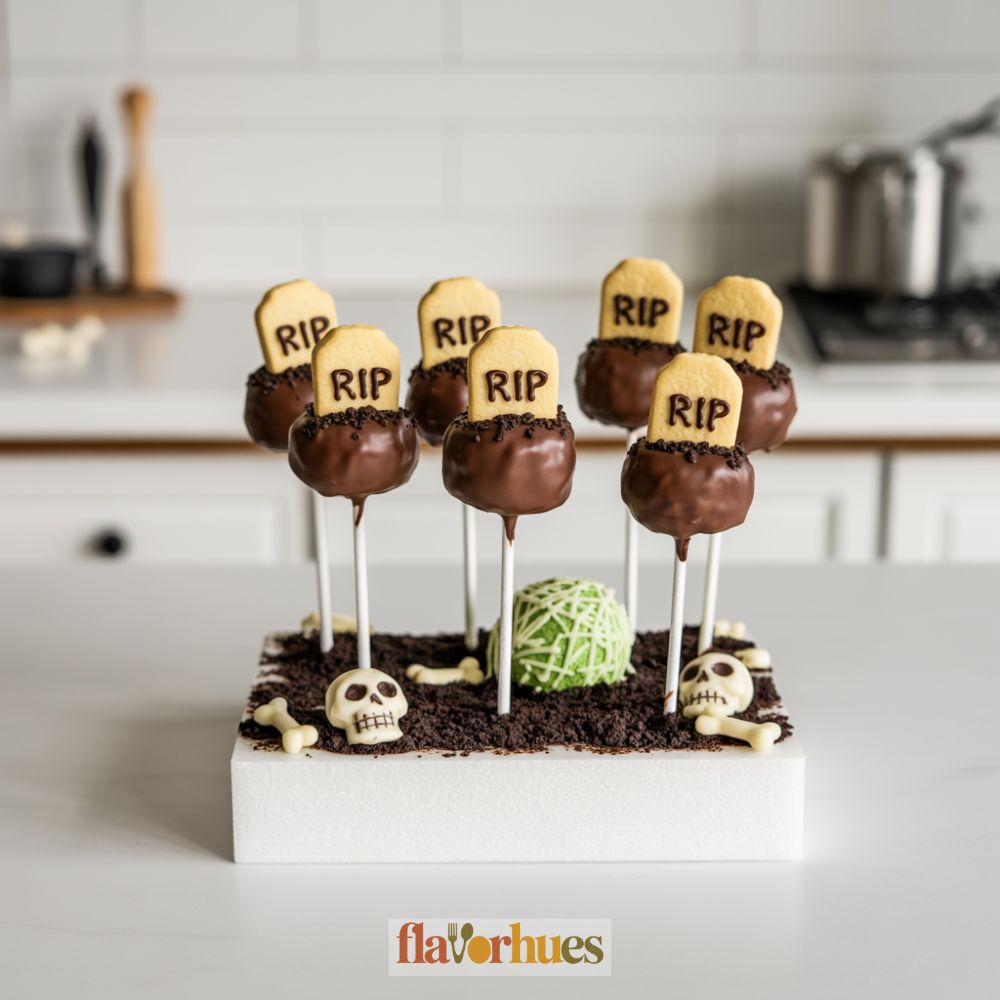
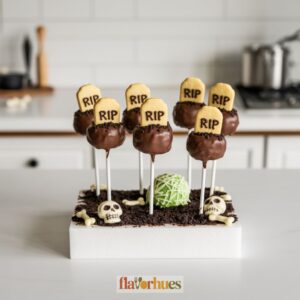
While the coating’s wet, I stick a cookie tombstone on top and sprinkle crushed cookies around the base for “dirt.” The black decorating gel is perfect for scribbling “RIP” or little faces on the tombstones.
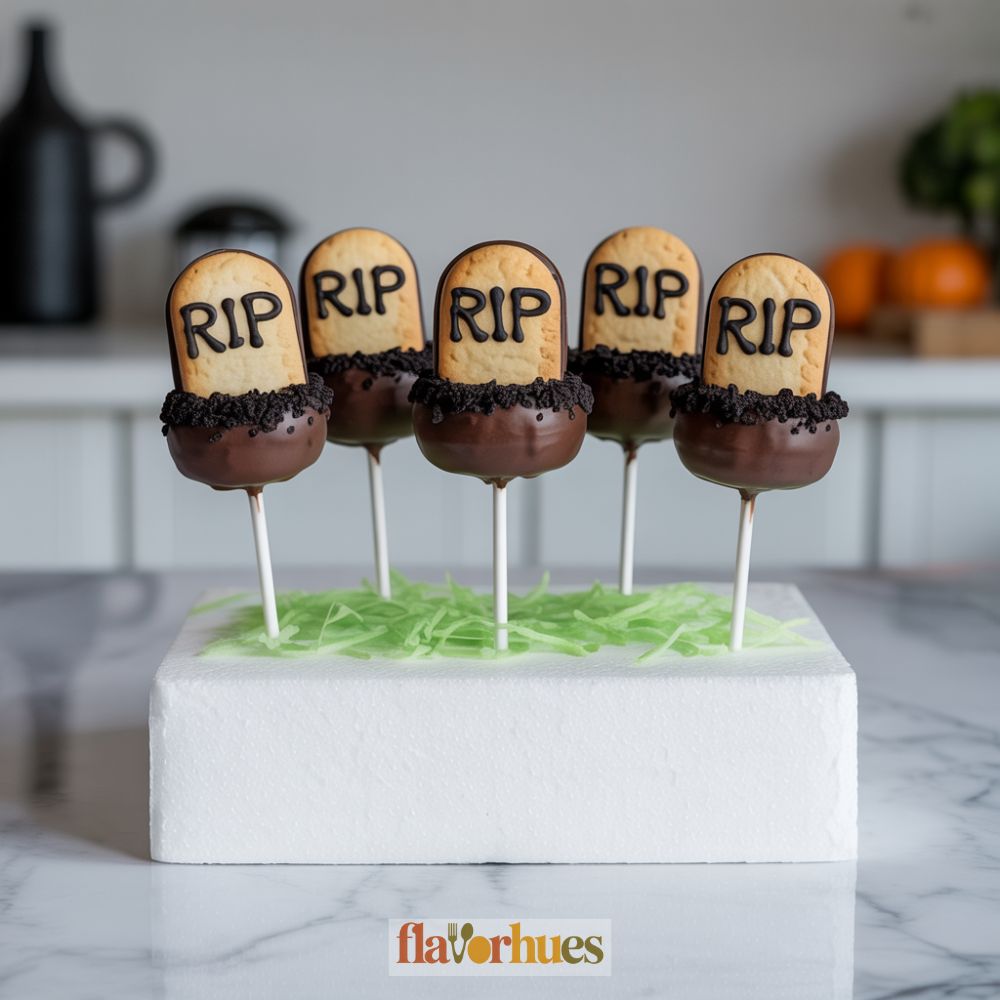
I let the cake pops dry upright in a foam block or stand. That’s it—they’re ready to go!
Decoration Tips
I try to keep decorating low-stress and fun. For these, gray candy melts give the tombstones a nice, classic stone vibe.
To write “RIP” or little messages, I use a black food marker, or sometimes just melted chocolate and a toothpick. No need to get too fancy.
Crushed chocolate cookies go around the base for a dirt effect. If I’m feeling it, some green coconut flakes make quick “grass.”
Here’s a quick cheat sheet:
| Ingredient | Amount | Use |
|---|---|---|
| Gray candy melts | 1 cup | Coat/tombstone shape |
| Crushed chocolate cookies | 1/4 cup | Dirt base |
| Green coconut flakes | 2 tbsp | Grass decoration |
| Black food marker/chocolate | For details | RIP/text/lines |
I let the cake pops dry upright so the decorations don’t smear. Smudged tombstones are a little too spooky for me.
Sometimes I toss on some mini bone sprinkles. Just a few—otherwise it gets crowded fast.
Equipment
- Spatula or spoon
- 8-inch cake pan (if baking cake)
- Small bowls for toppings
- Food-safe marker
- Foam block or cake pop stand (for drying)
Ingredients
- 15 oz chocolate cake baked and cooled
- 1/2 cup 120g cream cheese frosting
- 1 cup 175g milk chocolate chips or candy melts
- 1/2 cup 90g white chocolate chips (optional for decorations)
- A few drops black food coloring gel
- 20 lollipop sticks
- 1/2 cup 60g crushed chocolate cookies (for dirt)
- 10 rectangle-shaped cookies e.g., Milano
- 1 small pack candy bones or skulls
- 1/4 cup 20g green sprinkles or colored coconut (for grass)
- 1 edible food marker
Instructions
- Bake the Cake (if not pre-made): Bake chocolate cake according to box instructions. Let it cool completely.
- Crumble the Cake: In a large bowl, break the cooled cake into fine crumbs using your hands or a fork.
- Make Cake Pop Dough: Add cream cheese frosting to the crumbs and mix until it forms a dough-like consistency.
- Shape the Cake Pops: Scoop about 1–2 tablespoons of the mixture, roll into balls, then slightly flatten to form “grave” shapes.
- Insert Sticks: Gently insert lollipop sticks into each cake pop. Chill in the fridge for 30–60 minutes to firm up.
- Melt Chocolate: In a microwave-safe bowl, melt chocolate chips or candy melts in 30-second intervals, stirring in between until smooth.
- Coat the Cake Pops: Dip each cake pop into the melted chocolate, allowing excess to drip off.
- Decorate Tombstones: While coating is wet, press a rectangle cookie onto each pop as a tombstone.
- Add Dirt & Grass: Sprinkle crushed cookies around the base for dirt. Add green coconut or sprinkles for grass.
- Detail the Tombstones: Use a black food marker or decorating gel to write “RIP” or draw spooky faces.
- Dry: Stand the cake pops upright in a foam block or cake pop stand to dry and harden completely.
- Serve or Store: Once fully dry, serve immediately or store in an airtight container.
Creative Graveyard Tombstone Cake Pops Variations
I get bored easily, so I’m always switching up my Graveyard Tombstone Cake Pops. Here’s a few ways I make them stand out:
Sometimes I go for different colored candy melts on the tombstones. Gray and white are safe, but green, purple, or black? Those are fun for Halloween.
Ingredients List for Variations:
| Ingredient | Quantity |
|---|---|
| Chocolate cake | 2 cups crumbled |
| Vanilla frosting | 1/3 cup |
| Gray candy melts | 1 cup |
| Black decorating gel | 1 tube |
| Edible grass sprinkles | 2 tbsp |
| Green candy melts | 1/2 cup |
| Lollipop sticks | 12 |
| White candy melts | 1/2 cup |
| Mini candy pumpkins | 10-12 pieces |
Black or red gel works for writing “RIP” or drawing cracks. Mini candy pumpkins or gummy worms next to each pop take the graveyard look up a notch.
Sometimes I press edible grass sprinkles at the base for that overgrown vibe. Using green or white candy melts, I shape tombstones rounded or square—whatever feels right that day.
It’s all about mixing things up and having fun. No two batches ever look exactly the same, and honestly, that’s the best part.
Substitute
Sometimes I just don’t have everything I need for Graveyard Tombstone Cake Pops. When that happens, I reach for whatever’s close enough and hope for the best.
Here’s a quick table with some swap ideas:
| Original Ingredient | Substitute | Amount |
|---|---|---|
| Chocolate cake (1 box) | Vanilla cake (1 box) | 1 box |
| Cream cheese frosting (1 cup) | Chocolate frosting (1 cup) | 1 cup |
| Candy melts (8 oz) | White chocolate chips (8 oz) | 8 oz |
| Chocolate cookie crumbs (1/2 cup) | Crushed graham crackers (1/2 cup) | 1/2 cup |
| Rectangle cookies (8) | Graham cracker pieces (8) | 8 pieces |
If I’m out of candy melts, I just melt some white chocolate chips instead. I usually microwave them in 30-second bursts, stirring in between, until they’re smooth enough to use.
For cake flavor, sometimes I’ll go with vanilla cake instead of chocolate. It’s a lighter color, a little more subtle—honestly, it’s a nice change once in a while.
When I run out of cream cheese frosting, I just grab chocolate frosting from the fridge. It does the job and keeps everything together.
For decorations, graham crackers are my go-to if I don’t have those rectangle cookies. I just snap them into tombstone-ish shapes and call it good.
If I’m totally out of chocolate cookies for the “dirt,” I’ll crush up plain graham crackers and sprinkle those over the top. Not exactly the same, but it works in a pinch.
What Can Go Wrong?
Sometimes my cake pops just fall apart. This usually happens when I get carried away with the frosting and the mix ends up too wet.
Other times, I can’t get the pops to stay on the sticks. If the balls are too heavy or I get impatient and don’t chill them long enough, they’ll slide right off.
Cracking is another headache. If I dip cold cake pops into warm coating, sometimes they split. I try to let them sit out for a bit before dipping, but I’ll admit, I forget sometimes.
If the coating’s too thick, it can look lumpy or just drip everywhere. I’ll add a splash of vegetable oil and stir—usually that helps.
Here’s a little table for some common problems I run into:
| Problem | Possible Cause | Tip |
|---|---|---|
| Cake pop falls off stick | Too soft/too big | Chill longer, use less frosting |
| Coating cracks | Temperature change | Let cake pop warm up before dipping |
| Lumpy coating | Thick candy melts | Add oil, stir well |
Sometimes the decorations just won’t stick. I’ve found it helps to add them while the coating’s still wet—otherwise, good luck.
I try to double-check my ingredients list before I start. For my basic recipe, I use:
- 1 box (about 16 oz) chocolate cake mix
- 1/2 cup prepared chocolate frosting
- 2 cups candy melts
- 1 tablespoon vegetable oil
- 16 lollipop sticks
- Candy or icing for tombstone shapes
Storage And Shelf Life Tips
I always try to keep my Graveyard Tombstone Cake Pops as fresh as possible, and honestly, it’s all about storing them right.
After I finish decorating, I let the pops set until they’re completely firm. Then I tuck them into an airtight container—if they’re stacked, I usually toss a bit of wax paper between layers so the decorations don’t end up a smudgy mess.
Short-Term Storage:
- Room Temperature: Up to 2 days in a cool, dry spot, far from sunlight. I’d never leave them out on a sunny kitchen counter, that’s for sure.
- Refrigerator: Up to 1 week in an airtight container. It’s not my favorite method, but it works.
Long-Term Storage:
If I need to keep them around longer, the freezer’s my go-to. I wrap each cake pop in plastic wrap first, then pile them into a freezer bag.
- Freezer: Up to 1 month. Thawing them in the fridge overnight seems to work best, though sometimes I get impatient.
Here’s a quick reference table:
| Storage Method | Shelf Life | Tips |
|---|---|---|
| Room Temperature | 2 days | Use airtight container |
| Refrigerator | 1 week | Prevent condensation with wax paper |
| Freezer | 1 month | Wrap tightly and thaw slowly |
I always give them a quick sniff and check the texture before serving—just to be safe. Nobody wants a funky cake pop, right?