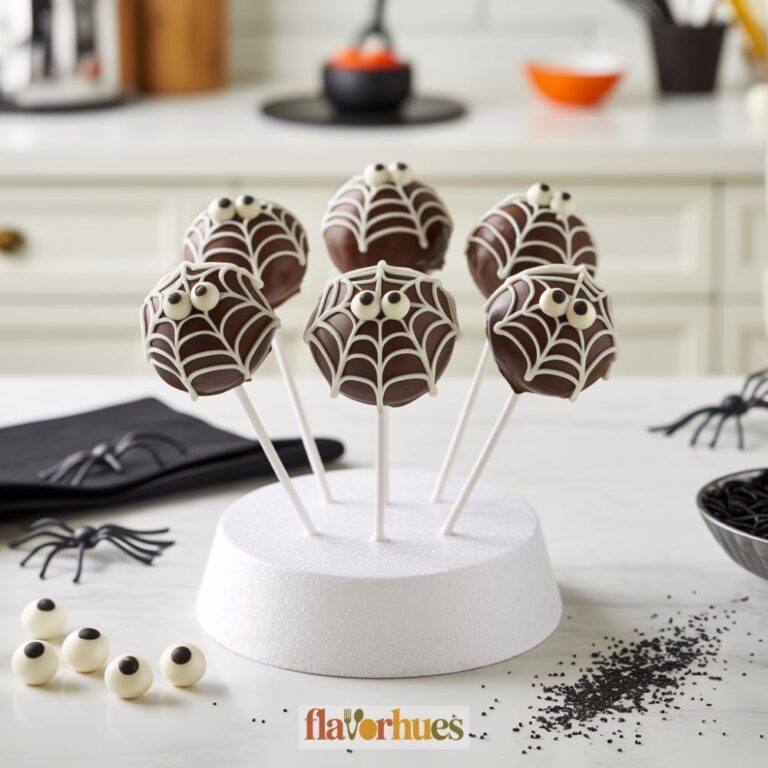
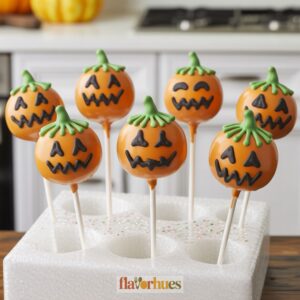
Glowing Candy Pumpkin Cake Pops Recipe
Glowing Candy Pumpkin Cake Pops are a fun and easy treat that light up your Halloween party table.
I love making these because they look amazing in the dark and are simple to put together, even if you don’t bake all the time.
The mix of sweet cake, orange chocolate, and a surprise glow is sure to impress both kids and adults.
Whenever I bring these cake pops to a get-together, everyone wants to know how I made them glow.
They’re perfect for school parties, family events, or just a fun night with friends. If you want a treat that stands out and tastes great, this recipe is a great choice.
You don’t need fancy tools to make these; most supplies are easy to find at the store.
With just a few basic ingredients and a little time, you can create treats that will be the talk of the party.
Why I Love Them
Glowing Candy Pumpkin Cake Pops make me smile every time I see them. They look fun and light up any dessert table.
My friends are always curious to try one when I bring them to a party. I enjoy making these cake pops because they’re easy and don’t take too long.
Sometimes, I even change the flavor by using chocolate cake instead of vanilla. The glowing effect really stands out in dim light.
It’s simple but looks cool and surprises people who don’t expect it. I love that anyone can help make them, even kids.
Baking together is one of my favorite ways to spend time with my family.
Equipment
For my Glowing Candy Pumpkin Cake Pops, I gather a few tools to make the process easy and fun.
Here’s what I use:
- Mixing bowls (two medium size)
- Measuring cups and spoons
- Electric hand mixer or whisk
- Spoon or spatula
- Baking sheet or tray
- Parchment paper
- Microwave-safe bowl
- Cake pop sticks (about 20)
- Styrofoam block or tall glass (for drying pops)
- Small paintbrush or food-safe brush
- Toothpicks
I also use a clean surface for shaping the cake balls, which helps keep the pops round. It really helps to have a microwave or double boiler for melting the candy melts.
Ingredients
To make my Glowing Candy Pumpkin Cake Pops, I use some simple baking ingredients that are easy to find.
Here’s what I need:
| Ingredient | Amount |
|---|---|
| Cake mix (vanilla or chocolate) | 1 box |
| Eggs | 3 large |
| Water | 1 cup |
| Vegetable oil | 1/2 cup |
| Frosting (store-bought or homemade) | 3/4 cup |
| Orange candy melts | 12 ounces |
| White candy melts | 8 ounces |
| Neon green gel food coloring | 1/2 teaspoon |
| Cake pop sticks | 24 |
| Edible black marker | 1 |
| Glow-in-the-dark edible dust (optional) | 1 teaspoon |
I start by baking the cake as the box says. I use eggs, water, and oil to make it soft and moist.
After the cake cools, I crumble it into a bowl. Then I mix in the frosting until I can shape the cake into balls.
I melt the orange and white candy melts in separate bowls. I add a little green food coloring to the white melts to make the pumpkin stems.
The glow-in-the-dark edible dust is optional, but I like that extra touch for a glowing effect. I use the edible marker to draw pumpkin faces at the end.
Instructions

First, I bake a cake following the instructions on my favorite box mix. I let it cool completely before moving to the next step.
I break the cake into small crumbs using my hands or a fork. Next, I mix in 1/3 cup of frosting until it forms a dough-like texture.
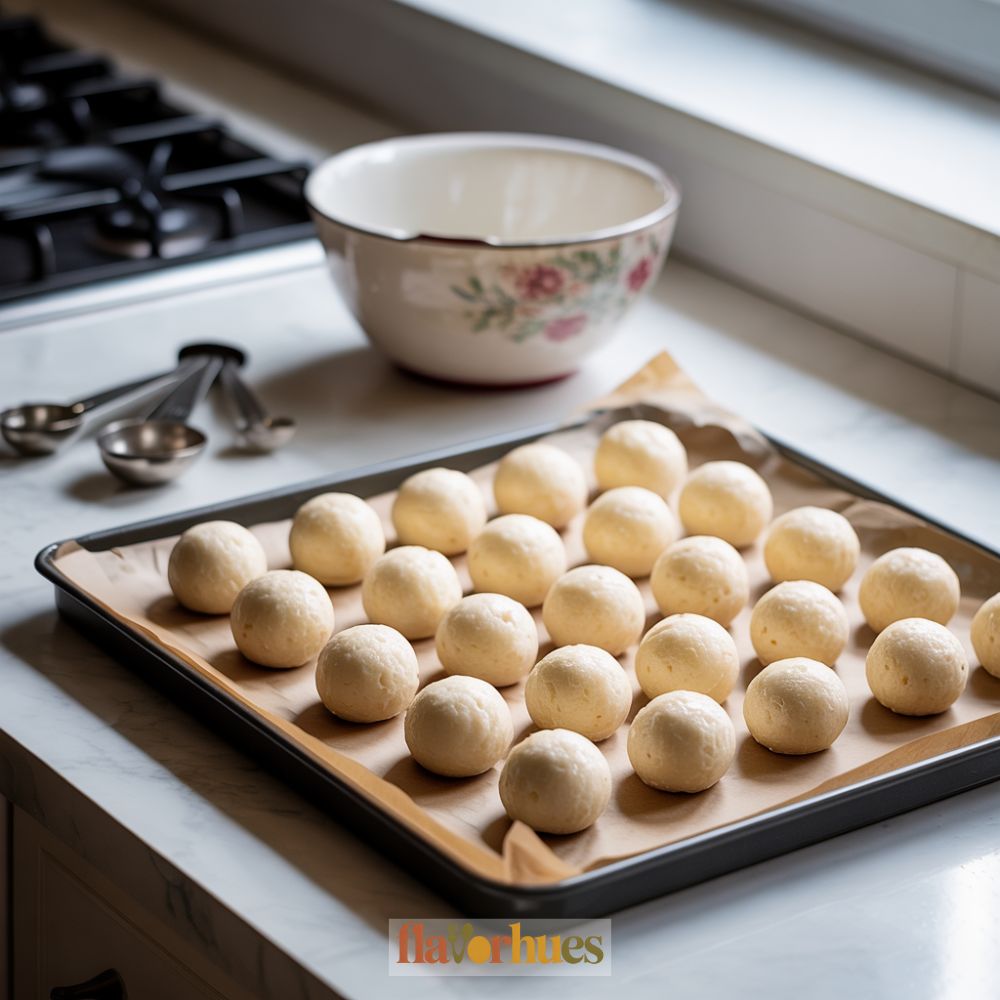
I roll the mixture into small balls, about 1.5 inches wide. I set the balls on a lined tray.
I melt 1 cup of orange candy melts in the microwave in 20-second bursts, stirring each time. I dip the tip of each lollipop stick into the melted candy, then push it halfway into a cake ball.
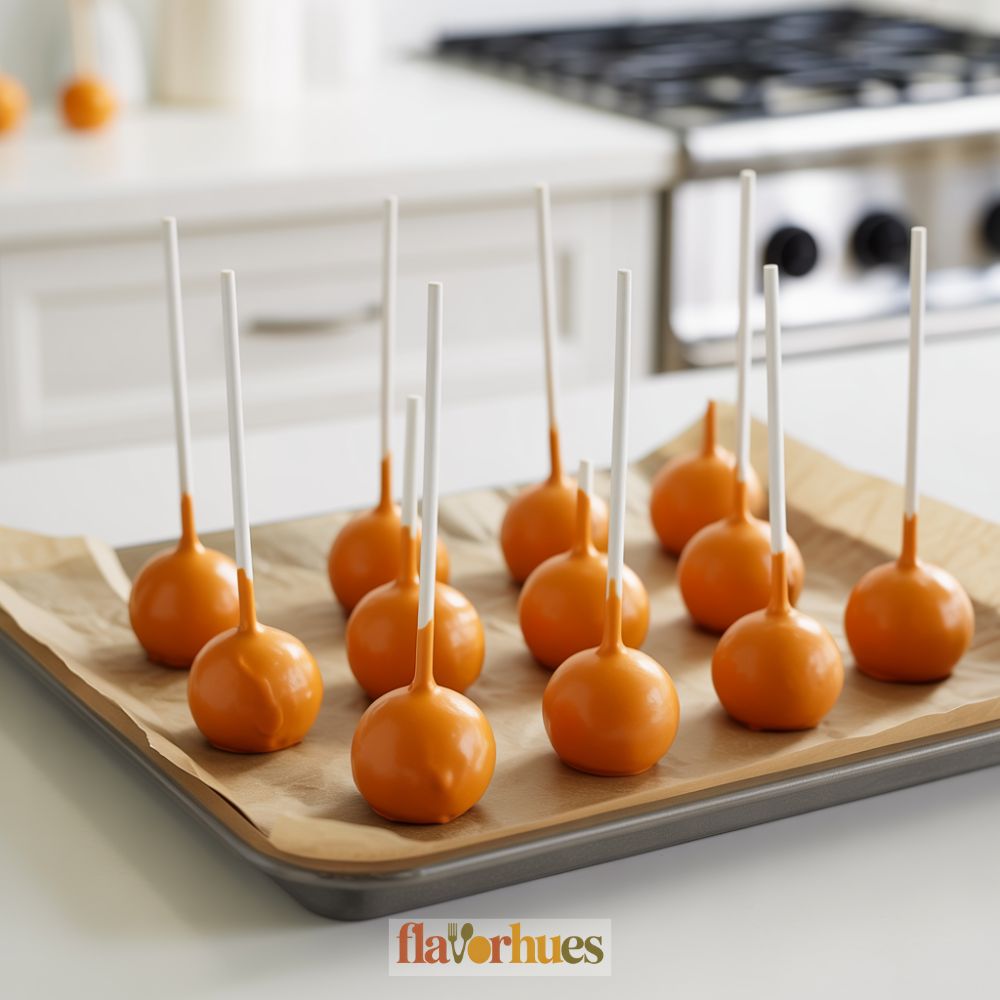
I chill the cake pops in the fridge for 30 minutes to make them firm. Once firm, I dip each cake pop fully into the orange candy coating.
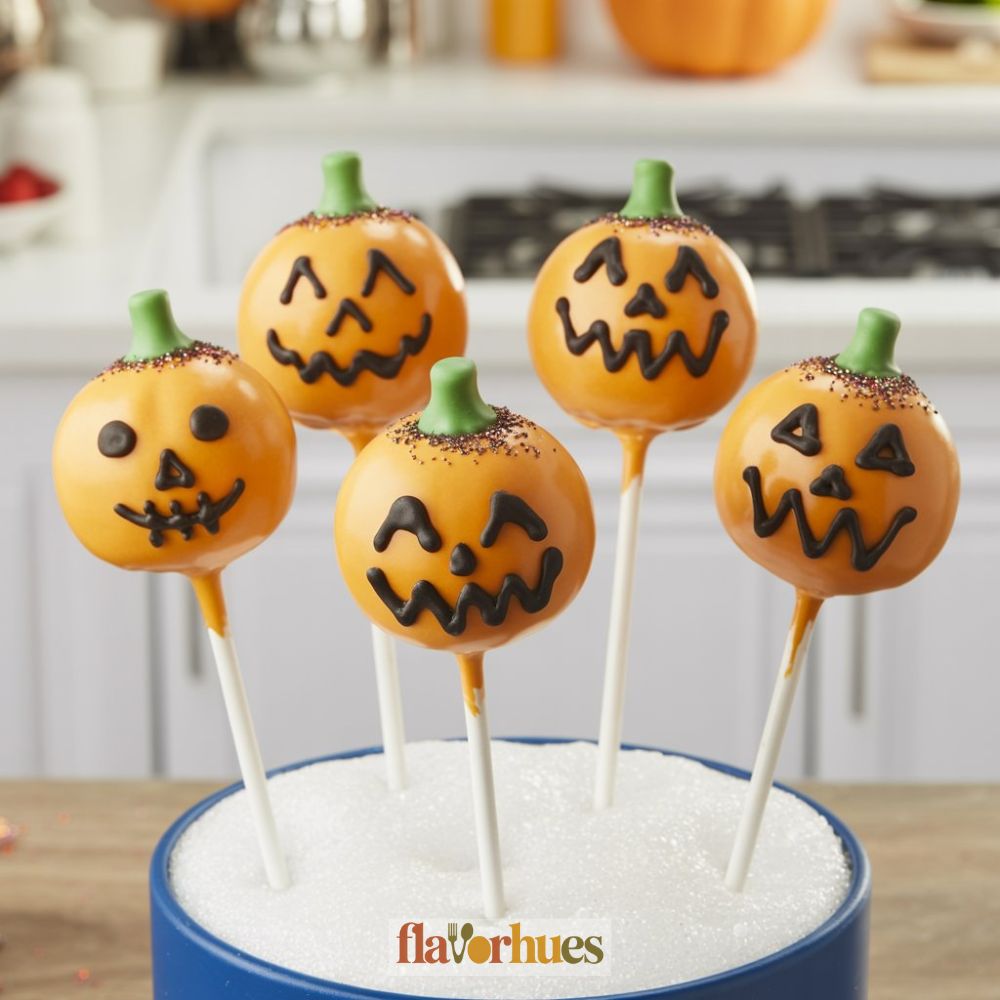
I let the extra drip off and stand them upright in a foam block to dry. To create the glowing pumpkin look, I use a small brush to paint thin lines with edible neon green gel around each pop.

If desired, I add small plastic leaves or a candy stem on top before the coating sets. Tip: If you want extra sparkle, sprinkle edible glitter on while the coating is wet.
Decoration Tips
I like to start by gathering all my decorating supplies before I begin. It makes things go smoother.
Here’s what I use to decorate 12 cake pops:
| Ingredient | Amount |
|---|---|
| White chocolate chips | 1 cup |
| Orange candy melts | 1/2 cup |
| Green candy melts | 1/4 cup |
| Edible glitter | 1 teaspoon |
| Lollipop sticks | 12 |
| Mini black icing pen | 1 (for faces) |
I melt the orange and green candy melts in separate bowls according to package directions. I dip each cake pop in orange first, then use a fork or toothpick to drizzle green on top for the pumpkin stem.
When the coating is still tacky, I sprinkle a bit of edible glitter for a glowing effect. Too much can make it messy, so I use just a pinch.
For the faces, I let the cake pops cool and harden. After that, I use a black icing pen to draw simple pumpkin faces like triangles for eyes and big smiles.
If I want to get creative, I might use small candies, like mini chocolate chips, for eyes. I press them in before the coating hardens.
Keeping the decorations simple makes the pops look clean and cute. I lay them on wax paper so they don’t stick while they dry.
Equipment
- Spoon or spatula
Ingredients
- 1 box vanilla or chocolate cake mix
- 3 eggs
- 1 cup water
- 1/2 cup vegetable oil
- 3/4 cup frosting store-bought or homemade
- 12 ounces orange candy melts
- 8 ounces white candy melts
- 1/2 teaspoon neon green gel food coloring
- 1 teaspoon glow-in-the-dark edible dust optional
- 24 cake pop sticks
- 1 edible black marker
For Decoration:
- 1 cup white chocolate chips
- 1/2 cup orange candy melts
- 1/4 cup green candy melts
- 1 teaspoon edible glitter
- 1 mini black icing pen for faces
Instructions
- Preheat oven and prepare the cake according to box instructions using eggs, oil, and water. Bake and let cool completely.
- Crumble the cooled cake into a large bowl using clean hands or a fork.
- Add 3/4 cup frosting and mix until a dough-like consistency forms.
- Roll into 24 small balls (about 1.5 inches wide) and place on a parchment-lined tray.
- Melt orange candy melts in a microwave-safe bowl in 20-second intervals, stirring between each.
- Dip the tip of each cake pop stick in melted candy, then insert halfway into each cake ball.
- Chill the tray in the refrigerator for 30 minutes until firm.
- Once chilled, reheat orange candy melts if needed and fully dip each cake pop to coat.
- Let excess drip off and insert upright into a Styrofoam block to dry.
- Melt white candy melts separately and tint with green gel food coloring to create a pumpkin stem coating.
- Using a small brush, paint green lines from top to sides for stem effect.
- Optionally, dust with edible glow powder while coating is still tacky for a glowing finish.
- Use a mini icing pen or edible marker to draw faces once the coating is dry.
- Add edible glitter or candy accents for extra sparkle.
- Let decorated pops dry on wax paper or stand in a drying block for 20–30 minutes before serving or storing.
Creative Glowing Candy Pumpkin Cake Pops Variations
I often like to try new ways to make my glowing candy pumpkin cake pops stand out. Changing up the colors and ingredients can create a whole new look.
Ingredients List for Fun Variations:
| Ingredient | Amount | Description |
|---|---|---|
| White chocolate | 200 grams | For dipping |
| Orange food gel | 1/4 teaspoon | For pumpkin color |
| Green fondant | 30 grams | Pumpkin stems |
| Candy eyes | 24 pieces | For faces |
| Edible glitter | 1/2 teaspoon | For glow effect |
| Cake crumbs | 400 grams | Any flavor |
| Cream cheese | 100 grams | To bind cake crumbs |
I use different colors of chocolate coating to make blue, yellow, or even “galaxy” pumpkins. Adding edible glitter or dust can also give each cake pop a magical touch.
Sometimes, I shape the tops with green fondant leaves or make funny faces with candy eyes. Some of my friends like to add tiny candy hats or even mustaches for a silly twist.
For a brighter glow, I roll the pops in edible glow-in-the-dark powder. If I want a candy crunch, I sprinkle them with crushed candy or mini chocolate chips.
Trying out mini pops is fun too. I just use less cake for each ball and make bite-sized treats.
This way, guests can enjoy more flavors and styles in one go.
Substitute
Sometimes I run out of certain ingredients when making Glowing Candy Pumpkin Cake Pops. Luckily, there are some easy swaps.
Cake Base Alternatives:
If I don’t have yellow cake mix, I use chocolate or vanilla cake mix. Both work pretty well, honestly.
Frosting Options:
No cream cheese frosting? I just grab a cup of chocolate frosting or vanilla frosting instead. The flavor’s a little different, but it’s still good.
Glow Effect:
For the glow, if edible glow-in-the-dark dust isn’t around, I mix about a tablespoon of tonic water with half a cup of white chocolate and brush it on. The quinine in tonic water helps the pops glow under a black light, which is kind of neat.
Candy Coating Picks:
If I’m out of orange candy melts, I melt white chocolate chips (8 ounces) and stir in orange food coloring. For green stems, I’ll use green gummy candy or pretzel sticks dipped in green candy melts. Both do the trick.
Here’s a list of possible substitutions:
| Original Ingredient | Substitute | Amount |
|---|---|---|
| Yellow cake mix (1 box) | Chocolate/vanilla cake mix | 1 box |
| Cream cheese frosting | Chocolate/vanilla frosting | 1 cup |
| Orange candy melts (8 oz) | White choc. chips + color | 8 oz + coloring |
| Green candy melt (2 oz) | Green gummy/pretzel sticks | 2 oz |
| Edible glow dust | Tonic water (for white choc) | 1 Tbsp + 1/2 cup |
What Can Go Wrong?
Making glowing candy pumpkin cake pops is fun, but I’ve found a few things can cause trouble. Here are some problems I’ve run into and how to spot them.
Cake Pop Cracks
Sometimes, when I chill the cake pops too long, the coating cracks. Dipping cold pops into warm candy melts? That temperature jump makes cracks show up fast.
Falling Off the Sticks
If my cake balls are too big or not packed firm enough, they might fall off the sticks. I try to keep each pop about 1 to 1.5 inches wide and really press the mixture together before adding the stick.
Lumpy or Uneven Coating
I melt the candy coating slowly, but sometimes it’s too thick. Thinning it with a tablespoon of vegetable oil per 12 oz (340g) of candy melts helps the coating go on smoother.
Highlights of Mistakes
| Problem | Possible Cause |
|---|---|
| Cracked coating | Cake too cold, coating too hot |
| Falling off stick | Cake too heavy, not firm enough |
| Dull “glow” effect | Not enough glow powder or unevenly spread |
| Sticky pops | Humidity, not enough chilling |
Tip: I use about a tablespoon of edible glow powder for every 24 cake pops. If you don’t spread it evenly, some pops just won’t glow much under blacklight.
Sometimes my decorations smudge if I touch them before they’re dry. I try to let each pop sit at least 20 minutes after decorating, but sometimes I get impatient—worth the wait, though.
Storage And Shelf Life Tips
I always let my cake pops cool completely before storing them. It just seems to help keep the coating from getting sticky or damaged, which is honestly the last thing you want after all that work.
To keep them fresh, I store cake pops in an airtight container. If it’s warm out, I’ll usually put a layer of wax paper between each layer of pops.
This helps stop them from sticking together, which can be a real pain if you’re trying to serve them later.
Here’s my quick storage guide:
| Storage Type | How Long They Last | Notes |
|---|---|---|
| Room Temperature | 1-2 days | Best for same-day serving |
| Refrigerator | 1 week | Keeps them firmer |
| Freezer | Up to 1 month | Wrap each pop tightly first |
I always make sure to keep cake pops away from direct sunlight and heat. That really helps the glowing candy coating stay looking bright and cheerful.
When freezing, I wrap each cake pop in plastic wrap and then add foil.
This keeps them from getting freezer burn, which nobody wants.
I also label the container with the date so I know how long they’ve been stored. That way, I don’t forget and can enjoy my glowing candy pumpkin cake pops while they’re still fresh!