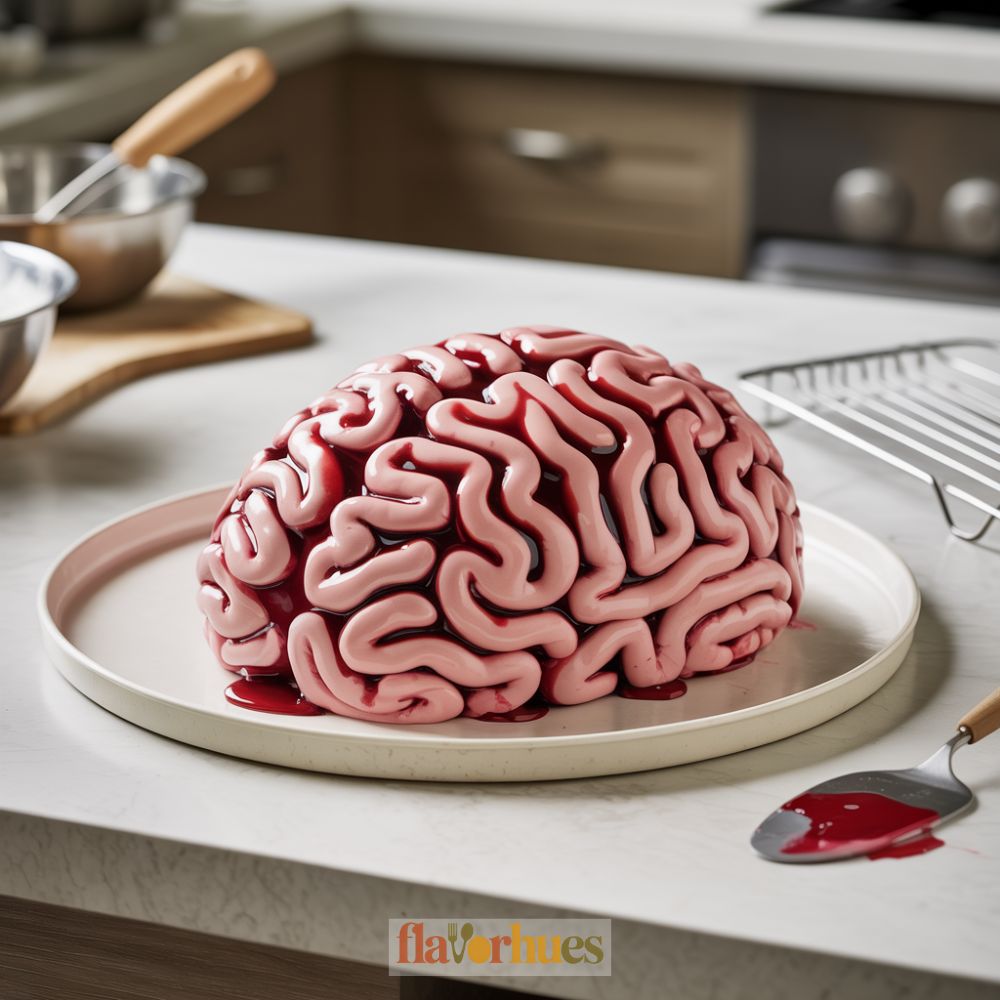
Brain Cake Recipe: Fun and Easy Dessert for Halloween
Making a brain cake always gets people talking. It looks spooky but tastes delicious, and it’s perfect for Halloween or any party where you want a fun surprise.
With just a few basic baking tools and clear steps, I can help you create a realistic brain cake at home.
I’m excited to share my tips for making this dessert. From shaping the cake to coloring the “brain” details, I’ve tried different methods to get it just right.
Anyone can follow this recipe, even if you’re not an expert baker.
There’s something special about serving a cake that gets a few gasps and a lot of smiles.
Keep reading to see how easy it is to make a brain cake that looks cool and tastes even better.
Why I Love Them
I love making Brain Cake because it’s both fun and a little spooky. It’s perfect for Halloween or themed parties.
When I bring this cake to gatherings, it always starts conversations.
The look of the cake is unique and silly. Shaping the top like a brain with fondant or frosting makes people smile and sometimes laugh.
I like seeing everyone’s reactions when they realize it’s just a tasty cake inside.
Making Brain Cake helps me enjoy baking even more. It combines creativity with simple steps, so I don’t need to be a professional baker to make something special.
Equipment
To make a brain cake, I gather a few basic tools from my kitchen. I recommend having these items nearby before getting started.
- Mixing bowls (at least two, medium and large)
- Electric mixer or whisk
- Measuring cups and spoons
- 9-inch round cake pans (I use two)
- Rubber spatula
- Offset spatula (helps with frosting)
- Parchment paper
- Serrated knife (for shaping the cake)
- Food coloring (to create the “brain” look)
- Rolling pin (if using fondant)
- Piping bag with round tip (for frosting details)
I like to line my cake pans with parchment paper to help with easy removal. An offset spatula makes frosting smoother, and a piping bag is a must for the brain design.
If I want an even more realistic cake, I use a bit of red food coloring for extra detail.
Ingredients
To make my brain cake, I gather all the ingredients before I start. Having everything ready helps a lot.
Here’s what I use for the cake layers:
- 2 cups All-purpose flour
- 1½ cups Sugar
- 1 tablespoon Baking powder
- ½ teaspoon Salt
- 1 cup Unsalted butter (softened)
- 4 large Eggs
- 1 cup Milk
- 2 teaspoons Vanilla extract
For the frosting and decorations, I add:
- 3 cups of powdered sugar
- 1 cup of unsalted butter (softened)
- 2 tablespoons of milk
- Pink and red food coloring
- 1 tube of red decorating gel
I find it helpful to also have a brain-shaped cake mold or a small bowl to help form the brain look.
If I want to add fillings, I use:
- 1 cup of raspberry jam (for a realistic effect)
I make sure to set all ingredients on the counter first. This way, I don’t forget anything later on.
Instructions
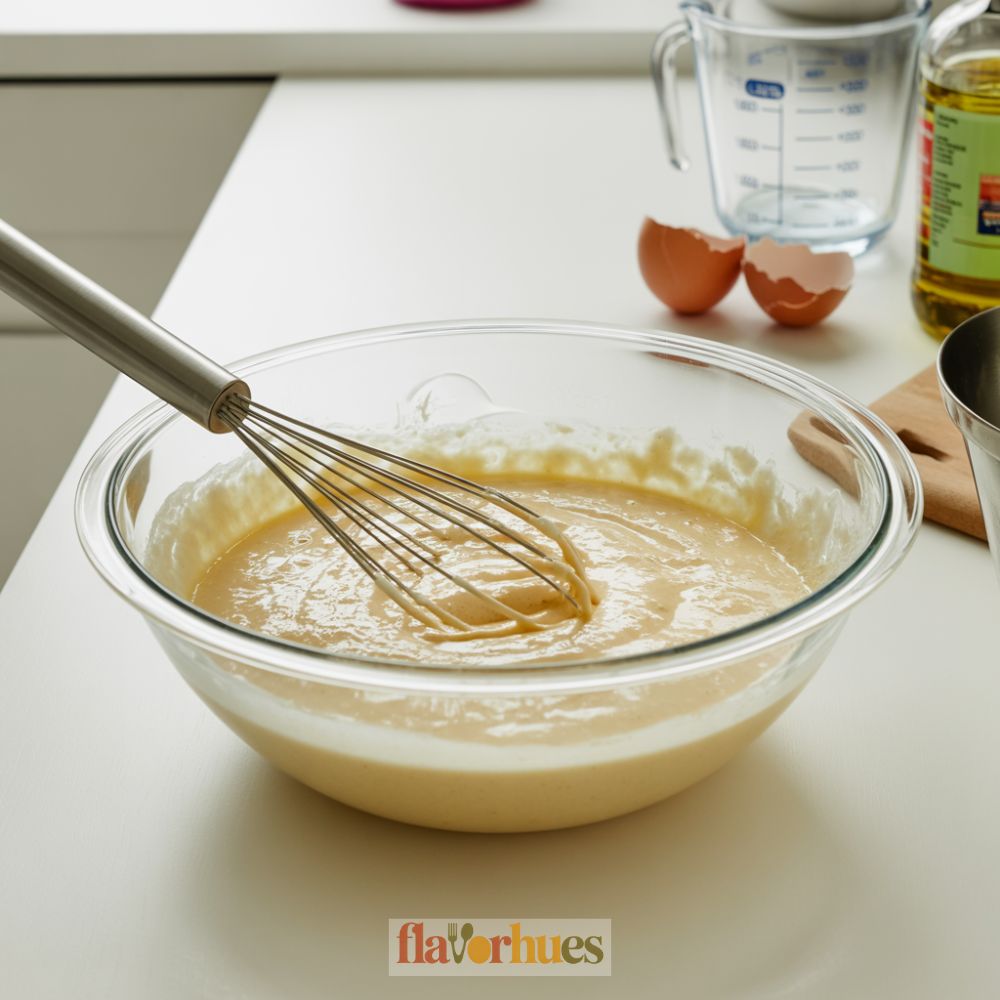
First, I preheat my oven to 350°F (175°C) and grease a round cake pan. I like to use nonstick spray so the cake comes out easily.

I mix the cake batter by following the box instructions using 1 box white cake mix, 3 egg whites, 1 cup water, and 1/3 cup vegetable oil.
I pour the batter into the prepared pan.
Next, I bake the cake for about 30-35 minutes. I check with a toothpick to see if it comes out clean.

Once baked, I let the cake cool completely on a wire rack.
While the cake cools, I make the frosting. For this, I blend 1 cup softened butter, 2 cups powdered sugar, 1 teaspoon vanilla extract, and 2 tablespoons milk until smooth.
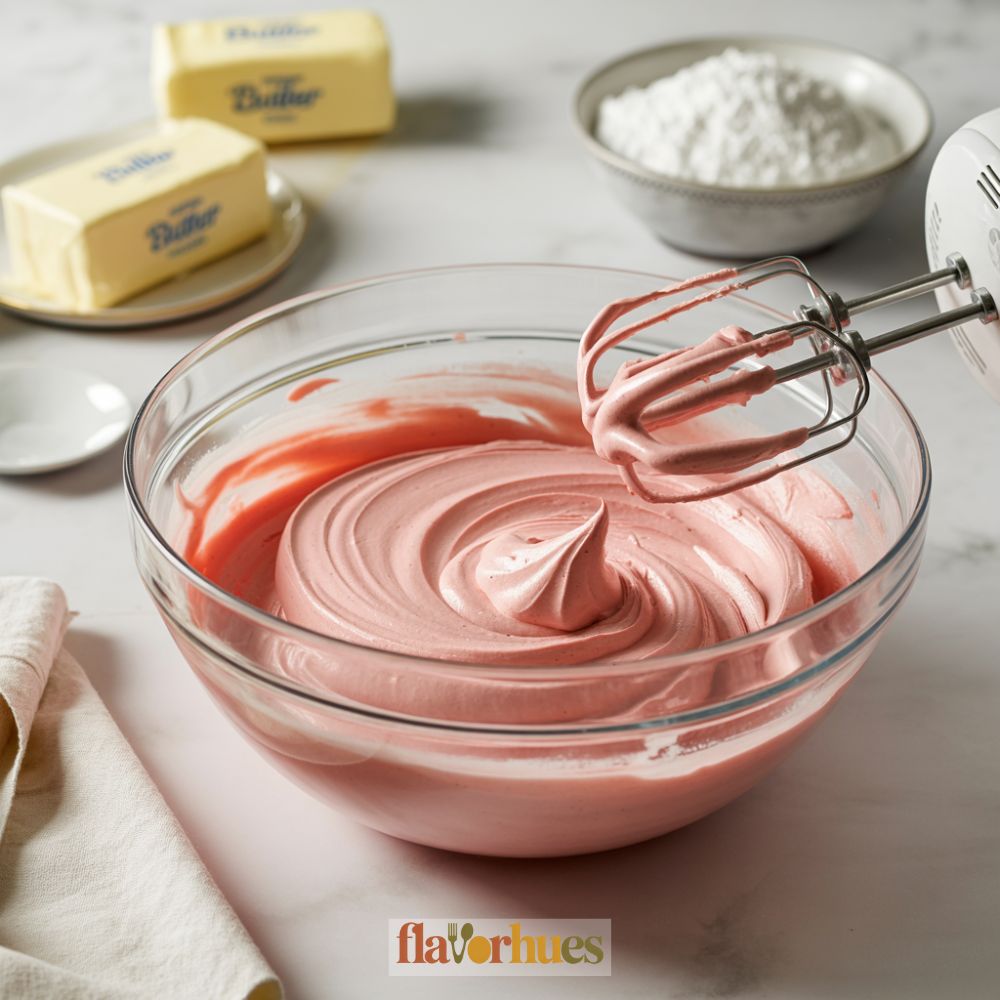
Now comes the fun part—decorating. I place the cooled cake on a tray.
I use a knife to carve a brain shape, then cover it with a thick layer of white or pink frosting.
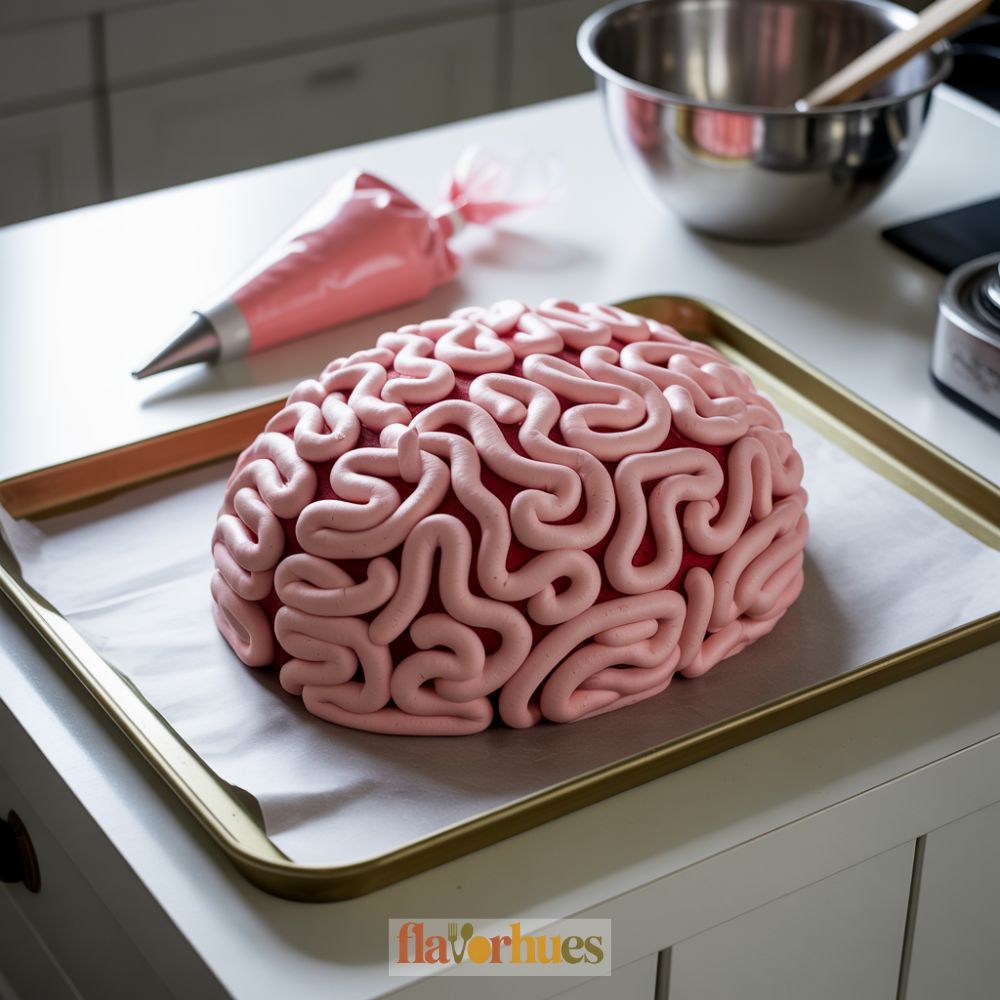
To create the brain look, I put more frosting in a piping bag. I pipe squiggly lines all over the cake to look like brain folds.
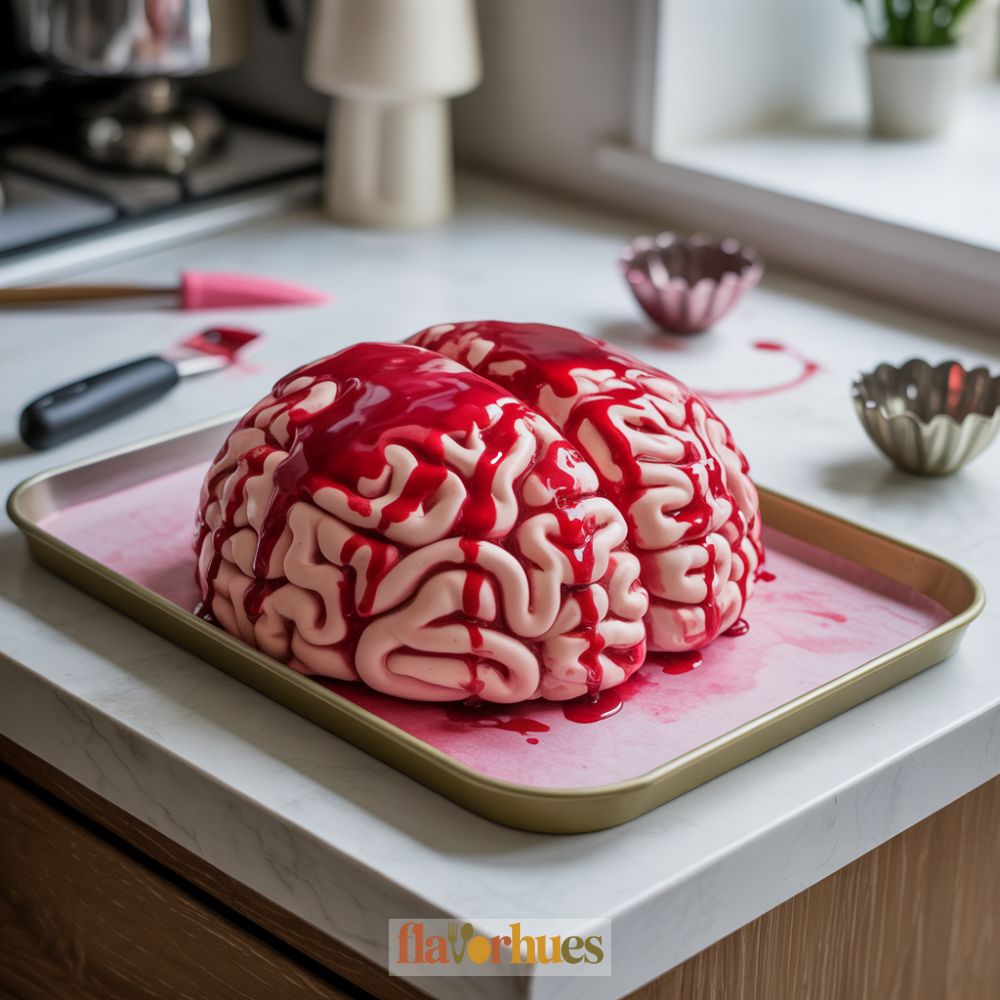
Finally, I add a few drops of red gel food coloring or raspberry syrup on top to make it look a little creepy. I keep the cake in the fridge until I am ready to serve.

Equipment
- electric mixer or whisk
- Two 9-inch round cake pans
- Offset spatula
- Serrated knife
- Food coloring
- Piping bag with round tip
Ingredients
For the Cake:
- 2 cups all-purpose flour
- 1½ cups sugar
- 1 tablespoon baking powder
- ½ teaspoon salt
- 1 cup unsalted butter softened
- 4 large eggs
- 1 cup milk
- 2 teaspoons vanilla extract
For the Frosting and Decoration:
- 3 cups powdered sugar
- 1 cup unsalted butter softened
- 2 tablespoons milk
- Pink food coloring
- Red food coloring
- 1 tube red decorating gel
- 1 cup raspberry jam optional, for filling
Alternate Cake Base (Boxed Option):
- 1 box white cake mix
- 3 egg whites
- 1 cup water
- ⅓ cup vegetable oil
Instructions
- Preheat oven to 350°F (175°C). Grease and line two 9-inch round cake pans with parchment paper.
- In a large bowl, cream together butter and sugar until light and fluffy.
- Add eggs one at a time, beating well after each addition.
- Mix in vanilla extract.
- In a separate bowl, whisk together flour, baking powder, and salt.
- Alternately add dry ingredients and milk to the butter mixture, mixing until just combined.
- Pour batter evenly into prepared pans.
- Bake for 30–35 minutes, or until a toothpick inserted comes out clean.
- Let cakes cool in the pans for 10 minutes, then transfer to wire rack to cool completely.
- While cakes cool, make frosting: beat 1 cup butter, 3 cups powdered sugar, 2 tablespoons milk, and a few drops of pink food coloring until smooth.
- Once cool, trim and carve cakes into a domed brain shape using a serrated knife.
- Place cake on a tray. Spread a layer of frosting over entire surface.
- Fill piping bag with pink frosting and pipe squiggly brain folds across the top and sides of the cake.
- Add drips of red gel or raspberry jam between folds for a gory effect.
- Chill in refrigerator until ready to serve.
Substitute
Sometimes I run out of certain ingredients or want to make my brain cake friendlier to different diets. Luckily, there are easy substitutes for most items.
If I don’t have cake flour, I use the same amount of all-purpose flour and take out 2 tablespoons per cup. Then, I add 2 tablespoons of cornstarch for each cup I removed.
This keeps the cake soft.
For people who can’t have eggs, I mix 1 tablespoon of flaxseed meal with 3 tablespoons of water to replace each egg. I let it sit a few minutes until it gets thick.
Here’s a quick reference table for common substitutes:
| Ingredient | Amount | Substitute |
|---|---|---|
| Cake flour | 2 cups | 2 cups all-purpose + 4 tbsp cornstarch (remove 4 tbsp flour) |
| Eggs | 3 | 3 tbsp flaxseed + 9 tbsp water (let rest) |
| Butter | 1 cup | 1 cup margarine or coconut oil |
| Milk | 1 cup | 1 cup almond or soy milk |
If I want the brain cake to be vegan, I use non-dairy milk and margarine instead of dairy milk and butter. I also double-check decorations—some food colorings have animal products.
Trying these substitutions helps keep the cake tasty and fun, no matter what I have in my kitchen.
What Can Go Wrong?
Sometimes, the brain cake just doesn’t come out looking how I pictured it. The lines can blur, or the colors might bleed together in weird ways.
If I go overboard with the food coloring, the shade turns dark or kind of muddy instead of that weird, fleshy brain-pink everyone expects. It’s a fine line, honestly.
Getting the cake out of the pan is another gamble. When I forget to grease the pan properly, chunks of cake stick and tear as I try to get it out.
Overbaking? That’s another thing. The cake turns out dry, and nobody wants a dry brain.
Piping the “brain” design has its own set of headaches. If the frosting is too soft, it won’t hold any shape and just gets all runny.
But if the frosting’s too stiff, it’s a struggle to squeeze out. Sometimes it even breaks while I’m decorating, which is just the worst.
Here’s a quick table of common problems and fixes:
| Problem | What Went Wrong | Quick Fix |
|---|---|---|
| Colors run | Too much food coloring | Add less coloring next time |
| Cake sticks | Pan not greased or floured | Grease and flour pan well |
| Frosting melts | Cake too warm when frosting | Cool cake completely first |
Sometimes I test a little food coloring or frosting on the side, just to see what I’m getting into. Mixing slowly and paying attention usually saves me from total disaster—well, most of the time.