Bat-Shaped Salami Bites Charcuterie Board Recipe
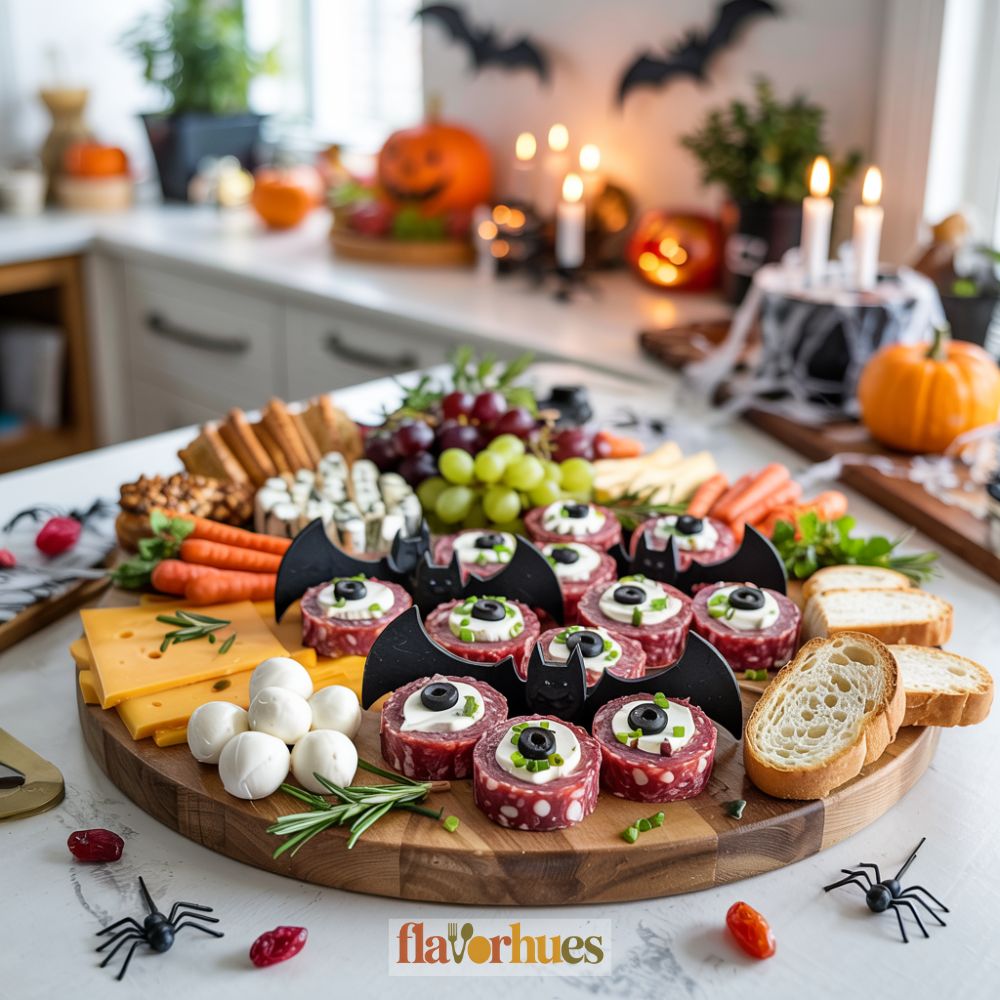
If you’re looking for a fun way to make your snack table stand out, you’ll probably love my Bat-Shaped Salami Bites Charcuterie Board Recipe.
This easy guide shows you how to make bite-sized salami bats that look cute and taste delicious. I use just a couple of simple tools and ingredients to turn regular salami slices into playful shapes that everyone will want to try.
Whenever I serve these at parties or family gatherings, people always ask how I made them.
I like how the bat shapes add a touch of fun, and you don’t need special cooking skills to get the look just right.
Kids and adults both seem to enjoy the surprise of seeing their favorite meat turned into something creative.
All you need is some salami, cheese, crackers, and a bat-shaped cookie cutter to get started.
I’ll show you the exact amounts I use for a crowd and give tips for arranging everything on the board.
You’ll have an eye-catching appetizer that’s quick, tasty, and sure to get people talking.

Why I Love Them
I really enjoy making these bat-shaped salami bites because they’re simple and fun.
The bat shapes look cute, but they’re honestly easy to cut out using a cookie cutter. This makes the recipe perfect for parties or holidays like Halloween.
These bites don’t need any fancy ingredients.
I already have most of what I need at home, like crackers and cheese. The salami gives a nice, salty flavor that goes well with all kinds of snacks.
My favorite part is watching kids and guests smile when they see the bat shapes.
It always starts a conversation and makes the table look extra festive.
It’s also fun to change things up each time.
Sometimes I use different kinds of cheese, or even add olives for eyes. This keeps it interesting and lets me be a little creative in the kitchen.
Clean up is fast, which I always appreciate.
Because the bites are small, they work well for snacking without making a mess.
Equipment
For this recipe, I use a few basic tools from my kitchen.
Most of them you might already have at home.
Here is what I need:
- Bat-shaped cookie cutter
- Medium cutting board
- Chef’s knife (for slicing cheese and extras)
- Small bowls or ramekins (for dips or nuts)
- Serving platter or charcuterie board
The bat-shaped cookie cutter is the most important part.
It helps me create the fun salami shapes.
A medium cutting board makes it easy to cut the cheese and arrange everything before moving it to the serving platter.
I also need a sharp chef’s knife. With it, I can cut cheese slices, vegetables, or any other toppings.
Sometimes, I use small bowls or ramekins to hold spreads, mustard, or nuts.
They help keep things neat.
At the end, I arrange everything on a large serving platter or a wooden charcuterie board to display the bites nicely.
If you want to check, here’s a quick table of what I use:
| Item | Purpose |
|---|---|
| Bat-shaped cutter | Cut salami into shapes |
| Knife | Slice cheese and extras |
| Cutting board | Prep ingredients |
| Small bowls | Hold dips or nuts |
| Serving platter | Assemble and display the board |
Ingredients
Here are the ingredients I use to make my Bat-Shaped Salami Bites Charcuterie Board.
All amounts serve about 6 people.
Salami Bites
- 24 thin slices of salami
- 4 ounces cream cheese
- 12 small pitted black olives
- 1 tablespoon chopped chives
Cheese and Extras
- 6 ounces cheddar cheese, sliced
- 4 ounces mozzarella balls (bocconcini)
- 1 cup red grapes
- 1 cup baby carrots
Crackers and Bread
- 1 cup mini crackers
- 8 slices of baguette, toasted
Decorative Touches
- 2 sprigs fresh rosemary
- 1/4 cup dried cranberries
I like to use a bat-shaped cookie cutter (about 2.5 inches wide) for the salami slices.
It’s optional, but it makes the bites look extra fun.
Here’s a simple table for quick reference:
| Ingredient | Amount |
|---|---|
| Salami slices | 24 |
| Cream cheese | 4 oz |
| Black olives | 12 small |
| Chives | 1 tbsp, chopped |
| Cheddar cheese | 6 oz, sliced |
| Mozzarella balls | 4 oz |
| Red grapes | 1 cup |
| Baby carrots | 1 cup |
| Mini crackers | 1 cup |
| Baguette slices | 8, toasted |
| Rosemary | 2 sprigs |
| Dried cranberries | 1/4 cup |
I find these ingredients easy to get at most grocery stores.
If I want to change things up, I can swap cheeses or veggies for favorites.
Instructions
First, I lay out my work area with parchment paper.
I use a small bat-shaped cookie cutter to cut salami slices into bat shapes. I press down firmly for clean edges.
Next, I arrange the bat-shaped salami bites in the center of my board.
I make sure the bats do not overlap so each one stands out.
I place cheese cubes, crackers, and nuts around the bats.
I keep each food in its own section, making a fun pattern.
If I have small bowls for dips or olives, I put them at the corners.
I use toothpicks or small forks for easy serving.
To add color, I scatter a few grapes or sliced vegetables on the board.
I sometimes tuck in a few sprigs of fresh herbs for a fresh look.
Finally, I check the board to see if anything needs a little adjustment.
I make sure everything is easy to reach. Then my Bat-Shaped Salami Bites Charcuterie Board is ready to enjoy!
Decoration Tips
I like to use a big wooden board to set everything up.
It makes the bat shapes easy to see and gives me plenty of space.
For a fun touch, I place the bat-shaped salami bites in the center.
I fan them out so the “wings” look like they’re flying across the board.
Cheese slices work best when I cut them into stars and moons using small cookie cutters.
I think it adds a playful, night-sky look.
To add color, I fill small bowls with olives, grape tomatoes, and green grapes.
I place these around the bats for balance.
Here’s a quick table of decoration ideas:
| Item | Placement Tip |
|---|---|
| Bat salami | Center, fanned out |
| Cheese shapes | Scattered between bat bites |
| Grapes | Edges or small piles |
| Olives | In tiny bowls or loose clusters |
| Crackers | Stacked on the side |
I sometimes sprinkle fresh parsley or basil leaves for a bit of green.
For a Halloween party, I use mini toy spiders or paper bats, keeping them separate from the food.
Arranging everything with space between items makes the board tidy and simple for guests to pick their favorites.

Equipment
- Bat-shaped cookie cutter (2.5 inches wide)
- Small bowls or ramekins (for dips or nuts)
Ingredients
Salami Bites
- 24 thin slices salami
- 4 oz cream cheese
- 12 small pitted black olives
- 1 tbsp chopped chives
Cheese and Extras
- 6 oz cheddar cheese sliced
- 4 oz mozzarella balls bocconcini
- 1 cup red grapes
- 1 cup baby carrots
Crackers and Bread
- 1 cup mini crackers
- 8 slices baguette toasted
Decorative Touches
- 2 sprigs fresh rosemary
- 1/4 cup dried cranberries
Instructions
- Use a bat-shaped cookie cutter to press into salami slices and cut out bat shapes. Press down firmly to get clean edges.
- Place bat-shaped salami bites in the center of your serving board, fanned out slightly so they look like they’re flying.
- Slice cheddar into fun shapes (optional) and place with mozzarella balls around the bats. Add crackers and toasted baguette slices in small piles nearby.
- Scatter red grapes and baby carrots around the board to add color and variety.
- Place dips, olives, or nuts in ramekins or small bowls and set them around the edges of the board.
- Add sprigs of rosemary, sprinkle dried cranberries, and adjust everything to look balanced. Keep items separated for neatness and easy snacking.
- Serve immediately or cover the board with plastic wrap until ready to serve to keep ingredients fresh.
Creative Bat-Shaped Salami Bites Charcuterie Board Recipe Variations
I like to switch things up when making my bat-shaped salami bites.
Using different cheeses or breads can give the board a new flavor each time.
Flavor Ideas:
- Cheddar or provolone instead of mozzarella
- Add spicy jalapeños under the salami
- Swap crackers for thinly sliced baguettes
A fun twist is using other deli meats.
I tried pepperoni, turkey, and even ham for variety. They all held their shape well.
Here’s a quick table with ideas:
| Salami Bites Add-In | Ingredient Amount |
|---|---|
| Mini pickles (cornichons) | 10 pieces |
| Sliced black olives | ¼ cup |
| Roasted red peppers | ½ cup, thinly sliced |
| Cream cheese | 4 tablespoons |
I sometimes use herbed goat cheese instead of cream cheese.
It adds a little tang.
For a sweet touch, I drizzle a bit of honey (about 1 tablespoon) over the bites.
There’s a lot I can do with these bats. Mixing and matching keeps the board interesting.
Substitute
Sometimes I run out of salami or want to try something new.
Here are some easy swaps:
- Turkey Pepperoni: Gives a similar look and is lower in fat.
- Ham Slices: Easy to shape and mild in taste.
- Roast Beef: For a different flavor, I use thin slices.
If you want a vegetarian option, try these:
- Smoked Tofu: Slice it thin and cut into bat shapes.
- Cheese Slices: Cheddar or Swiss work well and are fun to cut.
Here’s a quick table:
| Substitute | Flavor | Shape Difficulty |
|---|---|---|
| Turkey Pepperoni | Savory | Easy |
| Ham Slices | Mild | Easy |
| Roast Beef | Rich | Medium |
| Smoked Tofu | Smoky | Medium |
| Cheese Slices | Mild/Creamy | Very Easy |
When I use softer options like tofu or cheese, chilling them first makes cutting shapes much easier.
For those with allergies, I check labels for gluten or nuts. Some packaged meats and cheeses may include them.
I always encourage creativity! Trying new substitutes can make my bat-shaped bites unique every time.
What Can Go Wrong?
Sometimes, my bat shapes just lose their form and end up looking more like blobs. This usually happens if my knife isn’t sharp enough, or if I press too hard when I’m cutting.
I always try to use cookie cutters if I have them.
If I cut the salami too thick, the shapes get really hard to arrange on the board. Too thin, and they might rip—never fun.
I try to aim for slices about 1/4 inch thick. Any thinner and things get messy fast.
Cheese can dry out so quickly. If I prep the board too early and leave it uncovered, my cheese turns hard or gets all sweaty.
I always cover it with plastic wrap until it’s time to serve. That helps, but sometimes I still get anxious about it drying out.
When I pick garnishes, I admit I sometimes choose things that just don’t match the flavors. To avoid this, I stick with foods I already know pair well with salami and cheese.
Here’s a quick list of mistakes I try to avoid:
- Using dull tools
- Cutting pieces too thick or thin
- Leaving the board in the open air for too long
- Using too many strong-flavored items
Forgetting to add crackers or bread can make it tough for guests to actually eat the meat and cheese. I always throw in some small crackers or toast rounds on the side—otherwise, what’s the point?


