Mini Candy Corn Cheesecakes Recipe
I love making desserts that are both fun and delicious, so these mini candy corn cheesecakes are a favorite of mine.
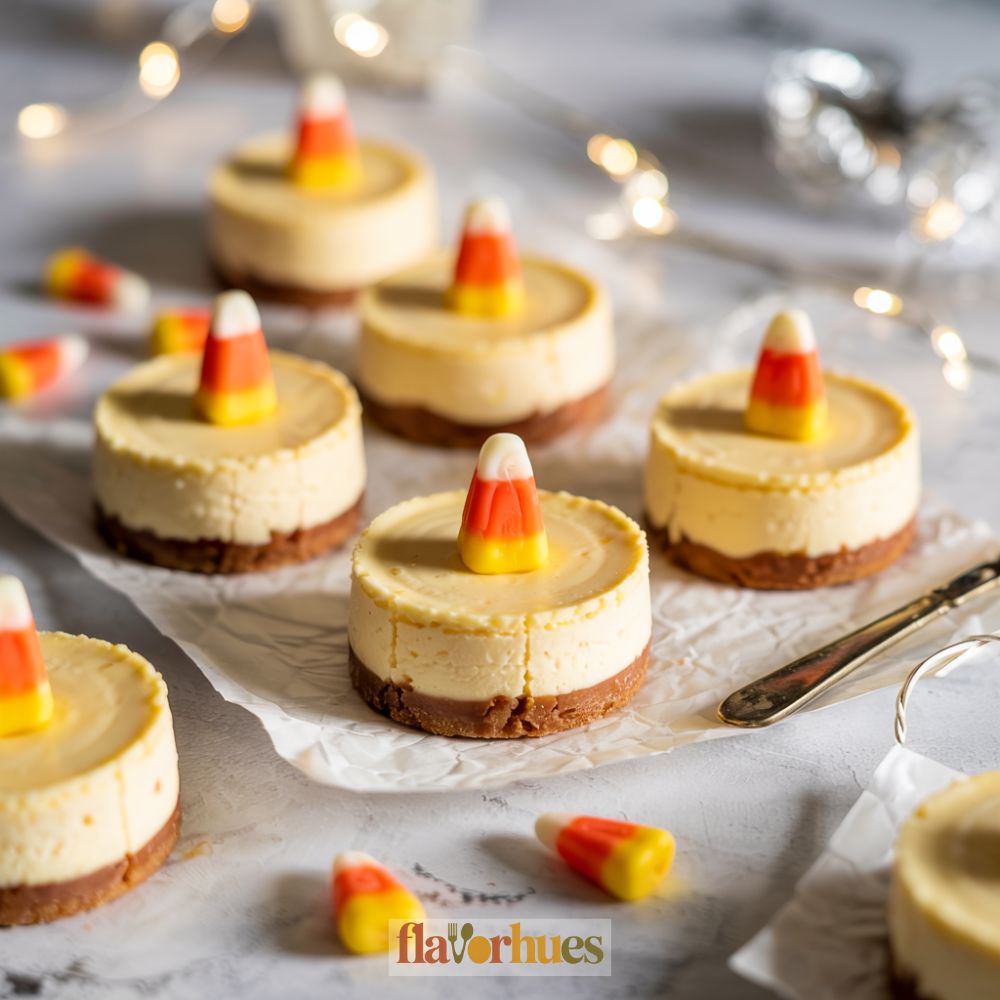
These bite-size cheesecakes are layered and colored to look just like candy corn, making them perfect for Halloween parties or fall gatherings.
Each one has a creamy cheesecake filling and a buttery graham cracker crust.
Making mini cheesecakes is much easier than you might think, and the candy corn theme brings a festive twist.
I’ll show you step-by-step how to get the bright candy corn colors and how to bake them just right.
You don’t need any fancy equipment—just a muffin tin, simple ingredients, and a little bit of food coloring.
Why I Love Them
Mini candy corn cheesecakes bring together fun colors and tasty layers. Every time I make them, they remind me of fall and Halloween.
The candy corn cheesecake mousse is creamy and light. I love how it isn’t too sweet, so the candy corn flavor really shows through.
Each bite has a smooth and fluffy texture that feels special. I like making them because each mini cheesecake is the perfect size.
Cleanup is simpler, and everyone gets their own treat without having to cut slices. Here are a few more reasons I enjoy these cheesecakes:
- They look playful with bright layers.
- Kids and adults both reach for them at parties.
- I can try new flavors, like chocolate cheesecake, for variety.
Making these mini cheesecakes feels creative and fun. I love watching the layers come together.
Decorating the tops with candy corn always makes me smile.
Equipment
For my mini candy corn cheesecakes, I use a handful of basic kitchen tools. These make the process easier and help my cheesecakes turn out just right.
I always start with a nonstick mini muffin pan. This gives the cheesecakes their cute, small size.
I also use paper or silicone liners so the cheesecakes don’t stick. A hand mixer or stand mixer is very helpful.
It mixes the cream cheese until it’s smooth and creamy. I prefer a hand mixer because it’s easy to use.
Here’s a quick list of what I need:
- Mini muffin pan
- Paper or silicone liners
- Hand or stand mixer
- Mixing bowls (at least two)
- Measuring cups and spoons
- Rubber spatula
- Small spoon or cookie scoop
I like using a cookie scoop to portion the cheesecake batter. This makes every mini cheesecake the same size.
For the layers, I use separate bowls for each color. This keeps the batter neat and helps me layer the orange, yellow, and white sections for the candy corn look.
A rubber spatula is perfect for scraping every bit of batter from the bowls. I also use a small spoon for smoothing and layering the batter in each cup.
It’s a simple setup, but it really helps. I double-check that I have everything ready before I start.
Ingredients
When I make mini candy corn cheesecakes, I start by gathering all my ingredients. Having everything ready makes the process simple and fun.
Here’s what I use for these cheesecakes:
- 8 oz (softened) Cream cheese
- ½ cup Powdered sugar
- 2 tablespoons Milk
- 1 teaspoon Vanilla extract
- 1 cup Cool Whip
- 12 (store-bought or homemade) Sugar cookies
- ½ cup Candy corn
- ¼ cup Chocolate chips (optional)
Cream cheese is the base for the filling. I make sure it’s soft before I mix it.
Powdered sugar helps make the cheesecake filling sweet but smooth. I add a little milk and vanilla extract for flavor.
Vanilla gives a warm taste that goes great with cream cheese. Cool Whip makes the cream light and fluffy.
I like to use sugar cookies as the crust because they’re sweet and buttery. Candy corn adds the classic fall look and taste.
Sometimes, I like to sprinkle a few chocolate chips on top for an extra treat. These are all the ingredients I need to make the mini cheesecakes look and taste like candy corn.
Instructions

First, I preheat my oven to 325°F (163°C) and line my mini muffin pan with mini cupcake liners. This helps the cheesecakes come out easily and keeps everything neat.
For the crust, I mix crushed graham crackers with melted butter in a small bowl. I press about a teaspoon of the mixture into the bottom of each liner to make a thin, even base.
Next, I prepare the cheesecake filling. In a mixing bowl, I beat the cream cheese until smooth, then mix in the sugar, egg, and vanilla.
I divide the filling evenly into three bowls. I add yellow food coloring to one bowl, orange to the second, and leave the third plain.
I layer the fillings carefully. Using a small spoon, I place a layer of yellow at the bottom of each liner, then orange, and finish with the plain cheesecake mixture on top.
The cheesecakes need to bake for about 18–20 minutes, or until the centers are just set. I let them cool in the pan for about 10 minutes, then transfer them to a wire rack.
Once cooled, I chill the cheesecakes in the fridge for at least two hours before serving. For garnish, I like to top each mini cheesecake with a piece of candy corn.
This recipe makes about 24 mini cheesecakes, perfect for sharing in dessert dishes at parties or family gatherings.

Equipment
Ingredients
- 8 oz cream cheese softened
- 1/2 cup powdered sugar
- 2 tablespoons milk
- 1 teaspoon vanilla extract
- 1 cup Cool Whip
- 12 sugar cookies for crust
- 1/2 cup candy corn for garnish
- 1/4 cup chocolate chips optional
- Yellow food coloring optional
- Orange food coloring optional
Instructions
- Preheat the oven to 325°F (163°C) and line a mini muffin pan with mini cupcake liners.
- Crush the sugar cookies into fine crumbs and press about 1 teaspoon of crumbs into the bottom of each liner to form a base.
- In a mixing bowl, beat together cream cheese until smooth. Mix in powdered sugar, milk, and vanilla extract. Fold in Cool Whip until creamy.
- Divide batter evenly into 3 bowls.
- Tint first bowl yellow with food coloring.
- Tint the second bowl orange with food coloring.
- Keep the third bowl plain (white).
- Layer the batter in each cup:
- First, spoon yellow batter into the bottom.
- Next, add orange batter.
- Finish with plain batter on top.
- Bake for 18–20 minutes, until centers are just set. Let them cool in the pan for 10 minutes before removing to a wire rack.
- Chill in the refrigerator for at least 2 hours.
- Top each cooled cheesecake with a piece of candy corn before serving.
Nutrition
Substitute
Sometimes I run out of an ingredient and need to find a quick swap.
If I don’t have traditional graham crackers for the crust, I use vanilla wafers or even ginger snap cookies.
Both give a tasty base for the cheesecakes. When I don’t want to use artificial food coloring, I look for natural options.
I can try turmeric for yellow and beet juice or strawberry powder for orange. These natural colors aren’t as bright but do the trick.
Here’s a quick table for easy substitutions:
| Original Ingredient | Substitute Ideas |
|---|---|
| Graham crackers | Vanilla wafers, ginger snaps |
| Cream cheese | Neufchâtel cheese |
| Food coloring | Natural colors (turmeric, beet juice, strawberry powder) |
| Candy corn toppings | Mini marshmallows, orange jelly beans |
If someone can’t eat dairy, I use dairy-free cream cheese. For an egg-free option, applesauce or a flaxseed egg can replace the egg in the batter.
I always check the labels when swapping ingredients, especially with food coloring. Some natural colorings can change the taste a little, so I test a small batch first.
What Can Go Wrong?
Sometimes, things just don’t go the way I want. Overbaked cheesecakes are probably my most common mishap.
If I leave them in the oven too long, cracks can show up or the texture gets dry. That’s always a little disappointing.
Another headache? Colors mixing together.
If I don’t chill each colored layer long enough before adding the next, the colors start to blend and I lose those neat candy corn stripes. Not exactly the look I’m going for.
- Crust falls apart: Using too little butter, the crust just crumbles.
- Soggy bottom: Too much butter, and suddenly the crust is wet and kind of sad.
- Cheesecake sticks to the pan: If I forget to line or grease the pan, everything sticks. That’s a mess I’d rather not deal with.
| Problem | Why It Happens |
|---|---|
| Cracks on top | Overbaked or cooled too fast |
| Blurry color layers | Not chilling layers before pouring |
| Lumpy filling | Cream cheese not fully softened |
I’ll admit, if I rush, I see more mistakes. Taking my time with each step—well, it’s not always easy, but it makes a difference.