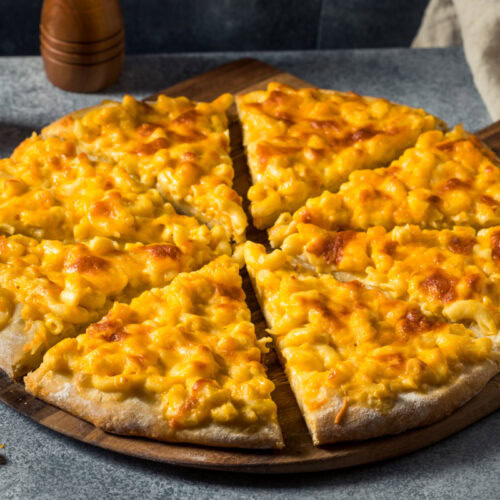
Homemade Macaroni and Cheese Pizza Recipe
Macaroni and cheese pizza brings together two of my favorite comfort foods—creamy mac and cheese and crispy pizza crust.
I came up with this recipe one night, just thinking, “Why not put mac and cheese on a pizza?” Turns out, it’s even better than I imagined.
This one’s actually not that hard to pull off. I’ll run through what you need, from gear to ingredients, and the steps are honestly pretty simple. Watching the cheese bubble up in the oven is probably my favorite part.
If you’re looking to shake up family dinner or make something fun for friends, this macaroni and cheese pizza hits the spot. I’ve thrown in some of my own tips so yours comes out just right.

Equipment
Having the right stuff out beforehand makes everything go way smoother. I always end up scrambling for a whisk if I don’t set things up first.
Here’s what I grab:
- Large pot for boiling macaroni
- Colander to drain the pasta
- Medium saucepan for the cheese sauce
- Whisk (trust me, it helps)
- Baking sheet or pizza pan (12-14 inches is good)
- Parchment paper or a bit of cooking spray
- Mixing bowl for tossing things together
- Measuring cups and spoons
- Wooden spoon or spatula
- Cheese grater if you’re using block cheese
- Oven mitts because, well, hot pans
I usually go for a pizza pan if I want that classic round look and a crispier crust. But honestly, a baking sheet works fine too.
The big thing is making sure your pan can handle the heat and is at least 12 inches across so you have space for all the good stuff.
And don’t forget to use a big enough pot for the macaroni—I use a 4-quart one so it doesn’t bubble over.
Ingredients
Here’s what you’ll want to have on hand for this mashup. It’s a little over-the-top but so worth it.
For the Base:
- 1 premade pizza crust or pizza dough (homemade is cool if you’re up for it)
- 1 tablespoon olive oil for brushing
For the Mac and Cheese:
- 2 cups elbow macaroni (gluten-free works too)
- 2 cups shredded cheese (I usually go for colby jack)
- 1 cup American cheese, cubed
- 1/2 cup gruyere, shredded
- 1/2 cup gouda, shredded
- 2 cups béchamel sauce
- 1/4 cup parmesan, grated
Optional Toppings:
- Bacon bits
- Pepperoni slices
- Green onions, chopped
- Diced jalapeños
- Peppers, sliced
- Mushrooms, sliced
- Shredded chicken
- Breadcrumbs for crunch
- Marinara sauce for dipping
If you’re short on time, boxed mac and cheese does the job, but homemade just tastes richer. Mixing up the cheeses gives you that gooey, melty vibe that works so well here.
Add whatever toppings you’re in the mood for—use what’s in your fridge.
Instructions
First things first, I preheat the oven to 425°F so it’s ready to go.
Then I make the mac and cheese—either from scratch or using a box if I’m in a hurry. I cook it until it’s creamy and set it aside for a minute to cool off a bit.
- Roll out the pizza dough on a floured counter until it’s about 12 inches across.
- Move the dough to a greased pizza pan or baking sheet.
- Brush the edges with olive oil or melted butter to help them brown up.
Time to build the pizza. I spread the mac and cheese all over the dough, but I leave about half an inch around the sides for the crust.
- Top with shredded mozzarella (about a cup).
- Toss on some extra cheddar if I’m feeling cheesy.
- Add toppings like bacon or breadcrumbs if you want.
Bake it in the oven for 12-15 minutes. The crust should get golden and the cheese should be bubbling.
Once it’s done, I let it sit for two or three minutes before cutting. That way the mac and cheese stays put when you slice it up.
Cut into eight slices and serve while it’s still hot.
Notes
If you can, shred your own cheese instead of using the pre-shredded stuff. The pre-bagged kind has powdery stuff on it that keeps it from melting as nicely.
Making the mac and cheese ahead of time helps too—it spreads easier when it’s cooled off a bit. Sometimes I make it the night before and just keep it in the fridge.
Don’t overcook the macaroni at the start. It’ll bake more in the oven, so I always leave it a little firm.
I like to partially bake the crust for about five minutes before adding the toppings. Otherwise, it might end up doughy underneath all that pasta.
Feel free to get creative with toppings—bacon, tomatoes, jalapeños, whatever you’re craving. Breadcrumbs add a nice crunch on top.
For leftovers, I stick them in an airtight container in the fridge for up to three days. Reheating in the oven at 350°F keeps the crust from getting soggy, but the microwave is fine if you’re in a hurry.
If you want to freeze an uncooked pizza, just wrap it well in plastic wrap and foil. It’ll keep for a couple of months.
Equipment
- Large pot (4-quart)
- Colander
- Medium saucepan
- Whisk
- Mixing bowl
- Measuring cups and spoons
- Wooden spoon or spatula
- Cheese grater (if shredding cheese)
- Pizza pan (12–14 inch) or baking sheet
- Parchment paper or cooking spray
- Oven mitts
Ingredients
- 1 premade pizza crust or pizza dough 12-inch crust
- 1 tablespoon olive oil for brushing the crust edge
- 2 cups elbow macaroni uncooked
- 2 cups shredded Colby Jack cheese or a similar mild melty cheese
- 1 cup American cheese cubed
- 1/2 cup Gruyère cheese shredded
- 1/2 cup Gouda cheese shredded
- 2 cups béchamel sauce store-bought or homemade
- 1/4 cup Parmesan cheese grated
- 1 cup shredded mozzarella for topping
- 1/2 cup cheddar cheese optional, for extra cheesiness
- 1/3 cup bacon bits optional topping
- 1/4 cup green onions optional topping, chopped
- 2 tablespoons pickled jalapeños optional topping, diced
- 2 tablespoons breadcrumbs optional topping, for crunch
- marinara sauce optional, for dipping
Instructions
- Preheat the oven to 425°F (220°C). Line a pizza pan or baking sheet with parchment (or lightly grease).
- Cook the macaroni in salted boiling water until just al dente (about 1–2 minutes less than the package directions). Drain well.
- Warm the béchamel in a saucepan over medium heat. Stir in Colby Jack, American, Gruyère, Gouda, and Parmesan until melted and smooth. Add the drained macaroni and stir until creamy. Let cool 5 minutes so it spreads more easily.
- Roll or press the pizza dough to about 12 inches and transfer to the prepared pan. Brush the edges with olive oil.
- (Optional for a crisper bottom) Par-bake the crust for 5 minutes, then remove from the oven.
- Spread the mac and cheese evenly over the crust, leaving about 1/2 inch around the edges.
- Top with mozzarella and (optional) cheddar. Add any toppings you like (bacon, green onions, jalapeños, or breadcrumbs).
- Bake for 12–15 minutes, until the crust is golden and the cheese is bubbling. Let rest 2–3 minutes before slicing.
- Slice into 8 pieces and serve hot, with marinara on the side for dipping if desired.
Notes
Nutrition
Tasting Notes
When I took my first bite of this macaroni and cheese pizza, I had to pause for a second—honestly, it just works. The creamy mac and cheese sits right on top of that crispy pizza crust, and somehow, the textures just play off each other in a way that’s hard to describe.
The cheese sauce is rich and smooth, like the kind you remember from childhood dinners. It’s got that classic comfort food vibe, you know?
The crust brings a little crunch to the party, which keeps the soft pasta from feeling too heavy. Around the edges, where the cheese sauce meets the crust, you get these golden, crispy bits—those are always my favorite part.
Sometimes, you bite into a spot where the cheese has caramelized a bit, and wow, it’s so good. The pasta on top stays tender, not mushy, which is honestly a relief.
This mashup brings together two favorites in a way that feels kind of obvious once you try it. The pizza crust gives some structure, while the mac and cheese brings that warm, satisfying taste.
Each slice holds up—no flopping or mess—which makes it easy to eat with your hands. That’s important, right?
The flavor is pretty mild, so kids would go for it, but there’s enough going on that adults won’t get bored. You can taste both the pizza and the mac and cheese, and neither one steals the show.
The best bites have a little of everything: crispy crust, creamy pasta, maybe whatever toppings you tossed on there. Sometimes the cheese stretches a bit when you pull a slice—love that.
It all tastes rich but not like you need a nap after. If you’re into comfort food, this one’s worth trying.