21 Halloween Charcuterie Board Recipes
Halloween is honestly one of my favorite times to get creative with food. I love making snacks and treats that look fun and a little spooky.
These 21 Halloween charcuterie board recipes help me impress my guests and make my party feel extra special. I enjoy finding new ways to mix classic Halloween flavors and festive decorations that everyone can enjoy.
With so many boards to choose from, I always find something easy to make that fits my celebration. Whether it’s a big party or just a few friends, these ideas make my Halloween table stand out.
1) Spooky Spiderweb Cheese Platter

When I want to impress my friends at Halloween, I always make a Spooky Spiderweb Cheese Platter. I like starting with a large, round platter and covering it with slices of cheese arranged in a circle.
Cheddar, Swiss, and mozzarella work well because of their colors and shapes. Next, I make the spiderweb design using thin lines of cream cheese.
I put the cream cheese in a plastic bag, cut a tiny bit off the corner, and pipe lines from the center out to the edge. Then, I connect them with smaller curved lines to look like a web.
To make it extra creepy, I create spiders out of black olives. I slice some olives in half for the bodies, then cut smaller pieces for the legs.
It’s fun watching these little spiders “crawl” on the web. I usually add a few crackers, grapes, or apples on the side for extra snacks.
This board is easy for me to put together and doesn’t take long. It’s a fun way to make my Halloween party table stand out.
2) Pumpkin Patch Veggie Board
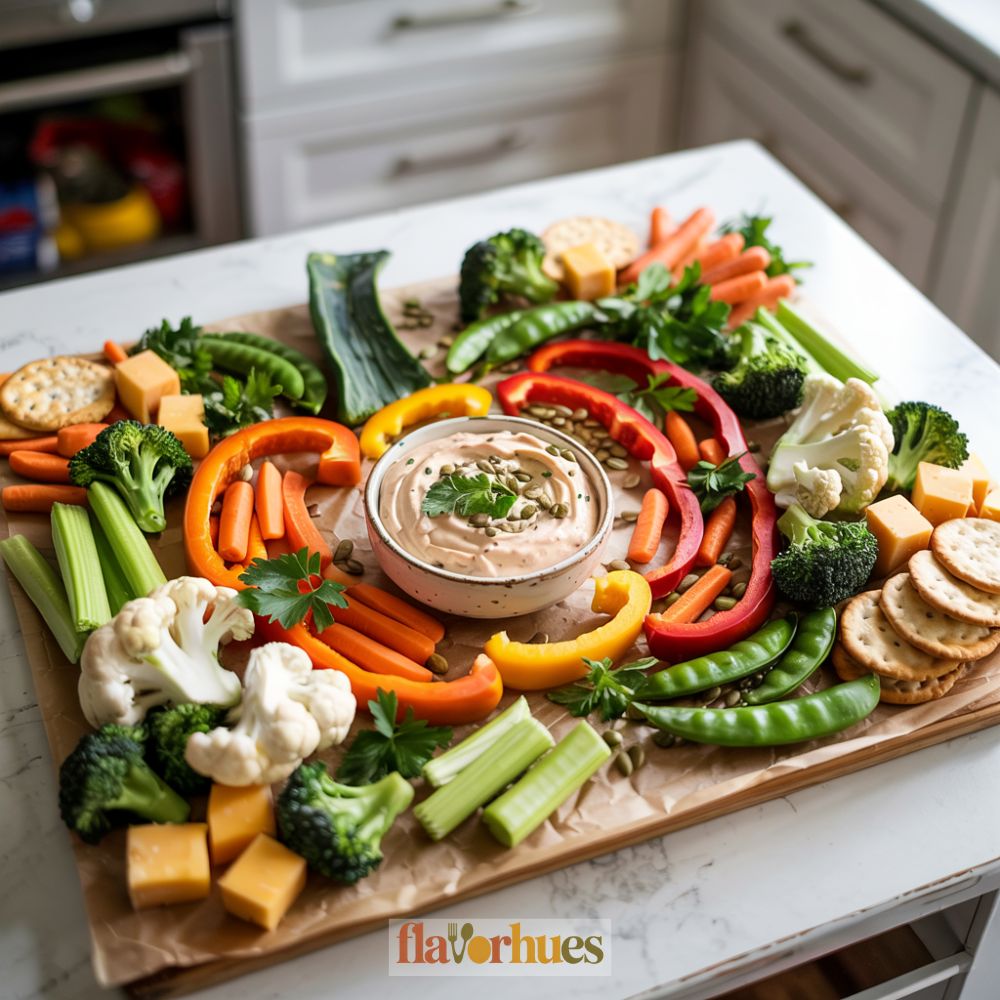
I like to make my Pumpkin Patch Veggie Board look bright and fun. First, I choose orange veggies like baby carrots, orange bell pepper slices, and cherry tomatoes.
These make up the “pumpkins” for my board. I arrange the orange veggies into little pumpkin groups on a large platter.
For the pumpkin stems, I use small pieces of celery or green bell pepper. I put these at the top of each grouping to look like real stems.
To add variety, I also include broccoli florets and cucumber slices as the “patch” part of the board. They fill in the spaces around my pumpkins and give the board more color.
I place a bowl of ranch or hummus in the middle for dipping. Sometimes, I like to add a handful of snap peas and radishes for extra crunch.
To make my veggie pumpkins look extra festive, I use a black olive cut in half for the “eyes” on some of the pumpkin shapes. This is optional, but I find it adds a cute Halloween touch.
This board is easy for me to put together and it’s a hit with kids and adults. I love making sure everyone gets to enjoy fresh veggies in a fun, seasonal way.
3) Mummy Hot Dog Charcuterie
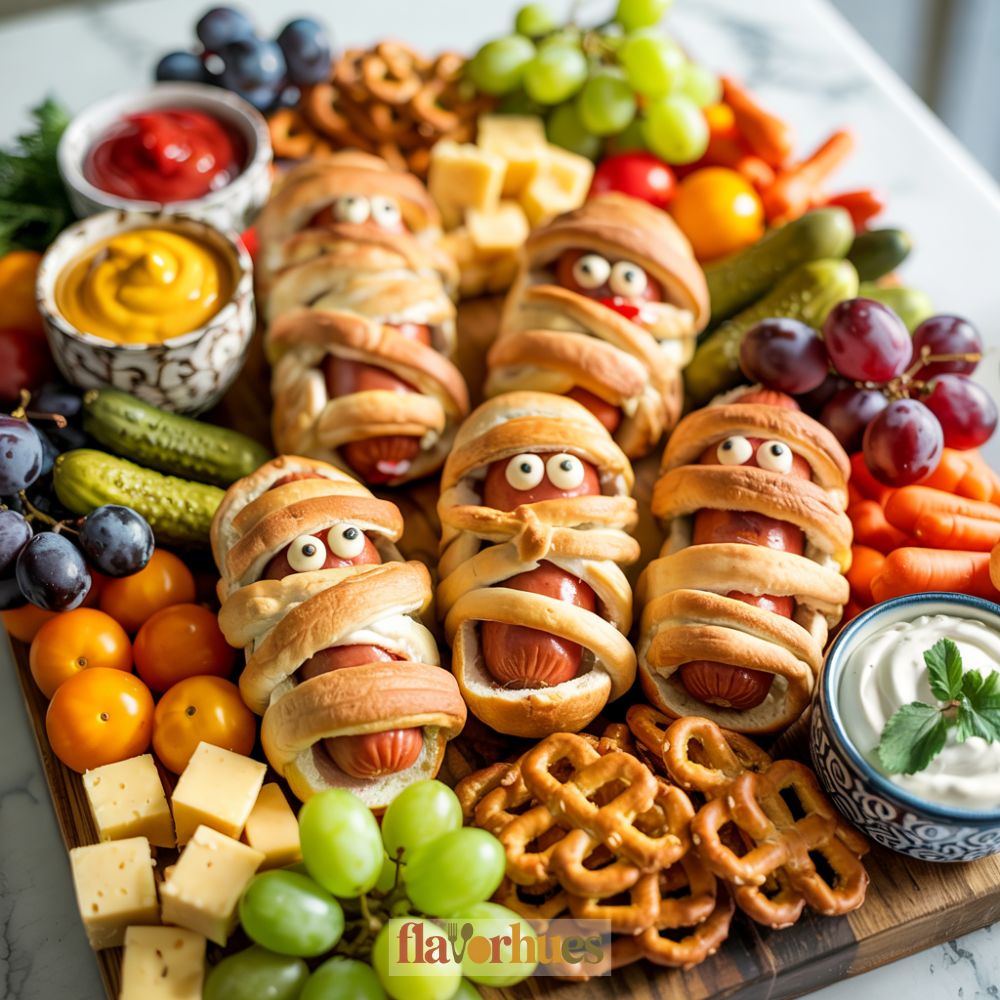
I love how easy and fun these mummy hot dogs are to make for Halloween. To prepare them, I use crescent dough and wrap thin strips around mini hot dogs, leaving a little gap for the “mummy faces.”
Then I bake until golden. I add tiny dots of mustard or ketchup for the eyes.
Sometimes I use candy eyes instead if I can find them at the store. On my charcuterie board, I stack the mummy hot dogs to look a little spooky, and fill the spaces with dipping sauces like ketchup, mustard, and cheese.
I might add a mix of pickles or olives around the edges for a pop of salty flavor. These mummy hot dogs are always a hit at parties.
Since they are bite-sized, they’re perfect for sharing and easy to grab. If you want to make them ahead of time, you can wrap and chill the hot dogs in the fridge.
Just bake them right before serving so they’re warm and fresh. I like to keep extra dough on hand in case I want to make more.
It’s simple and quick, so I never feel rushed when adding them to my board. Kids and adults both enjoy these cute snacks, and I like that they help fill out my charcuterie spread without much work.
Mummy hot dogs mix well with cheeses, crackers, and fruit. This makes my Halloween snack board look festive and balanced.
4) Witch’s Cauldron Dip Bowl
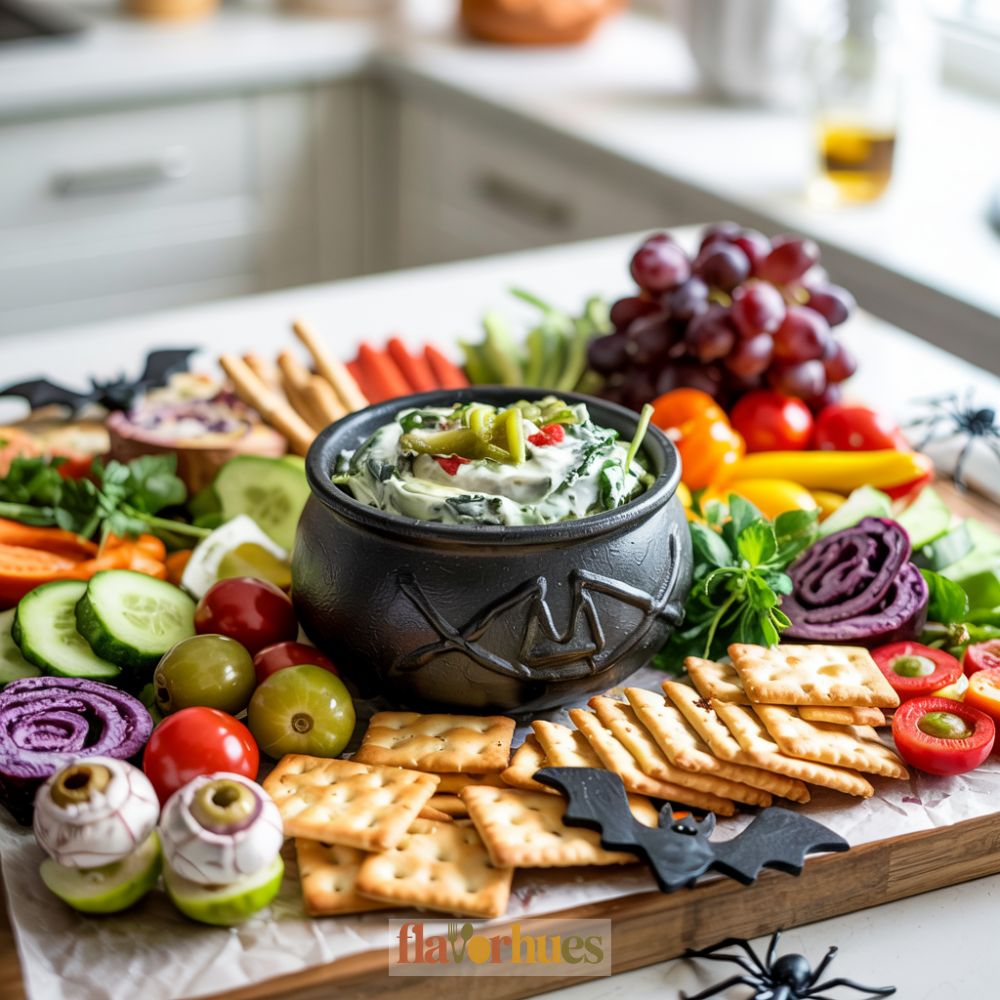
For this idea, I use a round black bowl to look like a witch’s cauldron. I fill it with a bright green spinach and artichoke dip.
The dip looks bubbly and fun, kind of like it’s brewing something magical. I place the bowl in the center of my board.
Around it, I arrange crunchy bell pepper strips, crackers, pretzel sticks, and sliced baguette for dipping. I like to add a few twisted breadsticks to look like “witches’ wands.”
To make it spookier, I sometimes slice black olives to look like little bats and scatter them on the dip. Small pieces of purple cabbage or radish can give a splash of color too.
If I want to make the dip look even more like a potion, I sprinkle chopped chives or parsley over the top. Sometimes I put a plastic witch hand or a small rubber spider on the edge of the bowl for a silly, creepy touch.
This dip is creamy and easy to scoop. My guests always have fun choosing their favorite dippers.
I keep everything bite-sized so it’s easy to eat. Making the dip in advance saves me time later.
I like how this adds a playful theme to my spread without much extra work.
5) Ghostly Brie with Cranberry Eyes
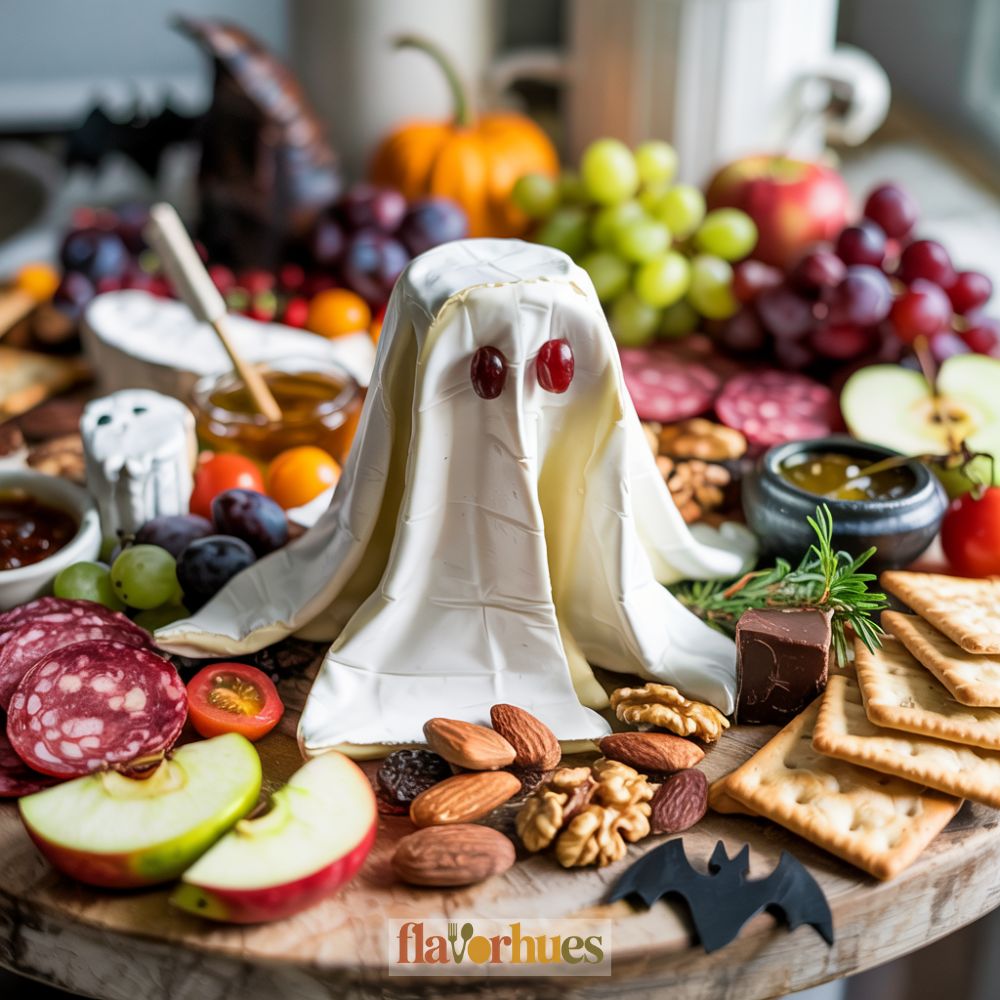
When I want to make my Halloween charcuterie board a little spooky but still delicious, I like to use brie cheese to create a cute ghost. All I need is a round wheel of brie as the base.
Its white rind already looks like a ghost, so there’s not much to change. To give my ghost some personality, I press two dried cranberries into the brie for eyes.
I sometimes add a tiny triangle of olive for a mouth, but that’s optional. I usually leave the brie whole so it keeps its ghost shape on the board.
Sometimes, I cut the bottom edge in a jagged line to look like it’s floating. Then I surround the brie with crackers or sliced baguette.
If I want, I add a small bunch of grapes or walnuts nearby for an extra touch. The sweet cranberries go well with the creamy brie.
It only takes a few minutes, and it always makes my board stand out. Making this ghostly brie is easy, and I don’t need any special tools.
I just use my hands for shaping and decorating. Kids like to help with the cranberries, too.
This snack is fun, quick to make, and adds a friendly ghost to my spread.
6) Cauliflower Brain Cheese Ball
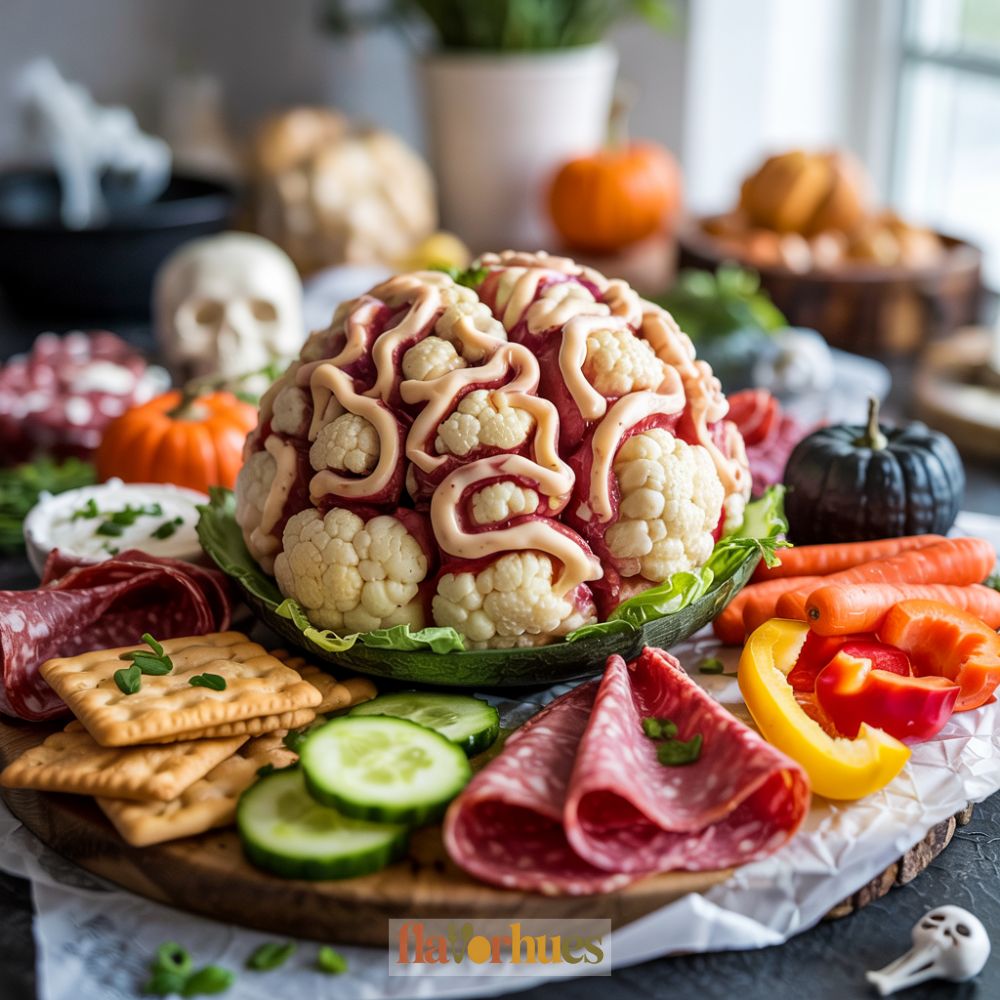
I like how fun and spooky a Cauliflower Brain Cheese Ball looks on a Halloween board. To make it, I steam some cauliflower florets until they get soft, then mash them well.
I mix the cauliflower with cream cheese, shredded cheddar, and a bit of garlic powder. Next, I shape the mixture into a brain shape using my hands or a piece of plastic wrap.
For more detail, I use a butter knife to make little lines and grooves to look like real brain folds. I sometimes tint part of the cheese ball with a little beet juice to make it look even more realistic and creepy.
I set the finished cheese ball on a plate. I like to serve it with crackers, pretzels, or sliced veggies for dipping.
The soft, creamy texture is easy to spread and tastes mild with a slight tanginess. For extra effect, I can place the cheese ball on a bed of lettuce or greens to look like it’s sitting on a mad scientist’s tray.
Kids may enjoy helping shape the brain or making the lines. It’s a simple, hands-on recipe that turns a basic cheese ball into something guests won’t forget.
If I want, I can swap cheddar for another cheese, or add cooked bacon bits for a smoky flavor.
7) Jack-o’-Lantern Fruit Platter
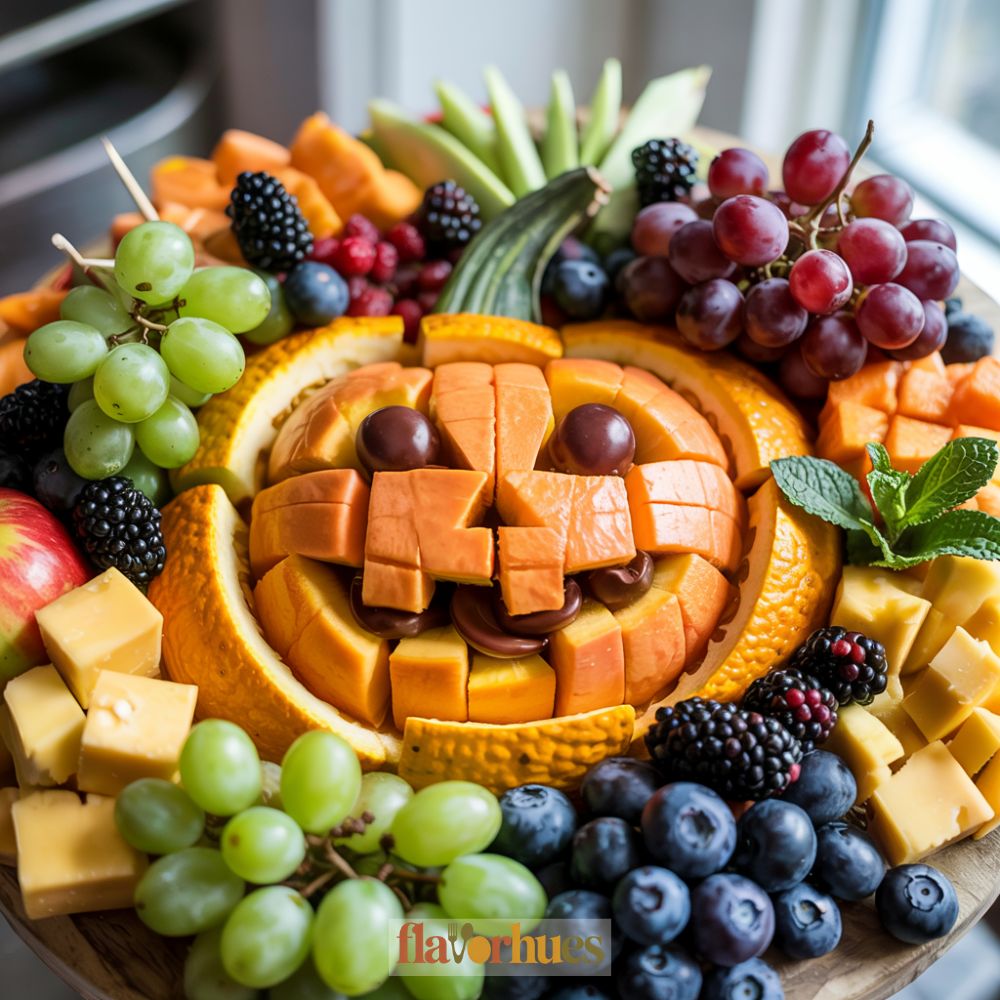
I love making a Jack-o’-Lantern Fruit Platter because it brings color and fun to the table. To make this platter, I start with orange slices and arrange them in a big circle to form the pumpkin’s face.
I use black grapes or blueberries to make the mouth, eyes, and nose. Sometimes I add a slice of kiwi or celery at the top for the stem.
It’s easy to change up the fruits based on what I have at home. For extra detail, I might add pineapple chunks or apple slices around the edges.
Sometimes I serve the fruit with a small bowl of yogurt or fruit dip on the side. Building the jack-o’-lantern face is the fun part.
I arrange the shapes by hand and adjust them until the face looks right to me. If you want, you can use chocolate chips or raisins for features instead of fruit.
This platter makes a healthy, bright snack for Halloween. Kids and adults both enjoy picking their favorite fruit pieces to eat.
8) Bat-Shaped Salami Bites
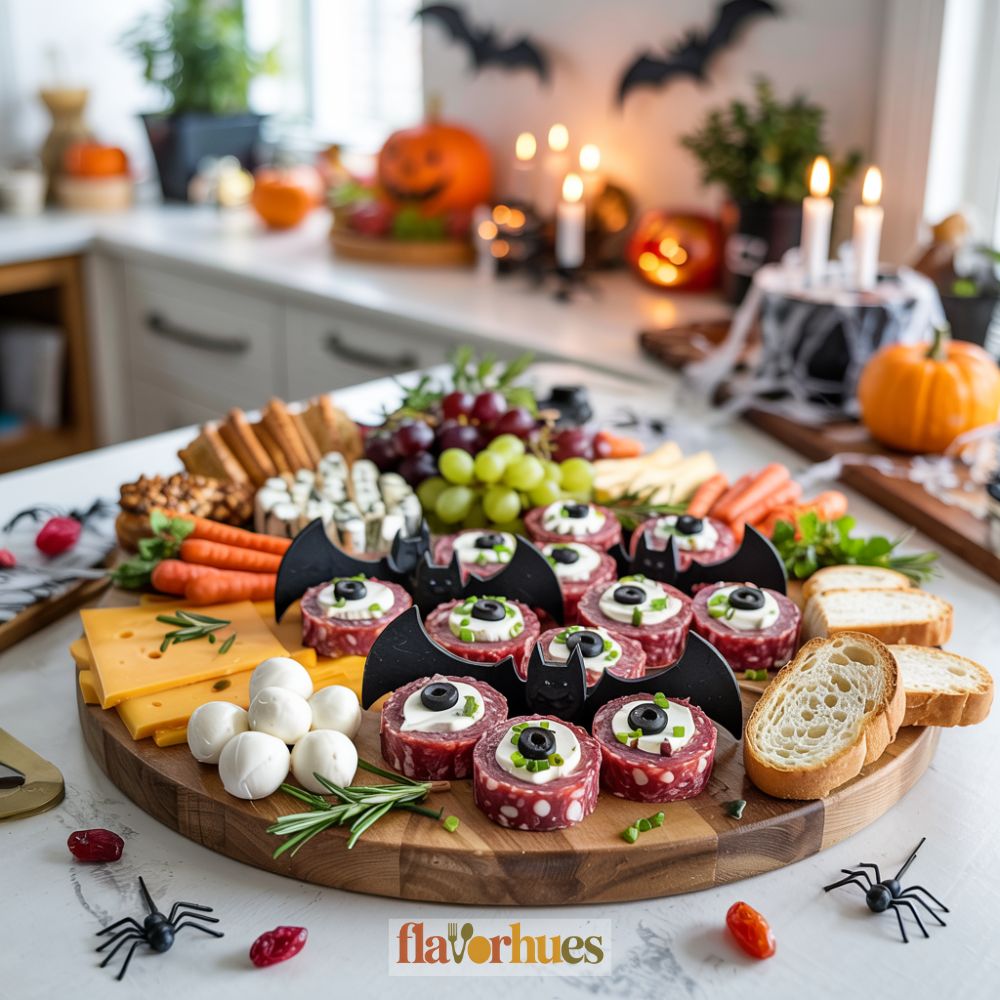
I love how these Bat-Shaped Salami Bites add a spooky touch to my Halloween charcuterie board. To make them, I use bat-shaped cookie cutters to cut slices of salami.
Sometimes, I use other meats like pepperoni if salami isn’t available. After cutting out the bat shapes, I place them on crackers or mini slices of bread.
For a quick topping, I add a little bit of cream cheese or cheddar under the salami. This helps hold the bats in place and adds some creamy flavor.
If I want to get extra creative, I use tiny edible eyes or black olives as decoration. These are simple to stick on with a dab of cheese.
It’s an easy way to make the bats look even more fun. I arrange the Bat-Shaped Salami Bites around other snacks so the shapes stand out.
Kids and adults usually smile when they see little bats flying across the board. Making these is quick, and I don’t need many ingredients.
All I need is salami, cheese spread, bread or crackers, and optional decorations like olives or candy eyes. These bites bring both flavor and Halloween style to any platter.
9) Bloody Beet Hummus Dip
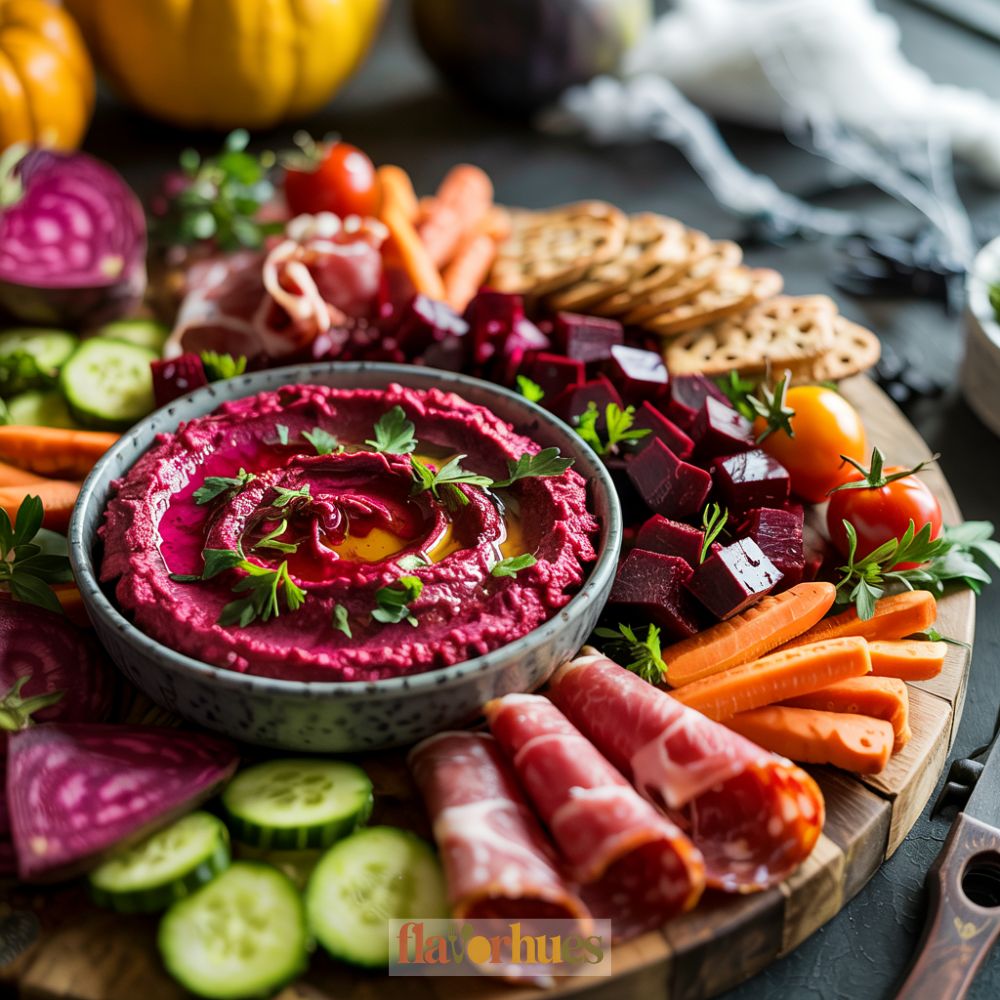
For my Halloween charcuterie board, I love making a simple Bloody Beet Hummus Dip. The color is a deep red, which looks spooky and fits the Halloween theme well.
It is easy to prepare and only takes a few ingredients. I start by blending cooked beets, a can of chickpeas, garlic, lemon juice, and tahini.
I add a little olive oil and salt, then blend until everything is smooth. The beets give the hummus its bright red color.
I spoon the beet hummus into a small bowl and swirl the top to create a “bloody” effect. Sometimes, I drizzle more olive oil on top for shine.
To finish, I sprinkle a bit of black pepper or sesame seeds for contrast. For serving, I place cut vegetables like carrots, cucumbers, and bell peppers around the bowl.
Crackers or pita chips work great for dipping too. It’s always a fun way to add something healthy to my Halloween spread.
This dip does not take a lot of time, and I usually make it a day ahead and store it in the refrigerator. The flavor gets even better overnight.
Plus, it gives my board that extra pop of color to really stand out.
10) Candy Corn Layered Dip
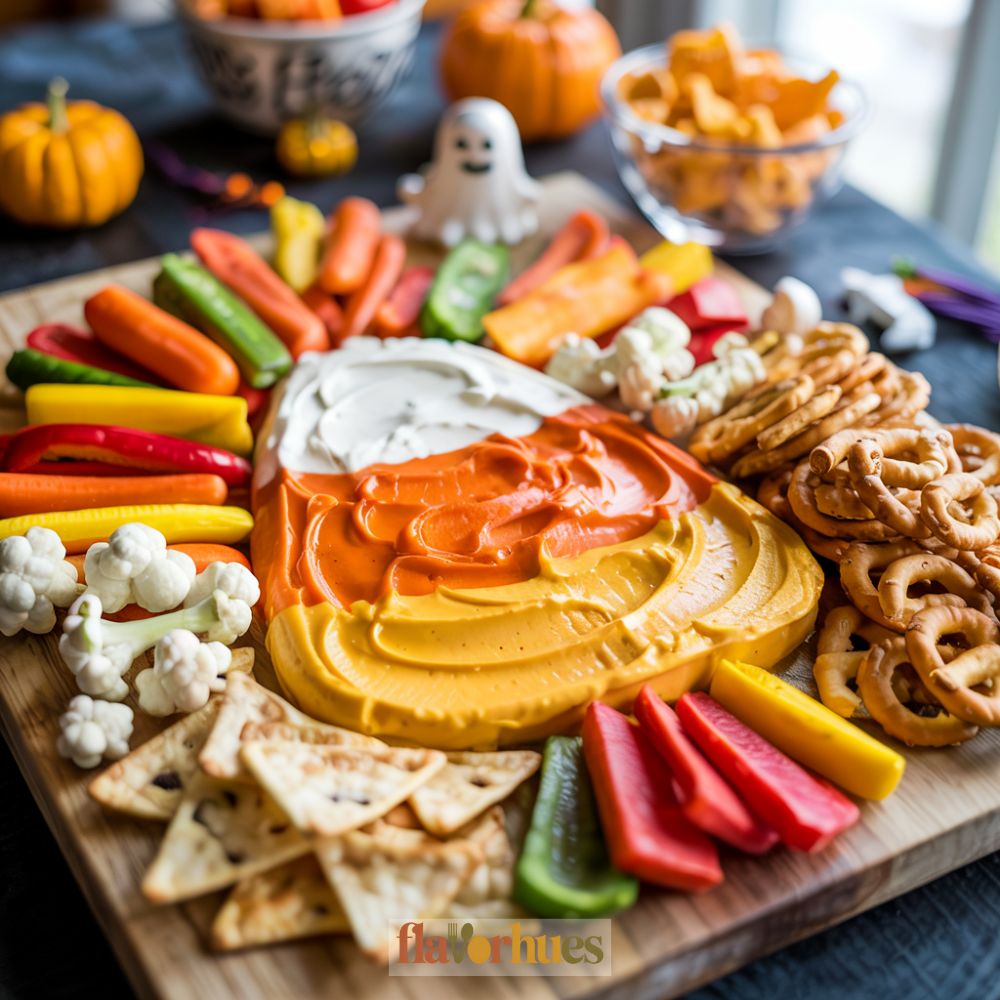
I love making this dip because it looks just like a giant piece of candy corn. The colors are so bright, and it always gets noticed on my Halloween snack table.
This dip is sweet and creamy, so it goes well with cookies, graham crackers, or even fruit. To build the dip, I start with a layer of whipped cream cheese mixed with a bit of powdered sugar—that’s my white bottom layer.
Next, I mix cream cheese with orange food coloring and some marshmallow fluff for the middle layer. For the top yellow layer, I add yellow food coloring to softened cream cheese and a little vanilla pudding.
I carefully spread each layer in a clear, round bowl to make that candy corn shape. If the layers get messy, I just use a spoon to fix the edges so the colors stay separate.
After that, I chill the dip for about an hour. This helps the layers stay firm and makes it easier to serve.
When it’s ready, I put the bowl in the center of my board and surround it with vanilla wafers, pretzels, and fruit slices. Kids usually love scooping up the dip because of the fun colors.
I also add real candy corn on the side for extra decoration. This dip always disappears fast at my Halloween parties.
11) Pumpkin-Shaped Cheese Ball
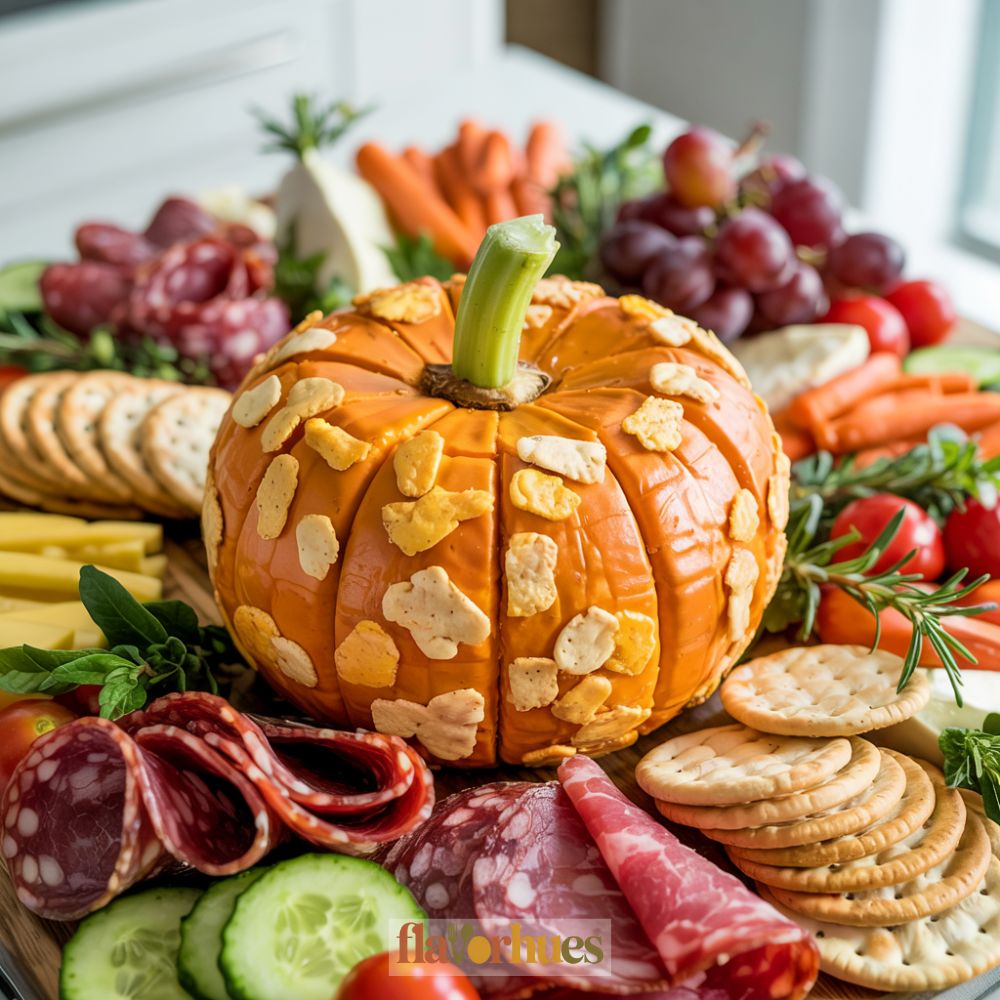
I love making a cheese ball that looks just like a pumpkin. It’s a simple way to add Halloween fun to the snack table.
I use cream cheese, shredded cheddar, and a bit of ranch seasoning for the base. I mix everything together and form it into a ball.
Then, I wrap it in plastic wrap and use rubber bands or string to shape ridges like a pumpkin. I chill it for at least an hour so it keeps its shape.
After chilling, I roll the cheese ball in crushed cheddar or orange nacho chips to give it a bright orange color. For a stem, I stick a piece of pretzel or a green bell pepper on top.
It pairs really well with crackers, pretzels, or sliced veggies. Guests always like breaking into the pumpkin shape and spreading the cheese.
Cleanup is easy because there aren’t many ingredients or steps. Plus, I can make it a day ahead and keep it in the fridge until the party.
12) Stuffed Mini Pepper Jack-o’-Lanterns

I love adding these bright and cute mini pepper jack-o’-lanterns to my Halloween charcuterie board. They look like little pumpkins but are so much easier to make and eat.
Their fun faces always make people smile. To make them, I pick out orange mini bell peppers and slice off the tops.
I use a small knife to carefully carve out simple jack-o’-lantern faces. The holes don’t have to be perfect—each one just needs a mouth and some eyes.
For the filling, I like to use a mix of cream cheese, shredded cheddar, and some chives or green onions. I scoop the mix into each hollowed-out pepper and pack it in gently.
If I want a little more flavor, I add cooked and crumbled bacon or chopped ham. After stuffing, I put the tops back on each pepper.
Sometimes, I use a little green herb like parsley to look like a pumpkin stem. These little peppers hold their shape well and can be made ahead and chilled until serving time.
They go great with crackers, cheese cubes, and fruit. The creamy filling pairs well with the crunch of the pepper.
I always notice these disappear quickly from the board.
13) Skeleton Meat and Cheese Spread
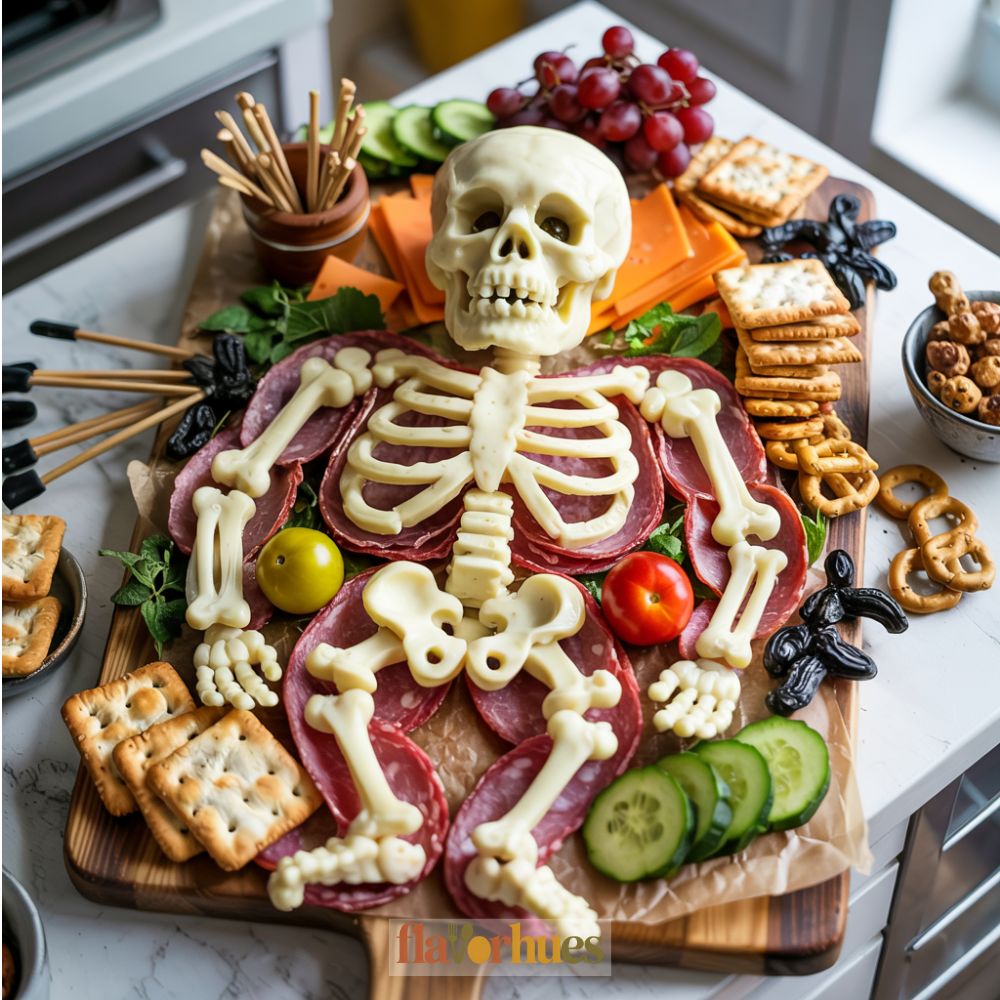
I like to make this board look like a skeleton using different shapes and sizes of meats and cheeses. First, I use sliced salami or pepperoni to make the ribs and arms.
I arrange these in a skeleton shape on a large platter. Next, I slice white cheddar or mozzarella and use them to form the skull and bones.
I cut little circles from cheddar for the eyes and stack cheese sticks or string cheese for the rest of the bones. For more detail, I use thin pretzel sticks or breadsticks for the skeleton’s fingers.
Olives work well for eyes, and I sometimes add cut veggies like mini carrots or celery for pops of color. To finish, I place crackers around the skeleton’s body so it’s easy to grab and eat.
Sometimes I also add small bowls of mustard or ranch on the side for dipping. It only takes about 20 minutes to put together.
I find this board is always a fun surprise and gets kids interested in eating more than just candy. The mix of meats, cheeses, and simple extras keeps it easy and tasty.
14) Black Cat Olive Arrangement
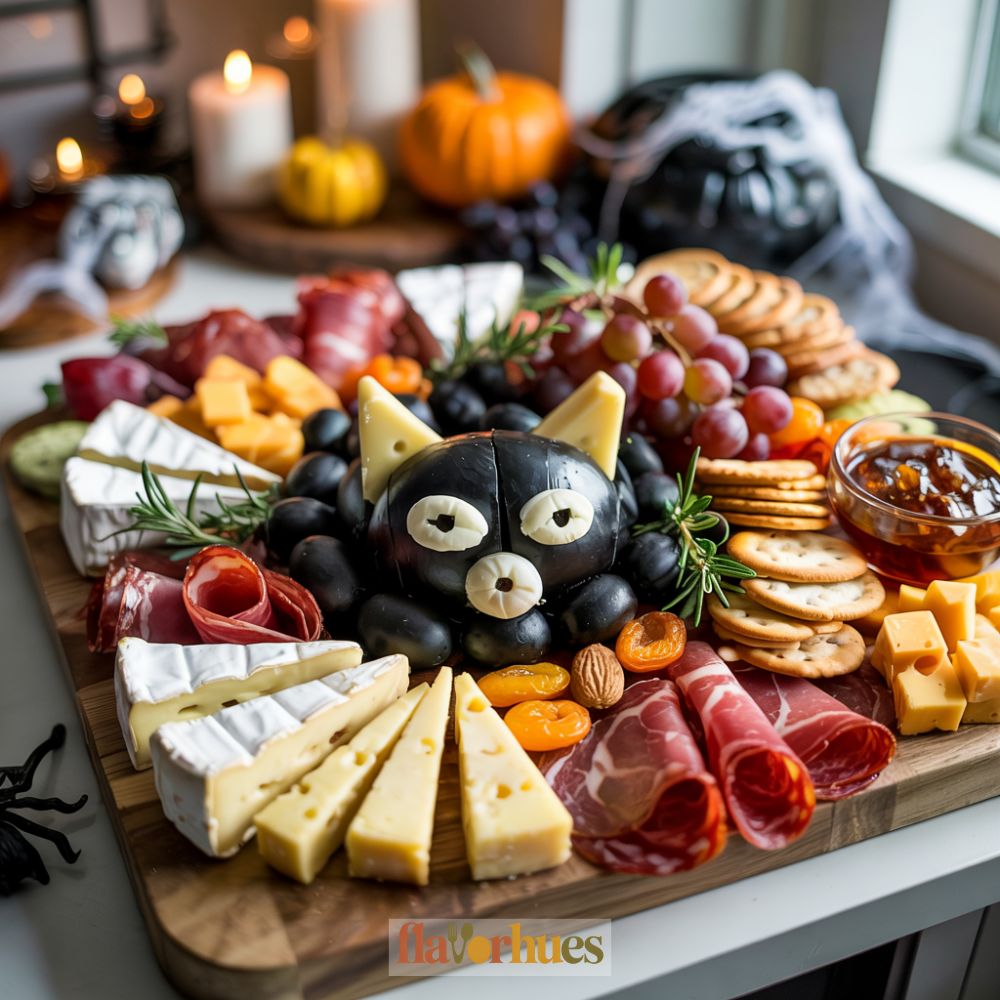
I like to make a simple black cat shape on my board using black olives. I take a mix of whole and pitted black olives to form the cat’s body and tail.
To make the head, I use a larger olive or even stack a few small ones close together. For the ears, two small triangle slices of cheddar or another firm cheese do the trick.
I place sliced green olives or capers for the eyes. If I want a nose and whiskers, I use thin strips of red bell pepper or chives.
I set my black cat olive shape on a bed of leafy greens or crackers. Sometimes, I add small cubes of cheese or vegetable sticks around the cat to fill in space and give more options to snack on.
The finished cat stands out against the lighter foods. This snack idea works well for Halloween parties.
Kids and adults enjoy picking out the olives. The arrangement comes together fast and is easy to adjust for different board sizes.
All I need to do is focus on making the shape clear, while still keeping the look fun. If I want to offer more dips, I leave a little bowl of hummus or ranch next to the cat.
The olives taste good with both. It’s a very simple recipe, but everyone recognizes the black cat theme, which makes the board extra special for Halloween.
15) Creepy Crawly Ants on a Log
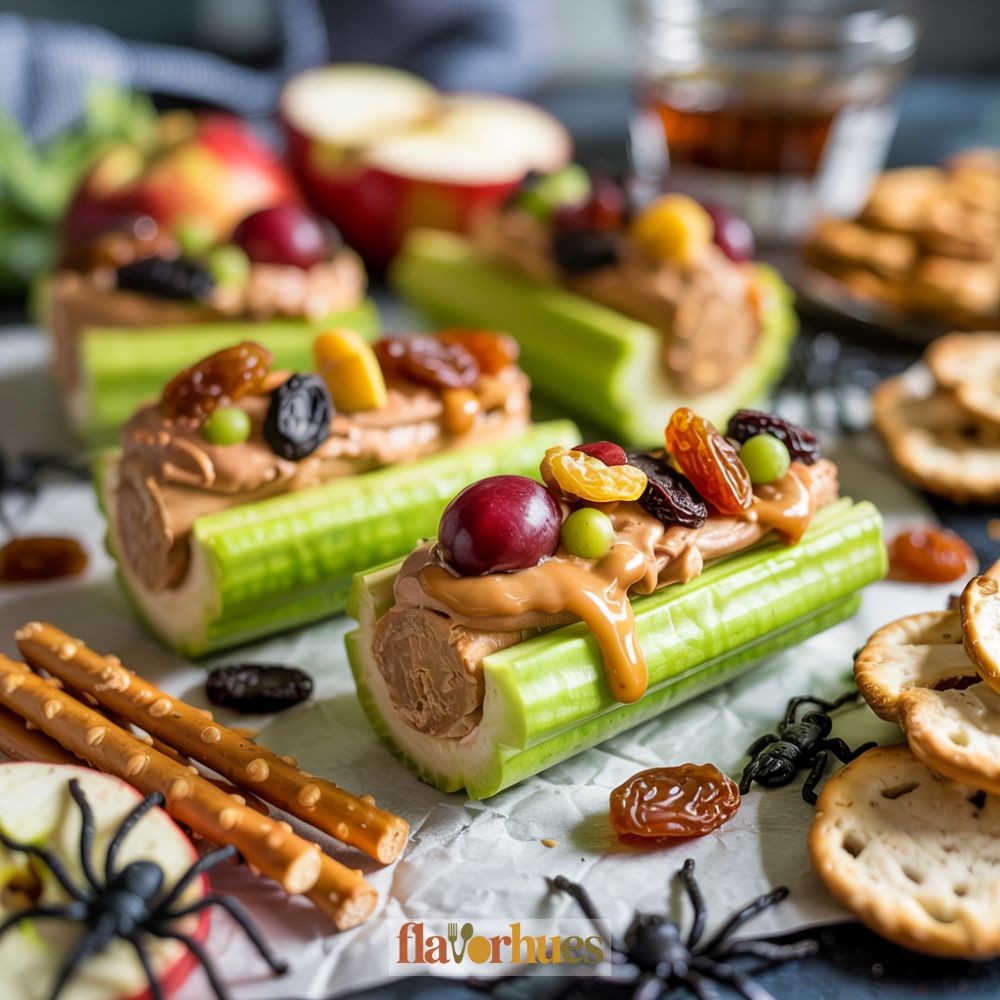
When I think of an easy, fun snack for Halloween, “Ants on a Log” comes to mind. For this recipe, I use celery sticks as the base.
I spread them with creamy peanut butter or cream cheese. After that, I line up raisins on top to look like a row of ants.
To make these a little creepier for Halloween, I sometimes use dried cranberries or mini chocolate chips along with raisins. Sometimes I add candy eyes to make some of the “ants” look more alive.
If I’m feeling creative, I use black licorice strings to make little legs for some ants. These are quick to put together, and I don’t need to cook anything.
Kids love to help with this snack because they can help decorate the logs. I like that these are easy to pick up and eat.
They add a playful touch to my Halloween charcuterie board with very little work. If someone can’t have peanut butter, I just use sunflower seed butter or even a spreadable cheese.
This way, I make sure everyone can enjoy these creepy crawly snacks. To finish, I lay all the logs side by side on my board.
I place them so the “ants” look like they’re marching across the spread. This makes for a fun and silly treat that gets lots of smiles.
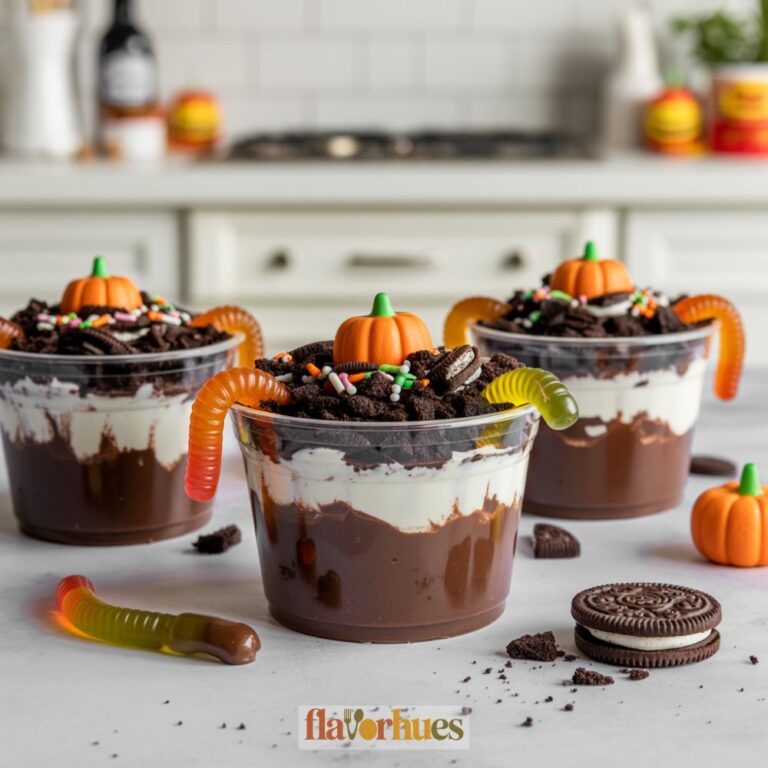
16) Graveyard Dirt and Worms Dip
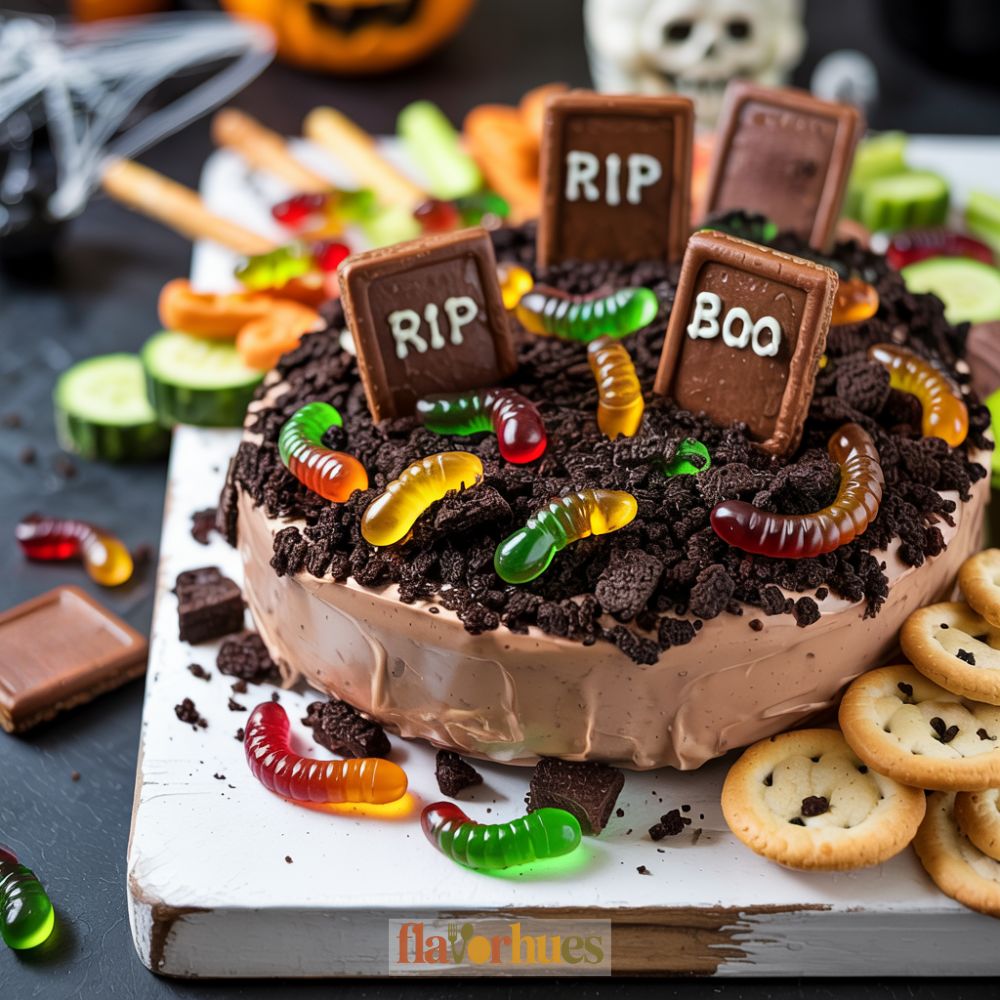
I love making this Graveyard Dirt and Worms Dip for Halloween parties. It looks spooky but it’s easy to put together.
I start with a base of chocolate pudding. This is my “dirt” layer. On top of the pudding, I sprinkle crushed chocolate sandwich cookies.
These make the graveyard dirt look real. Sometimes I use a snack bag to crush the cookies, and then I just sprinkle them right on top.
For the worms, I use gummy worms poked into the “dirt.” I let the worms stick out a little to make it look playful and creepy.
It’s fun to arrange them so it feels like they’re crawling out. To make it look more like a graveyard, I break some rectangular cookies in half and use icing to write words like “RIP.”
I stand the cookies up in the pudding so it looks like tombstones. This dip is best served with small spoons or scoops.
Sometimes, I add extra gummy worms around the base for more color. Everything in this recipe is store-bought, so there’s no cooking or baking required.
I usually make it just before guests arrive, so the cookies stay crunchy. Everyone always wants to dig in for a scoop with a worm!
17) Apple and Caramel Skull Bites
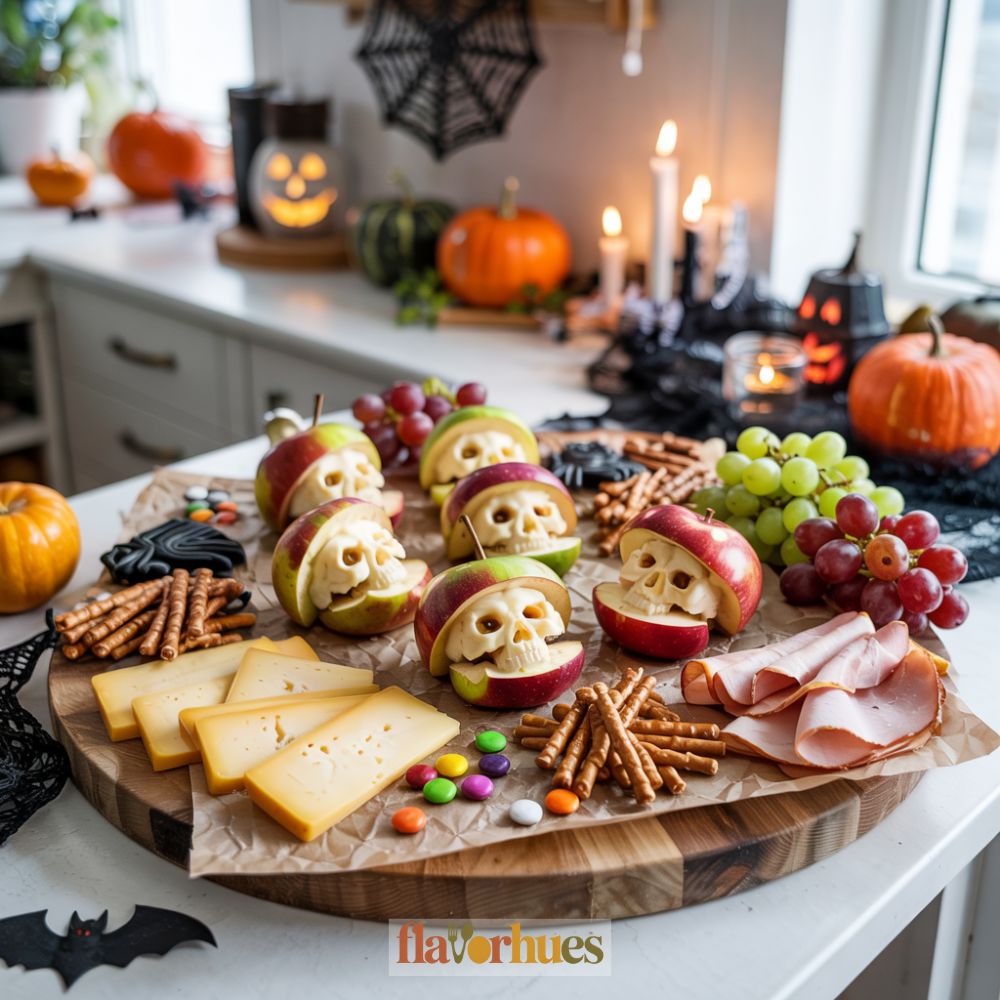
I like to add some fun shapes to my Halloween boards, so I make apple and caramel skull bites. I slice apples into thin rounds and use a small skull-shaped cookie cutter to make each piece look like a spooky skull.
Next, I melt caramel candies in the microwave until they are smooth. Then, I dip one side of each apple skull into the warm caramel.
After dipping, I put the apple bites on a tray lined with parchment paper. Sometimes, I drizzle a little melted chocolate on top or sprinkle chopped nuts for crunch.
I let the caramel cool and set for a few minutes. When they are ready, the caramel skulls are shiny and sweet, the apples are crisp, and they’re easy for everyone to grab and eat.
These treats look great on any Halloween board. I usually place them near the center, so they stand out.
They add a cute and creepy look along with a mix of tart and sweet flavor. Making apple and caramel skull bites is simple, and it’s a fun activity if I want to involve kids in the kitchen.
They also pair well with other fall snacks, like popcorn or dried fruit. Whenever I make them, people always notice the skull shapes right away.
They’re festive without being too scary, and the caramel makes the apples a little extra special.
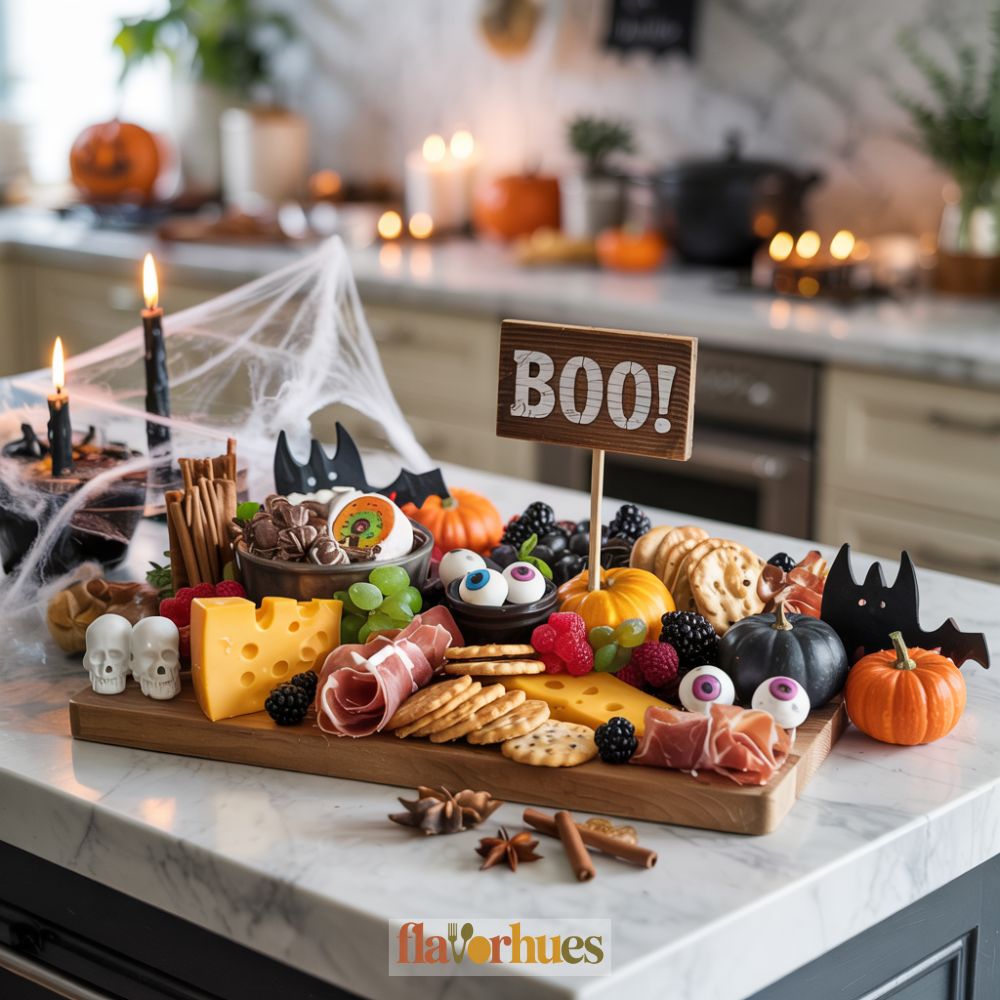
18) Halloween Candy Cheese Board
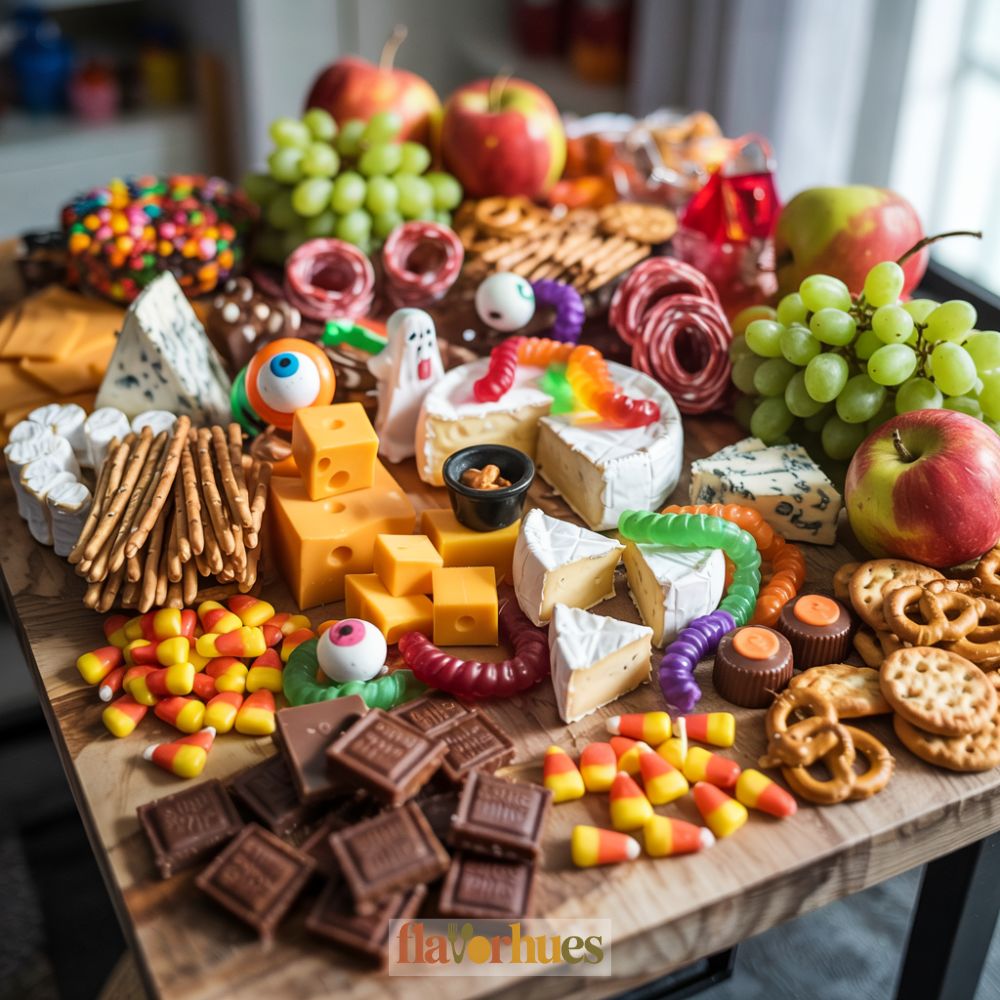
I like to mix my favorite cheeses with classic Halloween candies for this board. First, I pick a few cheeses like cheddar cubes, mozzarella balls, and Colby Jack slices.
I set them around the board in small groups to keep things easy to grab. Then I add some candies.
I scatter candy corn, mini chocolate bars, gummy worms, and candy pumpkins around the cheese. I try to place them in little piles or trails, so the board looks colorful and fun.
For crackers, I add round butter crackers and pretzel sticks. These help balance all the sweet and savory flavors.
Sometimes, I even use chocolate-covered pretzels for an extra treat. Fresh fruits make the board feel a bit lighter.
I place green grapes or apple slices in empty spots. These taste good with both cheese and chocolate.
If I want something creamy, I add a side of vanilla yogurt dip or chocolate spread. This gives everyone a sweet option for dipping fruit or candy.
I like to place a few small, Halloween-themed decorations on the board too. Plastic spiders or pumpkin picks help make it feel festive, but are easy to move out of the way before eating.
This board is very simple to put together. I just use a mix of sweet and salty snacks that I already have.
It works well for Halloween parties and is an easy way to try a little bit of everything.
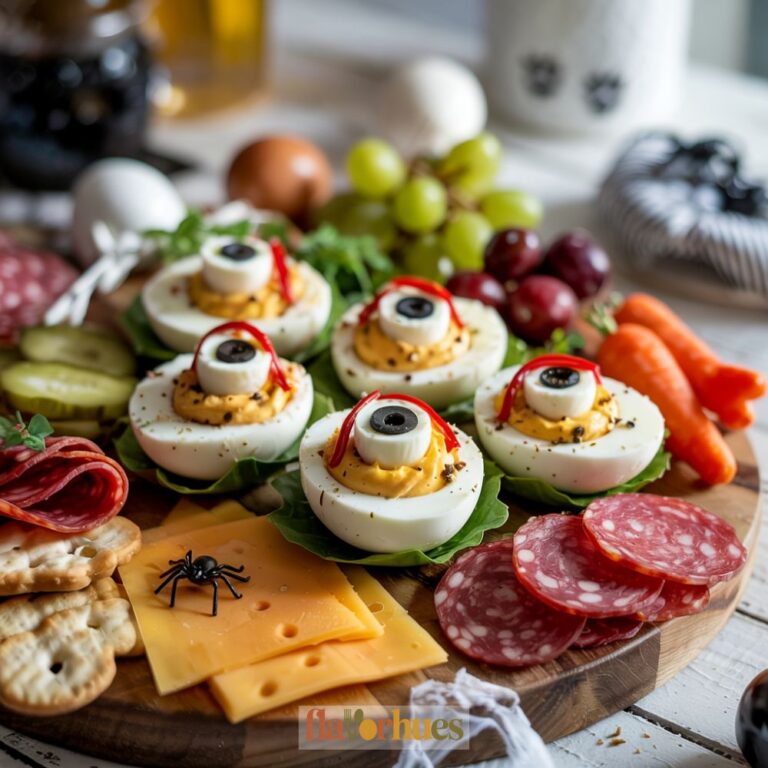
19) Deviled Egg Eyeballs

I love how simple these Deviled Egg Eyeballs are to make. They always get noticed at Halloween parties because they look so unique.
To start, I boil eggs, peel them, and slice them in half. I scoop out the yolks and mix them with mayonnaise, a little mustard, salt, and pepper.
Then I fill the egg whites with the creamy yolk mixture. To make them look like eyes, I use sliced olives for the pupils.
Sometimes I use green or black olives, depending on the look I want. For the bloodshot effect, I draw thin red lines on the whites with a little bit of food coloring and a toothpick.
These eggs are not just for looks. They’re tasty and very easy to eat with your fingers.
I often place them in the middle of the board for a spooky effect. If I want extra flavor, I sprinkle a bit of paprika or chives on top.
The eggs can be made a few hours ahead and kept in the fridge until it’s time to serve. Kids and adults enjoy these little eyeballs.
They add just the right amount of fun and a little creepiness to my Halloween spread.
20) Roasted Pumpkin Seeds Snack Bowl
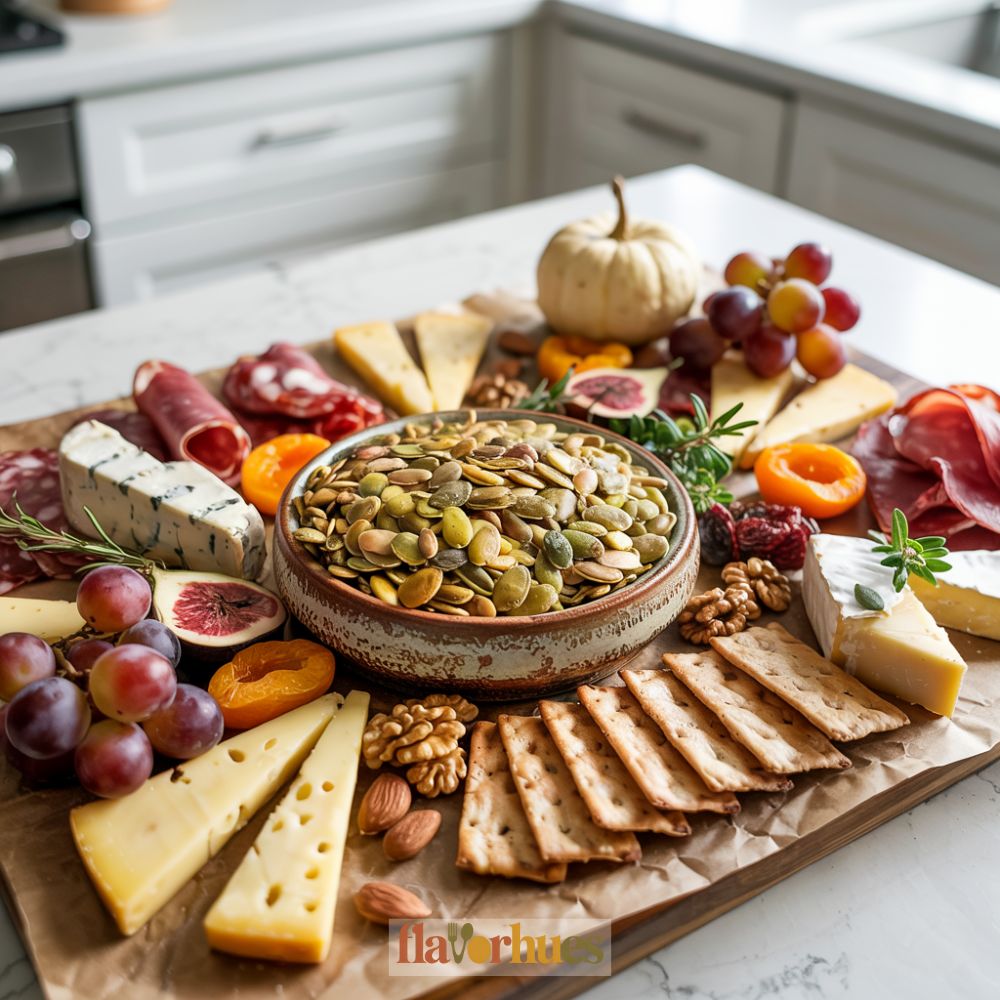
I always like making roasted pumpkin seeds for my Halloween charcuterie boards. They’re crunchy, savory, and honestly, just really easy to munch on.
After carving my pumpkin, I rinse the seeds thoroughly and try to get them as dry as possible. Patience is key—otherwise, they don’t crisp up quite right.
I toss the seeds with a splash of olive oil, a pinch of salt, and whatever spices I feel like that day. Sometimes it’s garlic powder, sometimes smoked paprika, or maybe both if I’m feeling bold.
Then I spread them out on a baking sheet. Into the oven they go, set at 350°F (175°C) for about 15 to 20 minutes.
I make sure to give them a good stir halfway through to help them roast evenly. When they’re golden and crispy, they’re done.
Once they’ve cooled off a bit, I pour them into a small bowl. I love adding them to the board as a salty snack—there’s always someone reaching for them.
You can serve these plain, or toss them with other roasted nuts if you want a little variety. Sometimes I go sweet with cinnamon sugar, or spicy with chili powder, depending on my mood.
I usually make a big batch and stash any extras in an airtight container. They keep pretty well for about a week, give or take.
It’s such a simple way to use up every part of the pumpkin. Plus, they just fit the Halloween vibe and are kind of irresistible between bites of cheese and fruit.
21) Candy Apple Charcuterie Cones
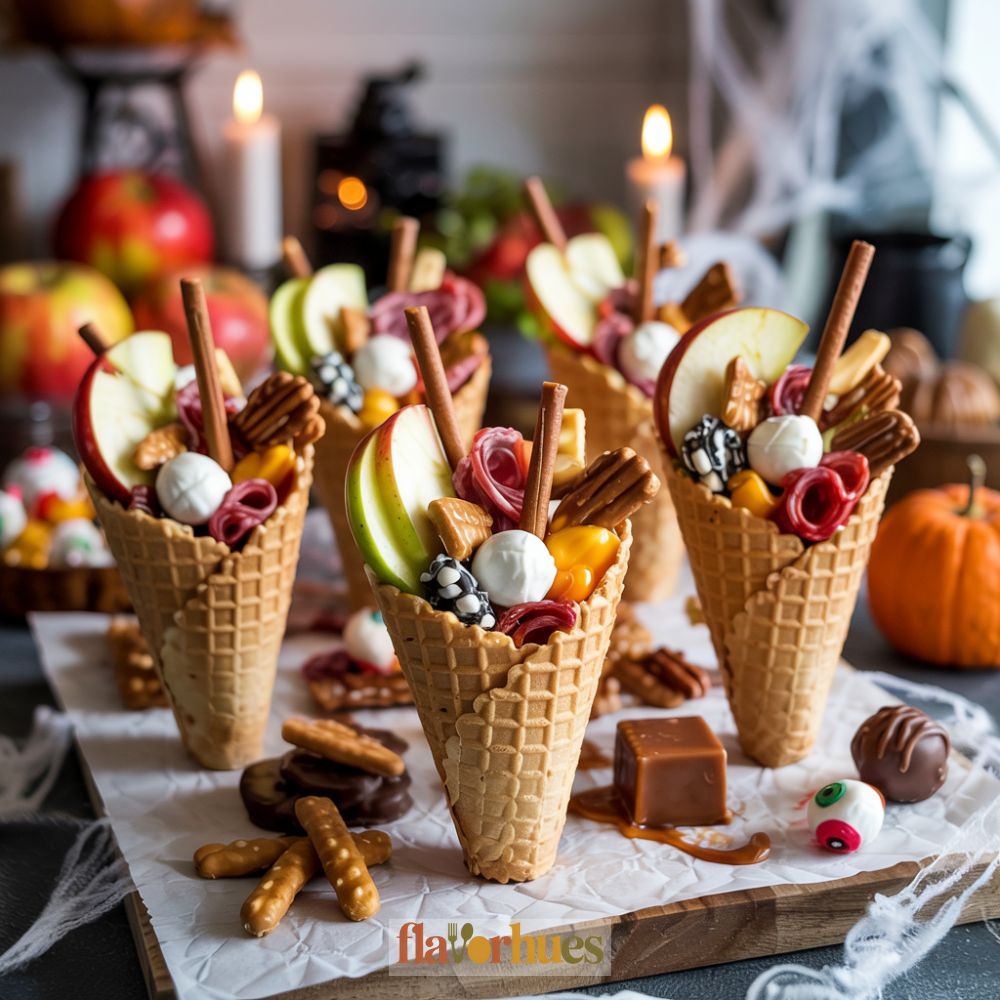
I like to make candy apple charcuterie cones for a fun Halloween snack. First, I cut apples into small slices and dip them in melted caramel.
After that, I let the caramel set so the slices won’t stick together. I use paper cones or little cups to hold the apples.
Inside each cone, I add a few caramel apple slices. Then I toss in some mini marshmallows, chopped nuts, and colorful Halloween candies.
For extra crunch, I might mix in pretzel sticks or graham cracker pieces. Occasionally, I drizzle melted chocolate over everything for a little more sweetness.
I like using both dark and white chocolate—it just makes the cones pop. When I want to get creative, I swap caramel for peanut butter or chocolate hazelnut spread.
Sometimes I throw in gummy worms or candy corn for a true Halloween vibe. There are a ton of combinations, honestly, and every cone feels a bit different.